Pipelines on AWS
The prerequisite for this post is that you have a sound understanding of Nextflow and made yourself familiar with the salmon-nf workflow created in this post. Furthermore, you should know all the essential AWS building blocks and basic architecture of an AWS based batch scheduler as I presented in my previous post. In this post, I will show you what environment and resources you have to actually set up on AWS to make the salmon-nf example pipeline run and then how to actually run jobs on the setup AWS Batch queue with Nextflow.
Credits
Many people have done a great job into setting up tutorials and blogs on this and I would like to acknowledge a few that helped me a lot to actually make my AWS pipelines happen:
- Maxime Garcia and his great blog
- Alex Peltzer
- Paolo Di Tommaso for Nextflow and Gitter support
There are a couple of tutorials that helped a lot:
Prerequisites
Accounts, users, roles, permissions
Some things have to be setup prior to starting setting up the actual AWS compute environment such as obvious things as an AWS account and other things like setting up an IAM user or Service roles which all has to be done only once and is exhaustively covered already in several blog posts such as this one by Alex Peltzer and Tobias Koch. Therefore, I will not spend any time on this and suggest you just follow the instructions in the blog post until it is time to set up your AMI which is where I will start off.
Step 1: Estimate resource requirements
Appropriate resource allocation is crucial for setting up AWS workflow that are both cost-efficient and high-throughput. Therefore, I strongly advise you to take a big enough test-dataset, run it on in a limitless test environment - hopefully many of you have some kind of in-house HPC cluster - and take the resulting measurements of resource consumption to find optimal storage, memory and CPU sizes.
Conveniently, Nextflow workflows can be easily executed both on AWS but also in your local HPC environment by simply defining additional profiles for the scheduler of your choice.
Here is one example of a simple SLURM profile:
singularity {
	enabled = true
}

docker {
	enabled = false
}

process {

    executor = 'slurm'
    clusterOptions = '--qos=short'
    cpus = '12'
    memory = { 8.GB * task.attempt }
}

params {

   salmonIndex = '/groups/Software/indices/hg38/salmon/gencode.v28.IMPACT'

}
As you can see, usually HPC environments do not allow Docker containers to run, but support Singularity containers which can be easily built from Docker containers.
The process section basically defines the scheduler, resources and the job queue in which the processes should run. Finally, the index files are usually stored in some globally accessible directory, similar to the s3 storage on AWS.
Now that we are set, Nextflow has this neat option flag -with-report that gives you a very comprehensive overview of the resources your processes consumed during execution.
Below are the most important excerpts of an example report from when I ran my Nextflow workflow on 1,222 breast cancer datasets from TCGA:

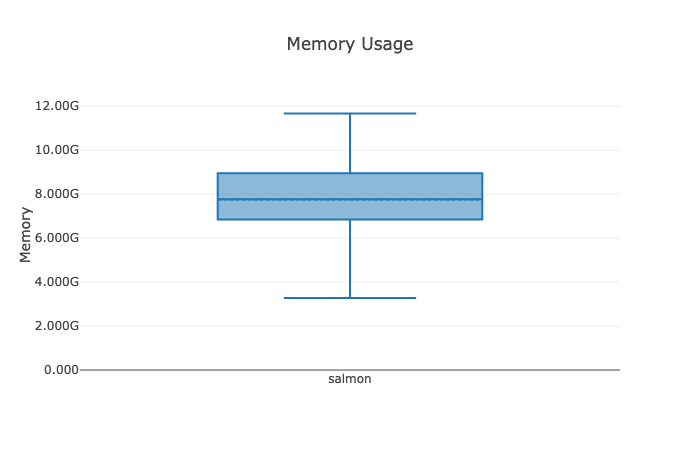
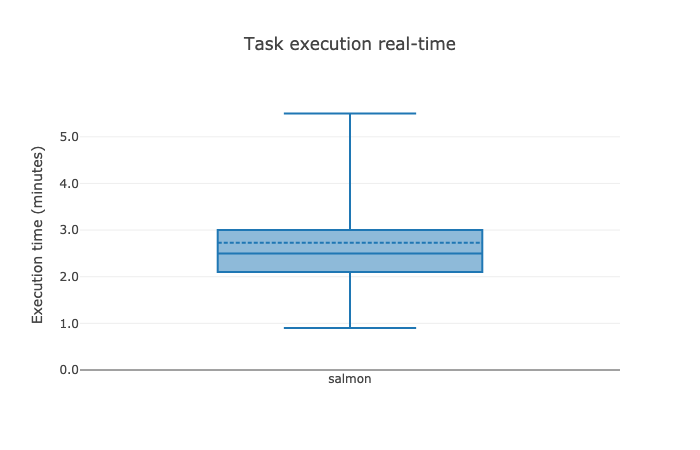
On average a single task ran on 6 threads, consumed 8 GB of memory and ran 2:30 minutes - this is the rough framework of resources we will have to consider when allocating resources and choosing appropriate EC2 instances.
Step 2: Creating a suitable AMI
I found the setup and configuration of suitable AMIs to be the most demanding step when creating an environment to run a pipeline on AWS. Several things have to be considered:
- Base image: It has to be
ECS-compatible EBSstorage: The attached volumes have to be large enough to contain all input, index, temporary and output filesAWS CLI: TheAMIhas to contain theAWS CLIor otherwise no files can be fetch from and copied toS3from theEBSvolumeAMIscannot be reused for processes containing lessEBS(more is possible)
This section covers how you can set up your AMI for a given task of your pipeline and what to consider on the way.
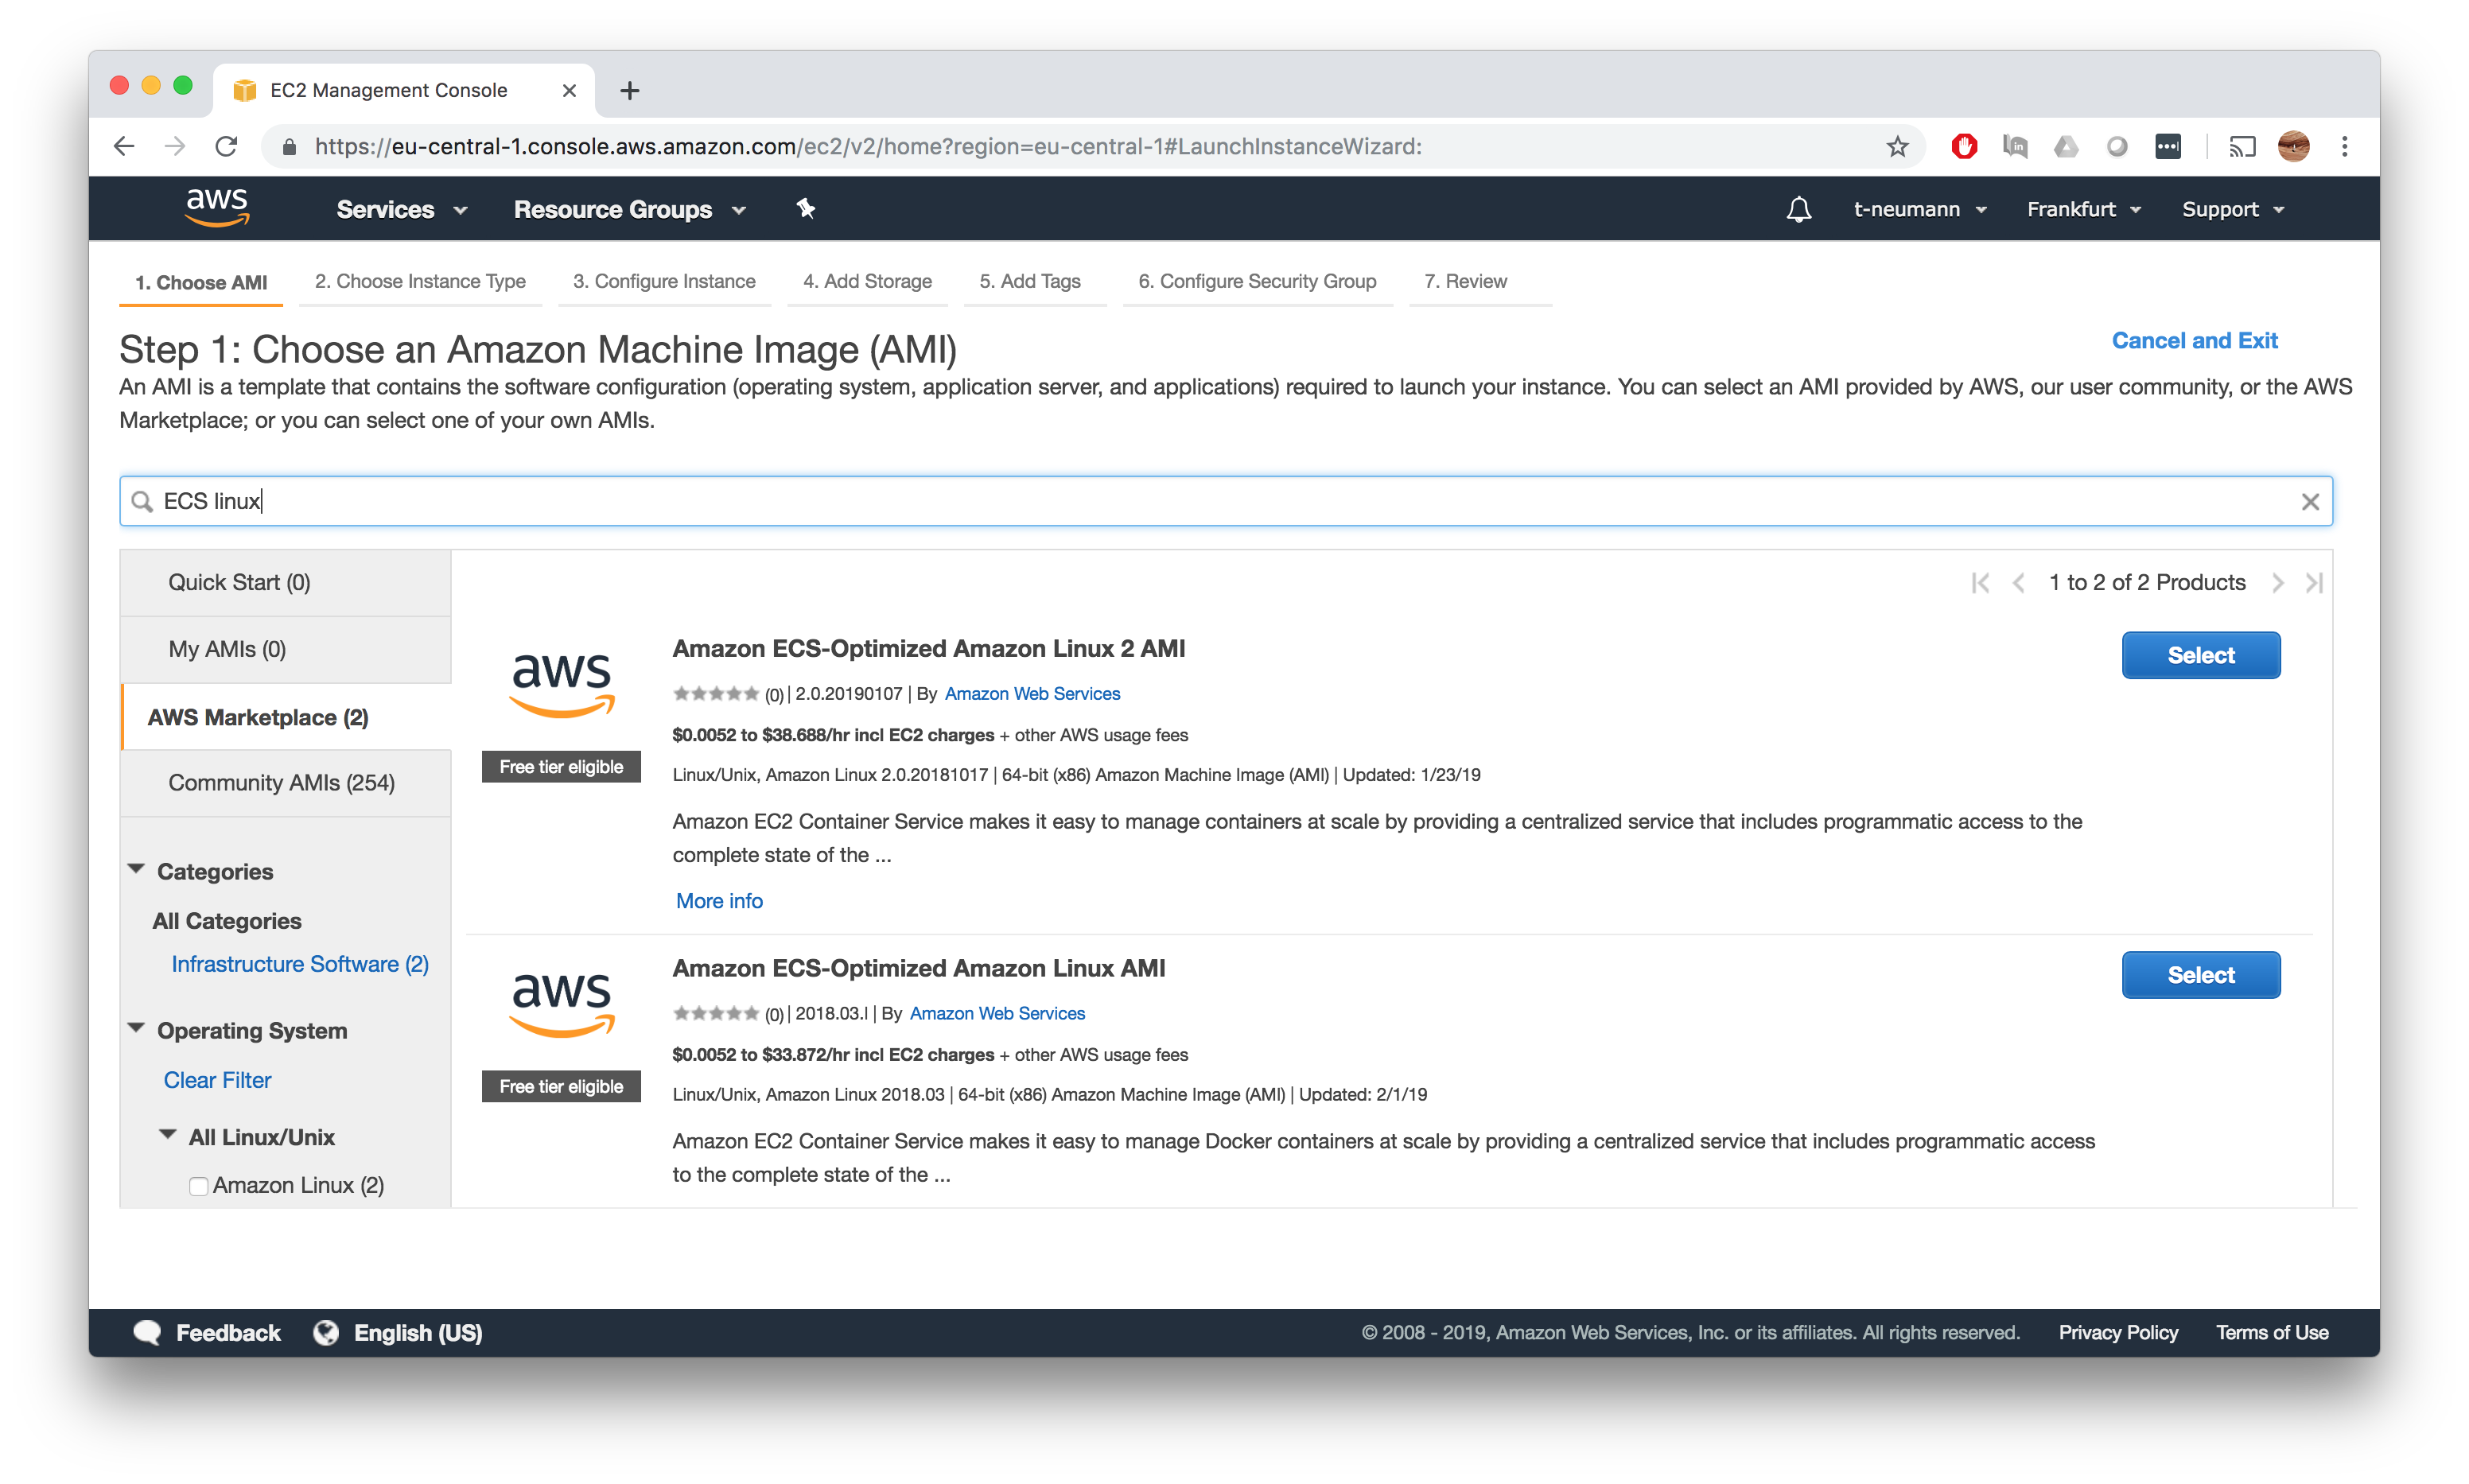
Choose an Amazon Machine Image (AMI)
As a first step, we want to make sure to pick a base image that supports ECS from the AWS Market Place. I strongly advise you to use one of the Amazon ECS-Optimized Amazon Linux AMI images.
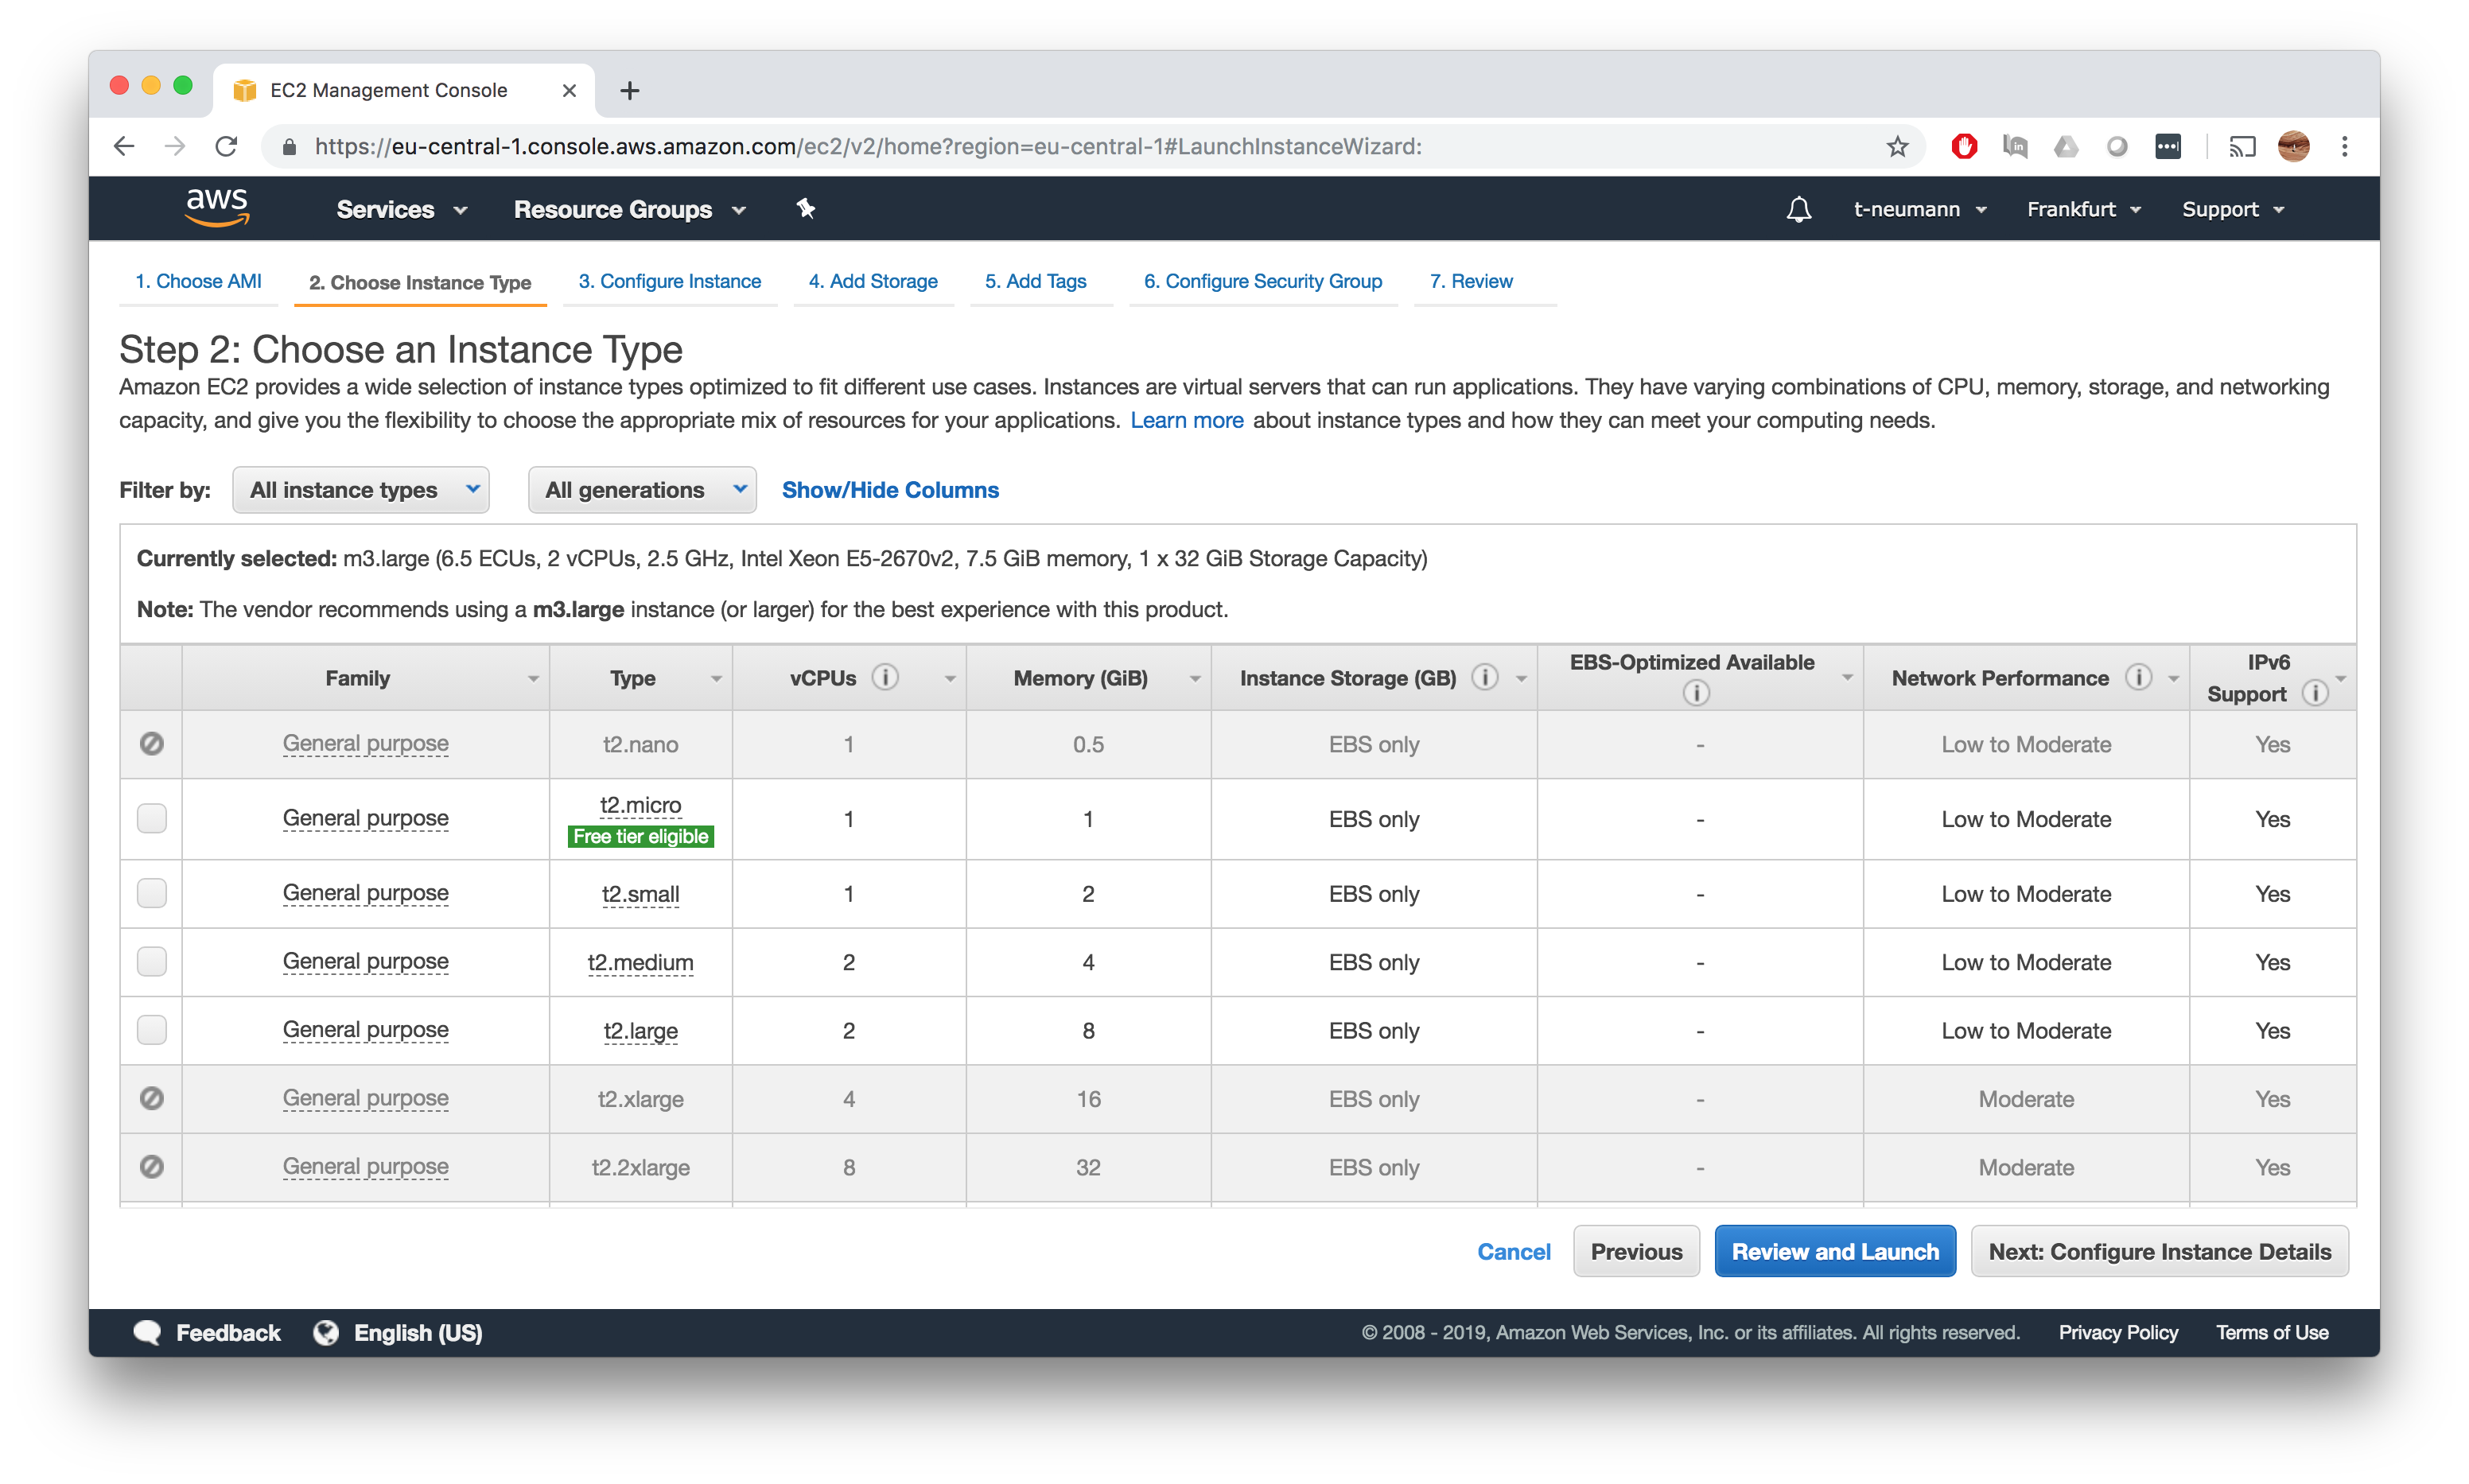
Choose an Instance Type
The EC2 instance we want to use to create our custom AMI does not need be resourceful, since we won’t run any jobs on that. Therefore, a t2.micro instance is more than sufficient.
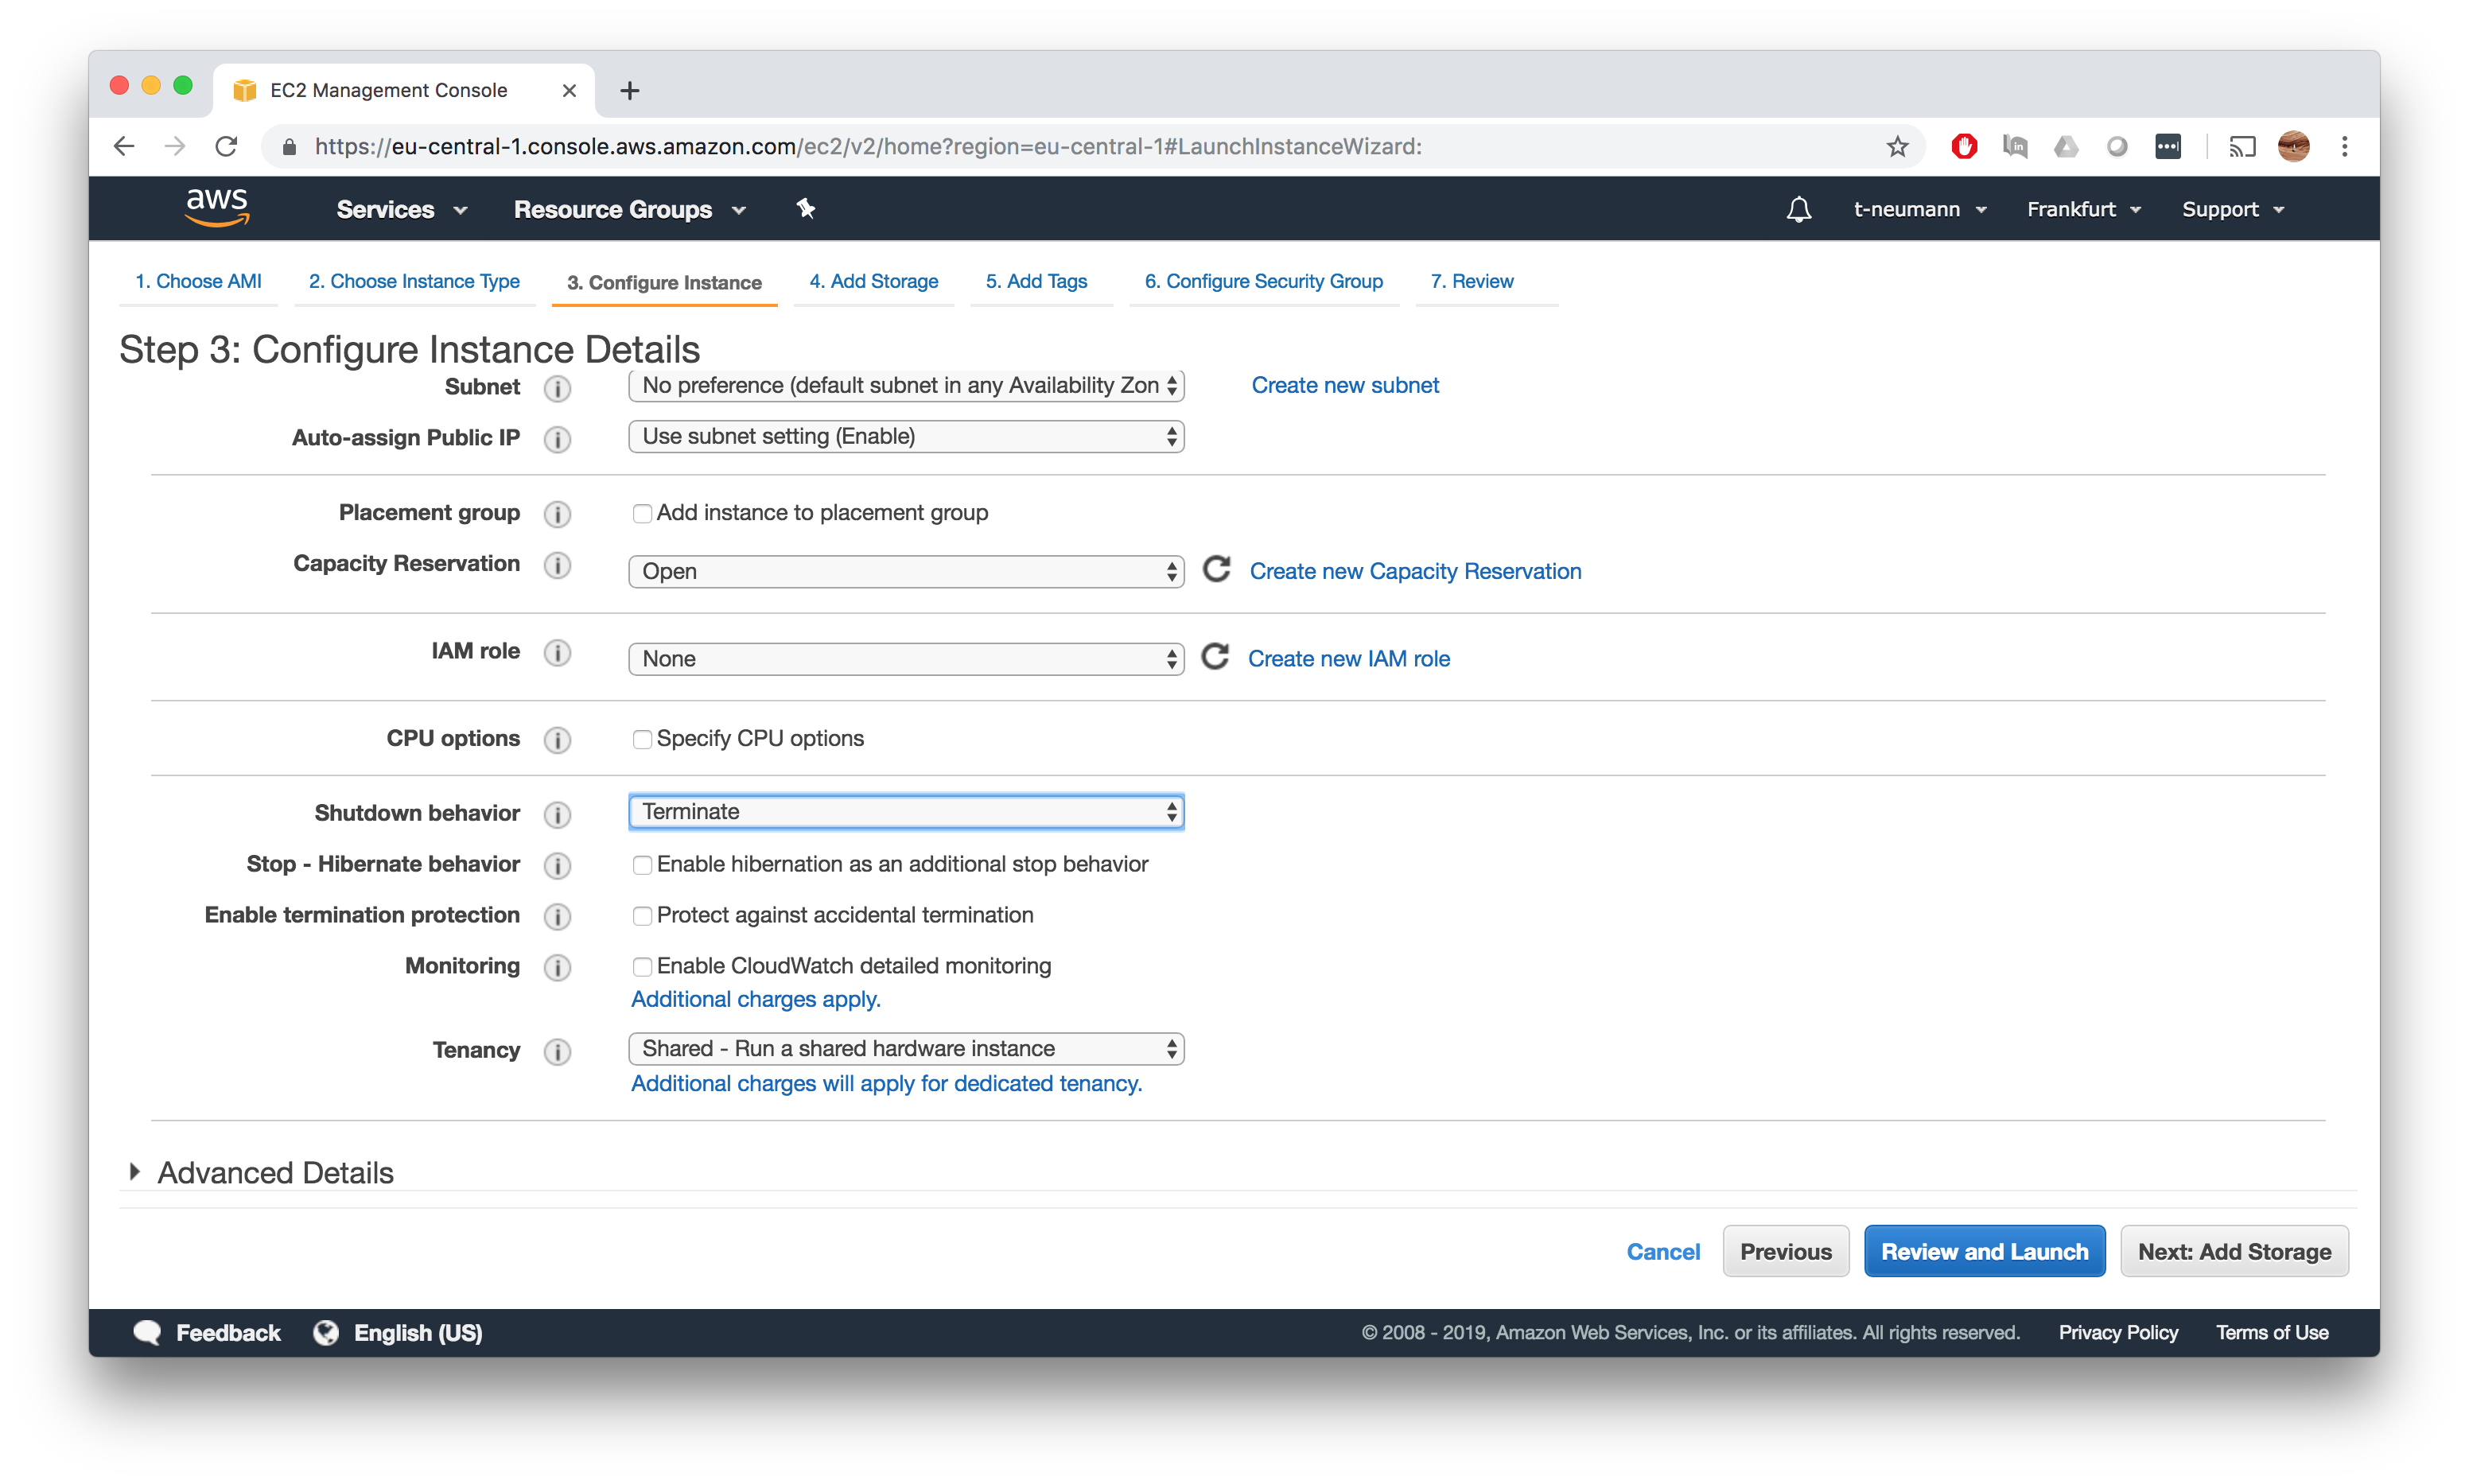
Configure Instance Details
The instance configuration can be mostly left to the defaults. However, I would strongly advise you to set the shutdown behaviour to terminate, otherwise attached volumes will be kept persistent and you continue to pay unless you explicitely terminate the instance manually. I actually ran into huge costs when misconfiguring this (300$) so watch out!.
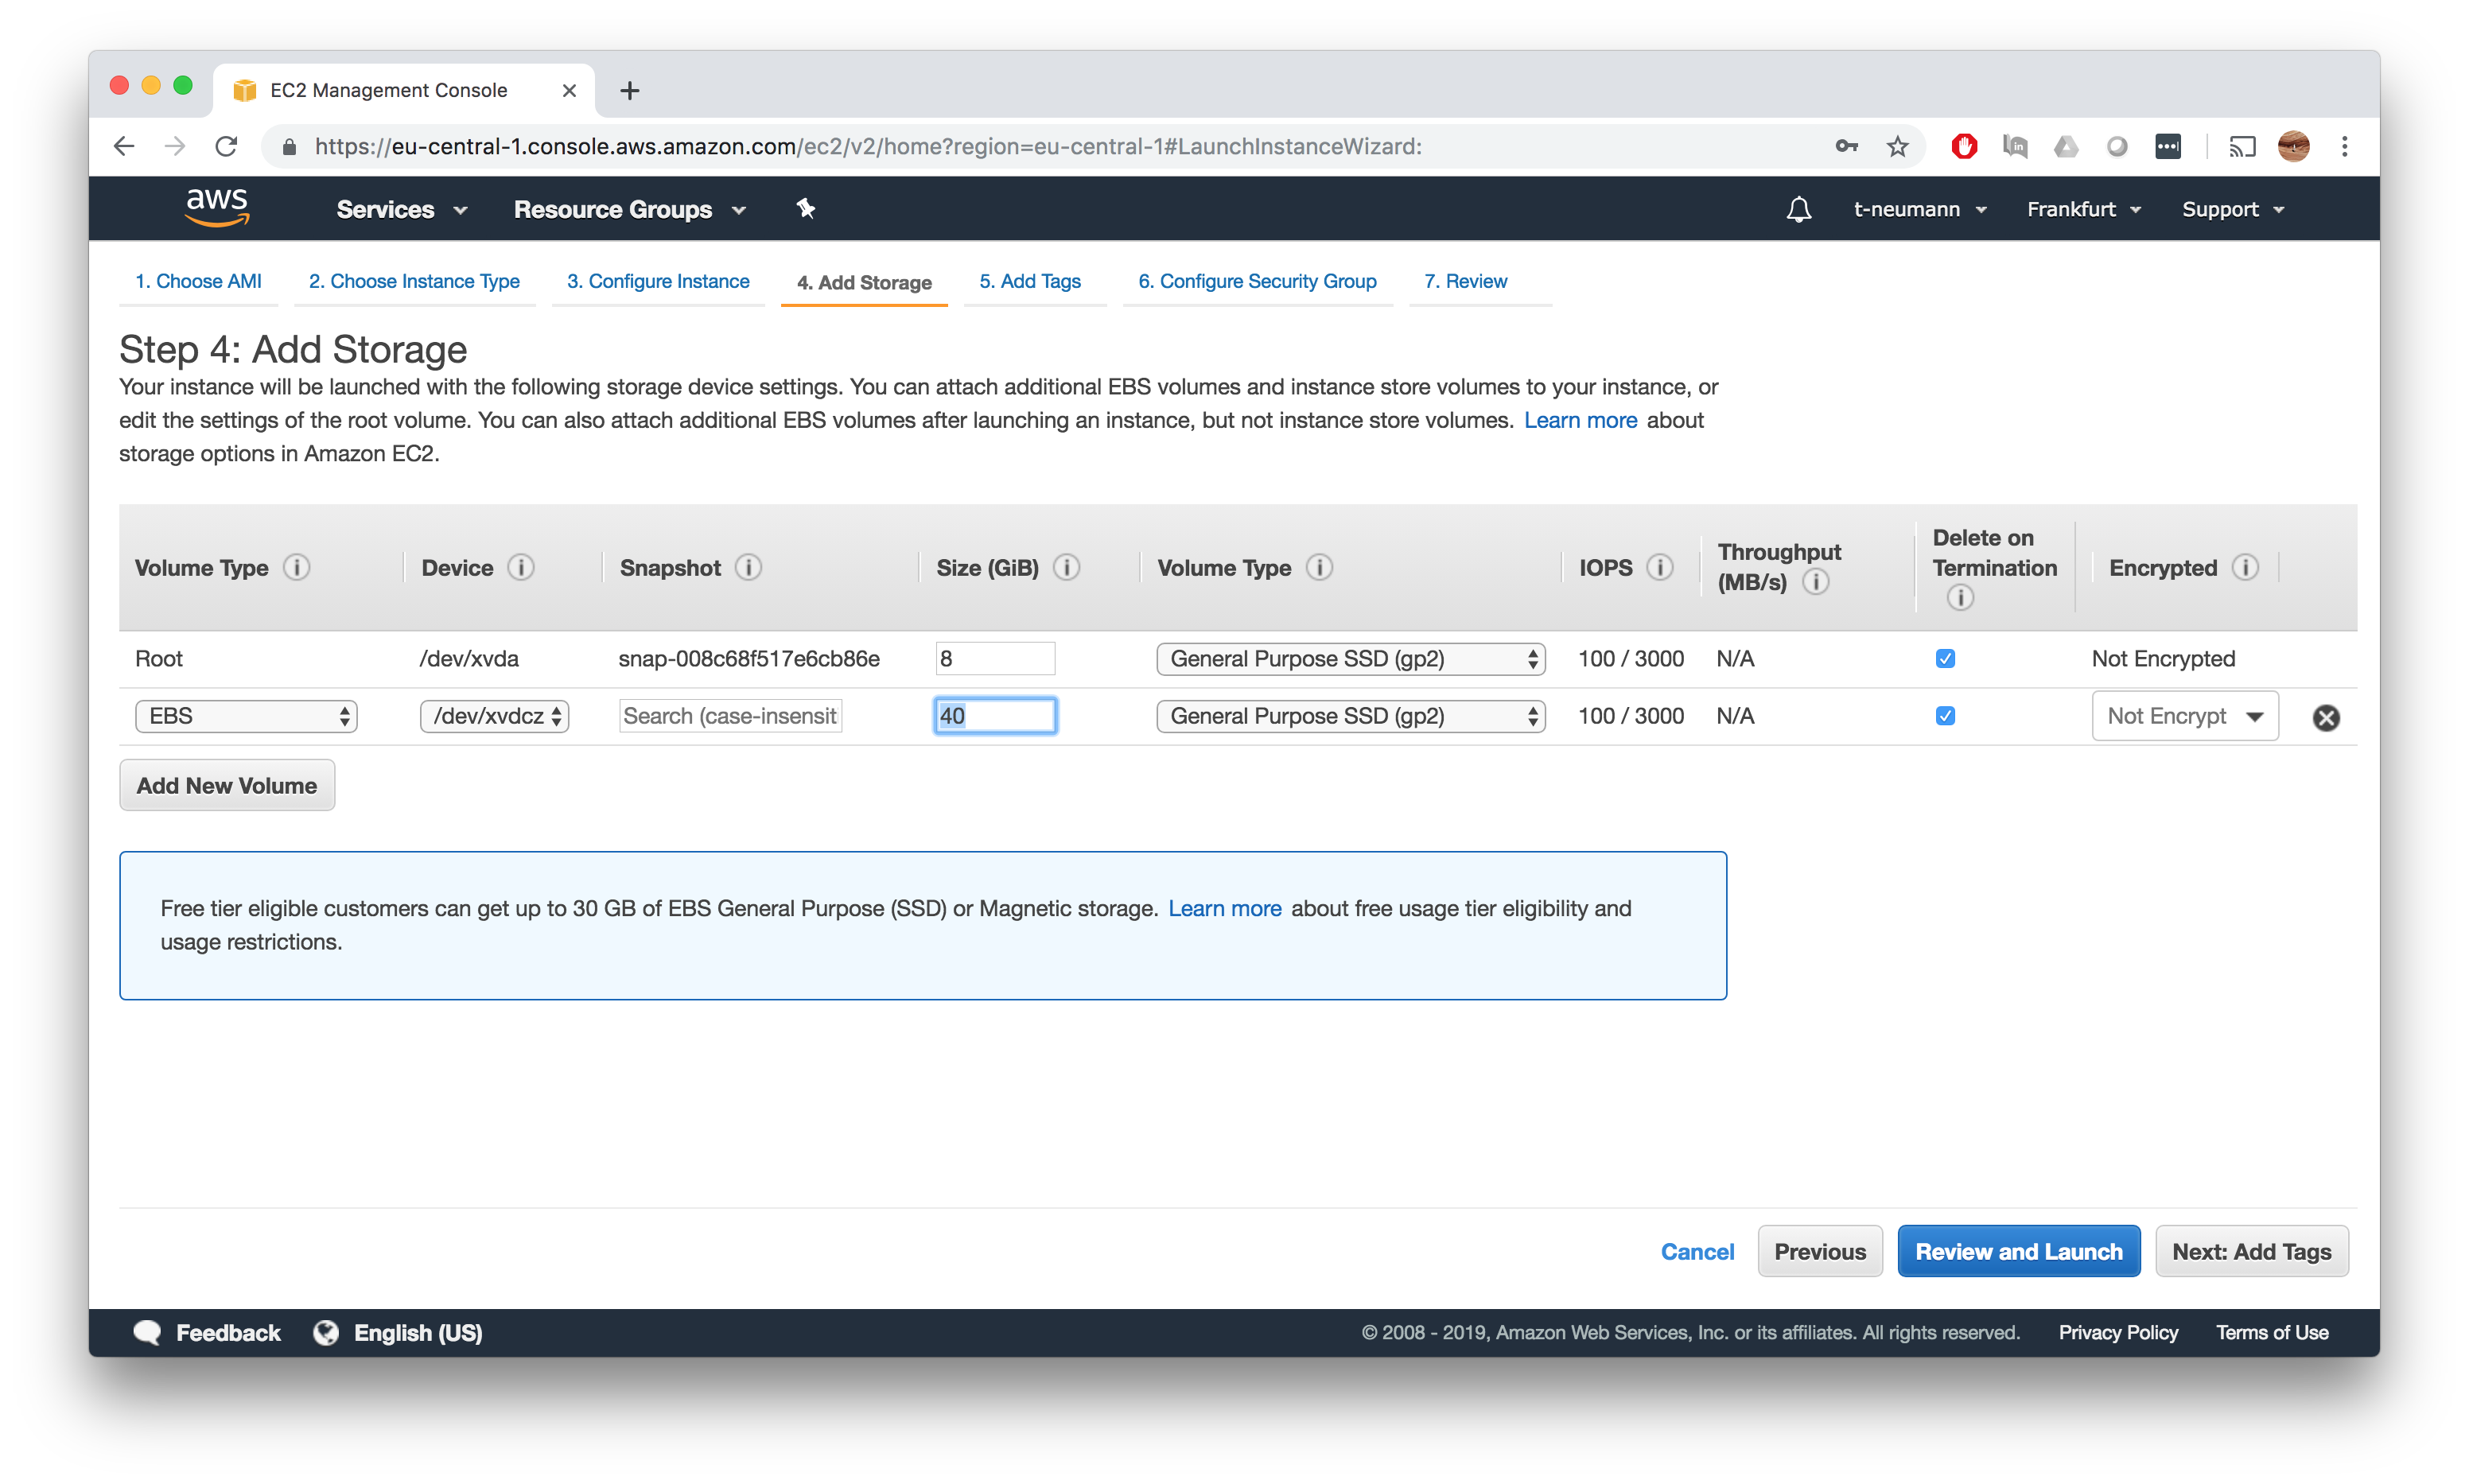
Add storage
This is the single most important point of the entire AMI setup process - here you define the minimum number of added storage for your AMI. This storage must be large enough, to contain all input and index files for a given task as well as all temporary and final output files produced during the computation. I hope you did some thorough benchmarking and extrapolation of resources on your input dataset.
Add tags
Unless you want to add optional tags, nothing to do here…
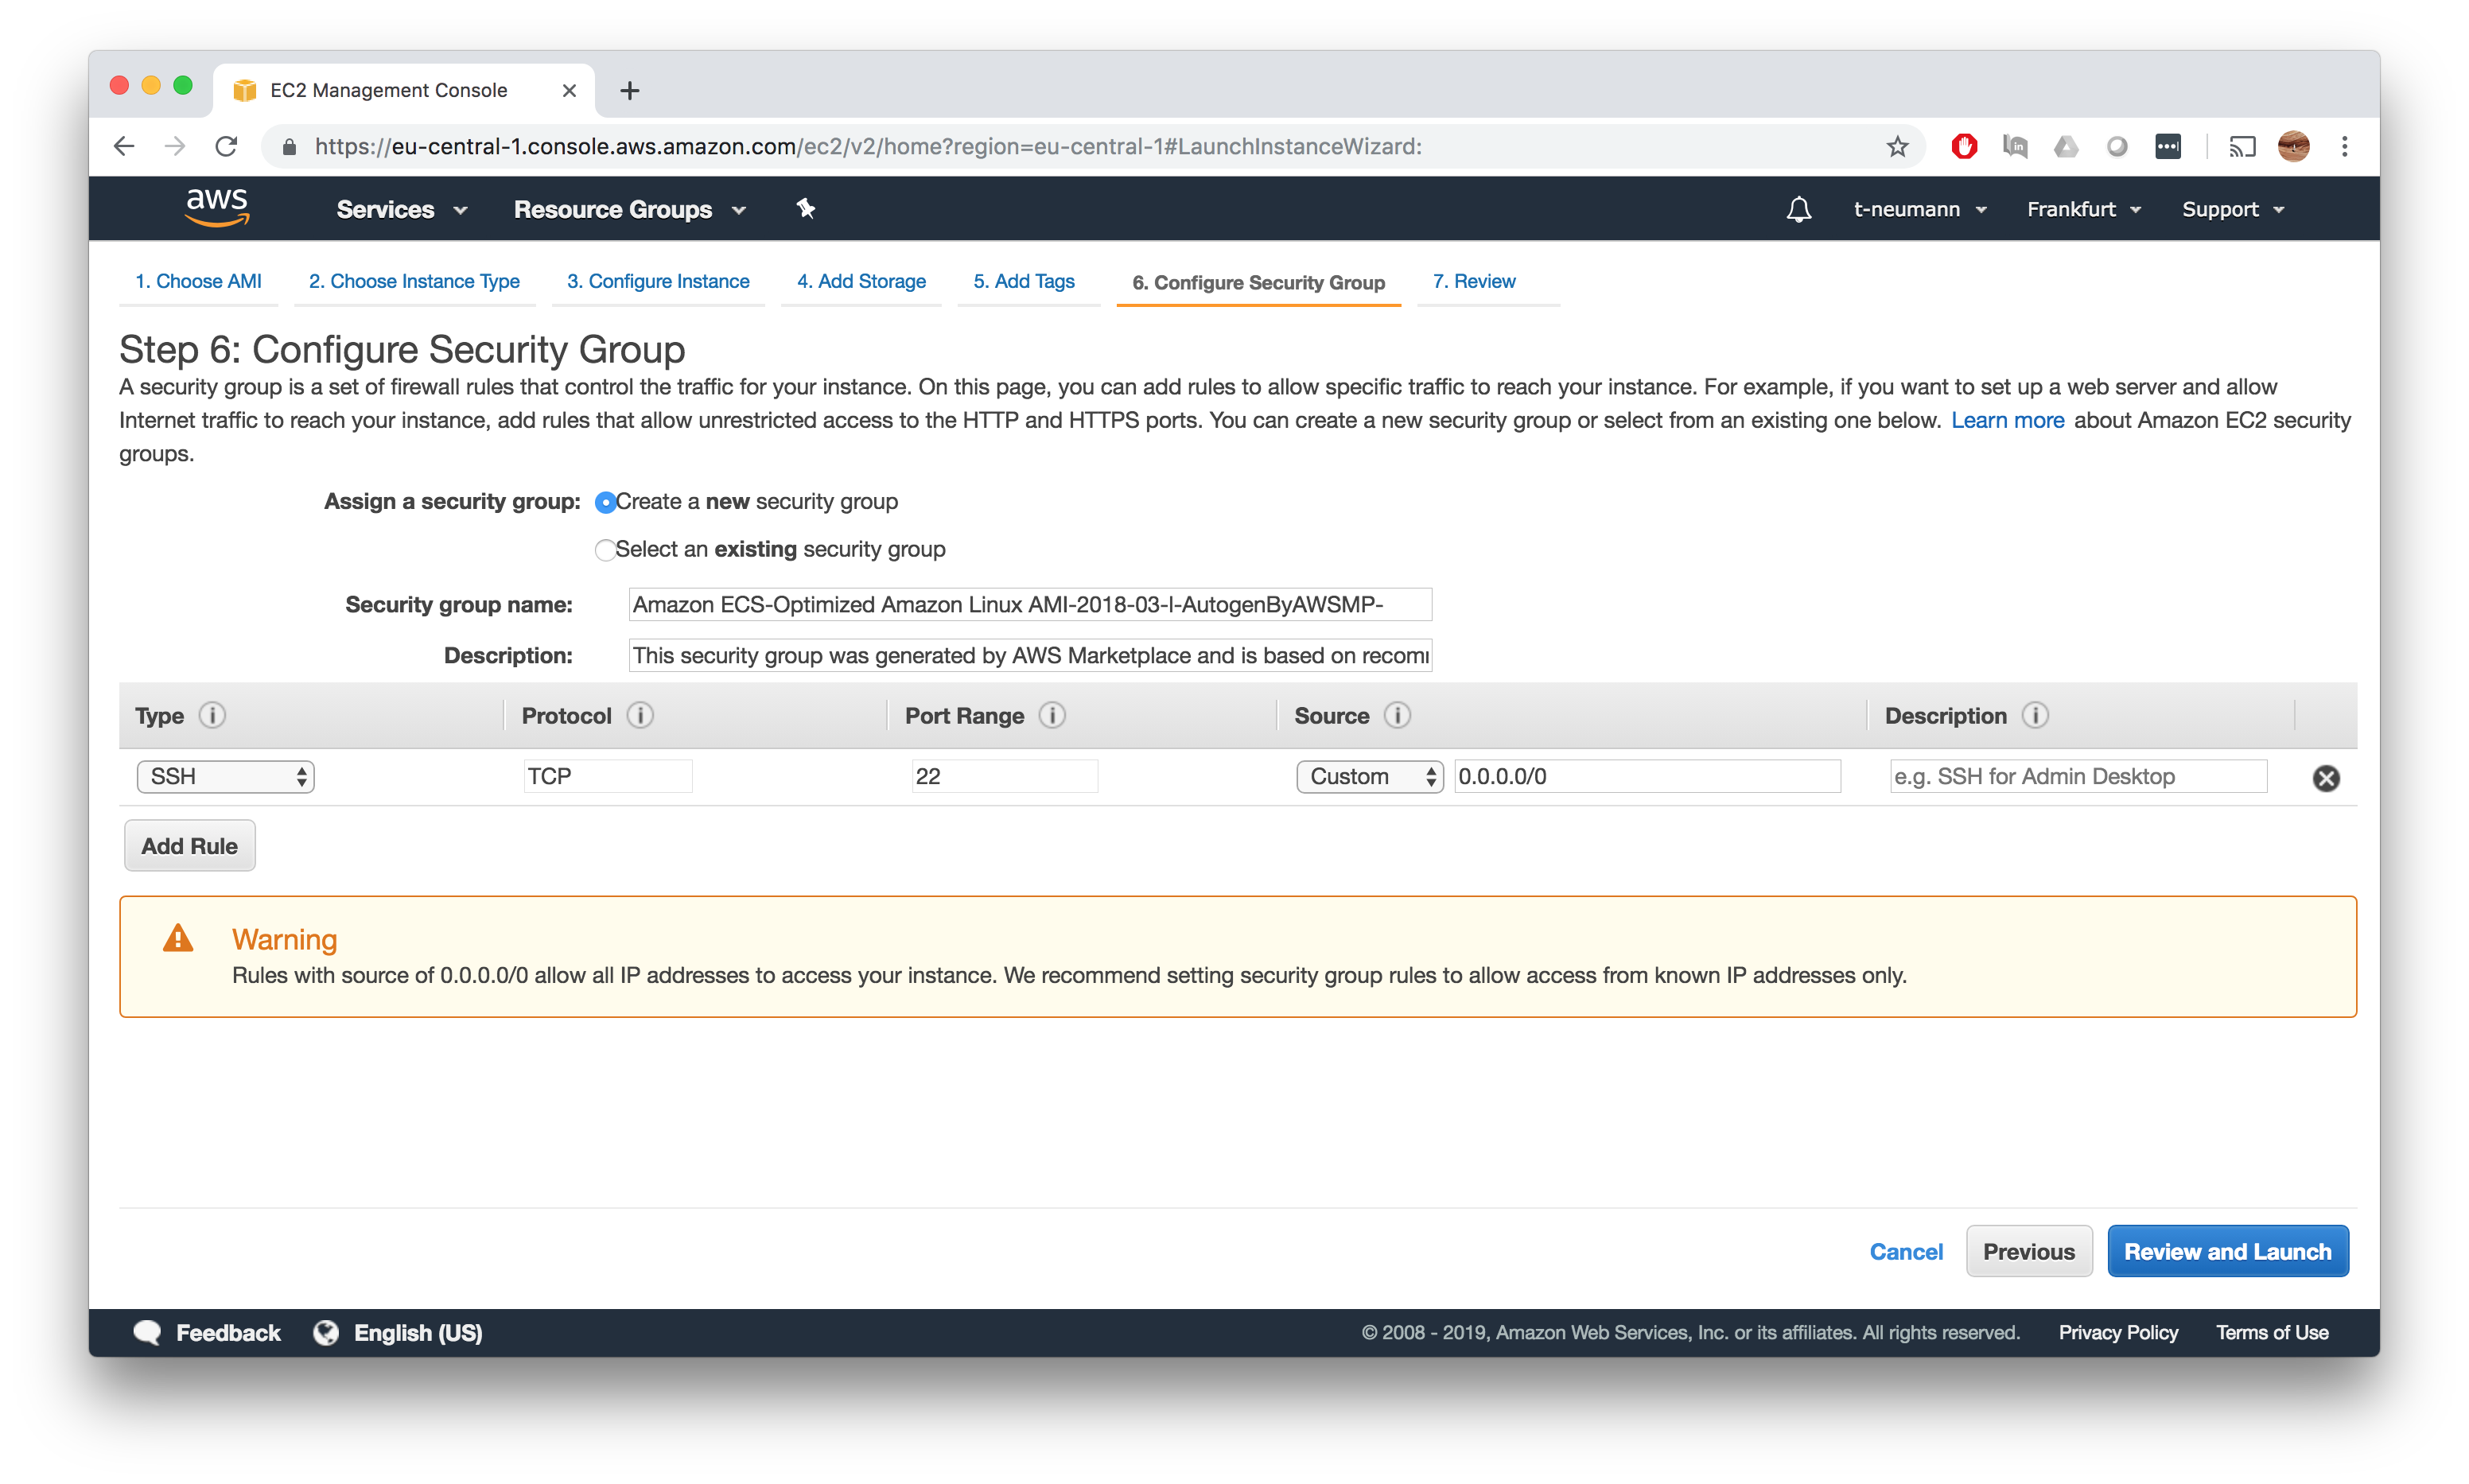
Configure Security Group
Before firing up your instance, you need to configure the associated security group. For me, letting AWS create the security group worked perfectly fine, I would still double check that you can connect to the EC2 instance - in case of doubt set the source to 0.0.0.0/0, even though probably all IT security experts will kill me for that. Now you are ready to lauch the instance.
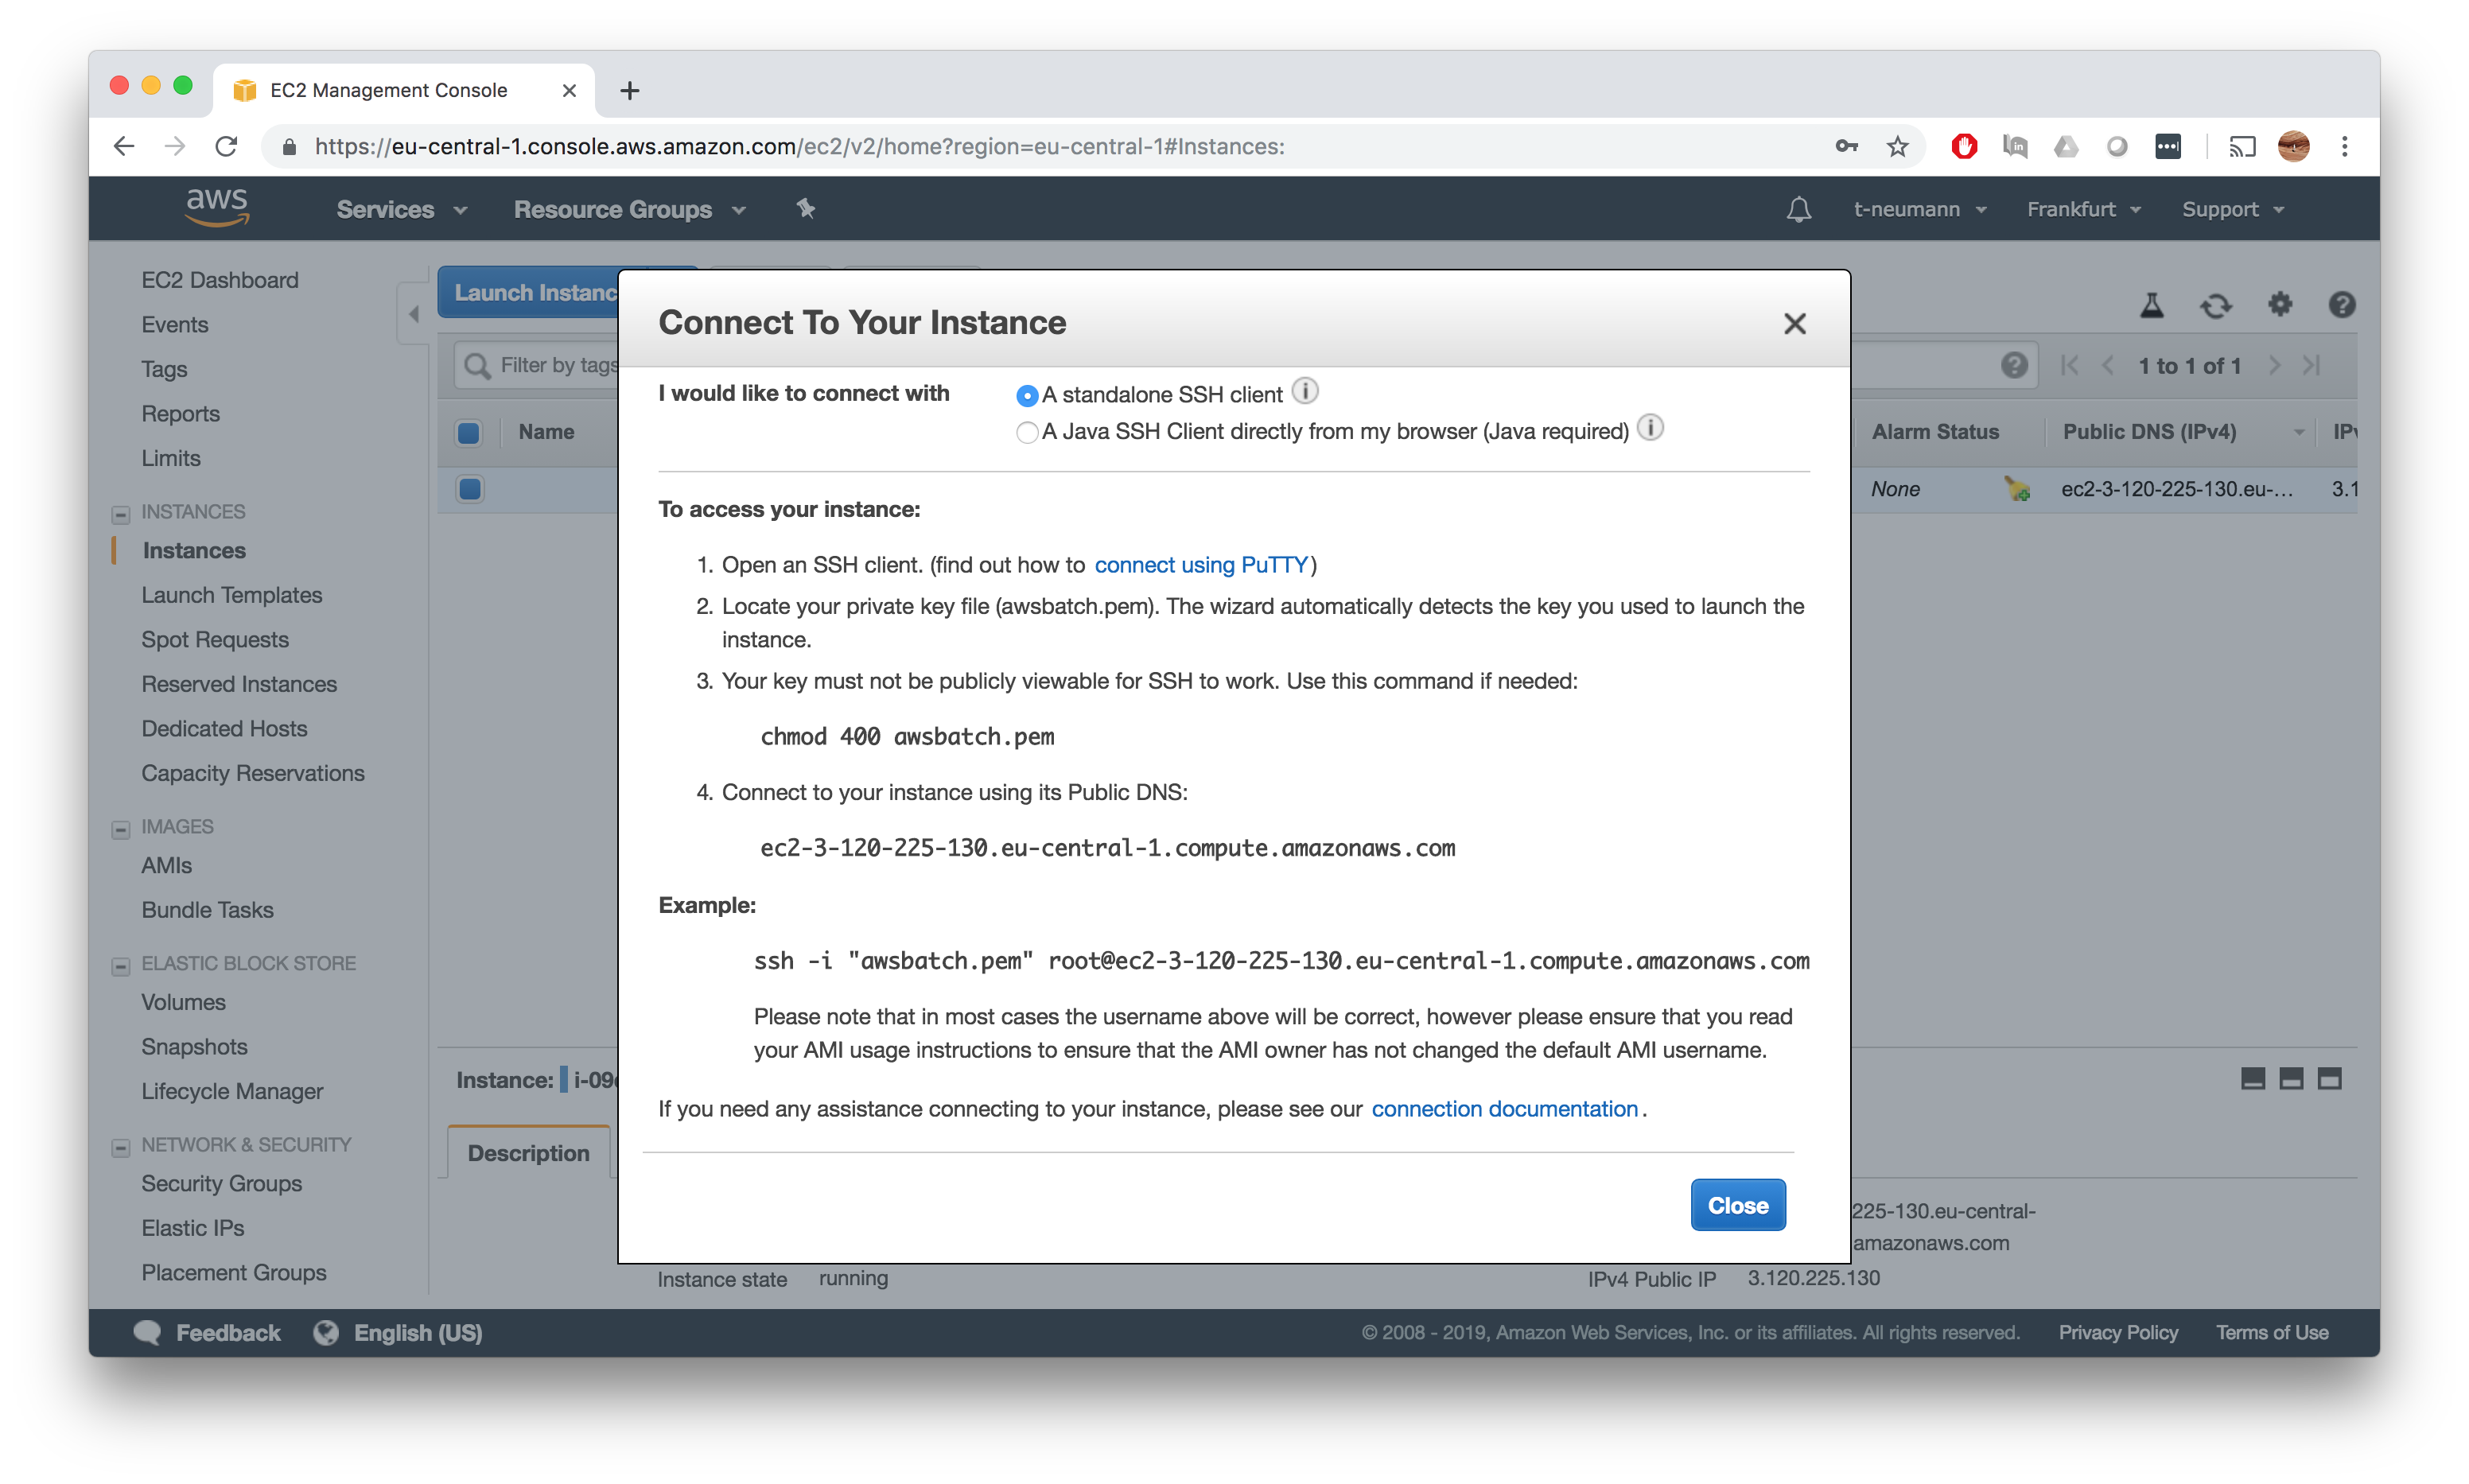
SSH connect to instance
Now right click and hit Connect to get your ssh connect command to your instance. You might have to change the default root user to ec2-user.
Adjust Docker container size to EBS
The first thing we want to check once we connected to our instance is that the Docker configuration reflects the amount of added EBS storage.
[ec2-user@ip-172-31-40-128 ~]$ docker info | grep -i data
 Data Space Used: 309.3MB
 Data Space Total: 42.42GB
 Data Space Available: 42.11GB
 Metadata Space Used: 4.833MB
 Metadata Space Total: 46.14MB
 Metadata Space Available: 41.3MB
In the above example we see that indeed Docker is configure for the specified 40 GB EBS data volume.
As per default, the maximum storage size of a single Docker container is 10 GB - independent of the data space available - we have to adjust this.
[ec2-user@ip-172-31-40-128 ~]$ docker info | grep -i base
 Base Device Size: 10.74GB
To this end, we have to extend the file in /etc/sysconfig/docker-storage to contain the following parameter --storage-opt dm.basesize=40GB and restart the Docker service.
sudo vi /etc/sysconfig/docker-storage
DOCKER_STORAGE_OPTIONS="--storage-driver devicemapper --storage-opt dm.thinpooldev=/dev/mapper/docker-docker--pool --storage-opt dm.use_deferred_removal=true --storage-opt dm.use_deferred_deletion=true --storage-opt dm.fs=ext4 --storage-opt dm.use_deferred_deletion=true --storage-opt dm.basesize=40GB"
[ec2-user@ip-172-31-40-128 ~]$ sudo service docker restart
Stopping docker:                                           [  OK  ]
Starting docker:       	.                                  [  OK  ]
[ec2-user@ip-172-31-40-128 ~]$ docker info | grep -i base
 Base Device Size: 42.95GB
Install AWS CLI
Nextflow requires the AWS CLI to copy files such as input files and indices from and output files to S3.
Use the following lines to add it to your AMI:
sudo yum install -y bzip2 wget
wget https://repo.continuum.io/miniconda/Miniconda3-latest-Linux-x86_64.sh
bash Miniconda3-latest-Linux-x86_64.sh -b -f -p $HOME/miniconda
$HOME/miniconda/bin/conda install -c conda-forge -y awscli
rm Miniconda3-latest-Linux-x86_64.sh
Give it a quick spin to see whether everything is ok.
[ec2-user@ip-172-31-40-128 ~]$ ./miniconda/bin/aws --version
aws-cli/1.16.121 Python/3.7.1 Linux/4.14.94-73.73.amzn1.x86_64 botocore/1.12.111
Save your AMI
Now you can go back to your EC2 instance dashboard and save your AMI by right clicking and going for Image->Create Image.
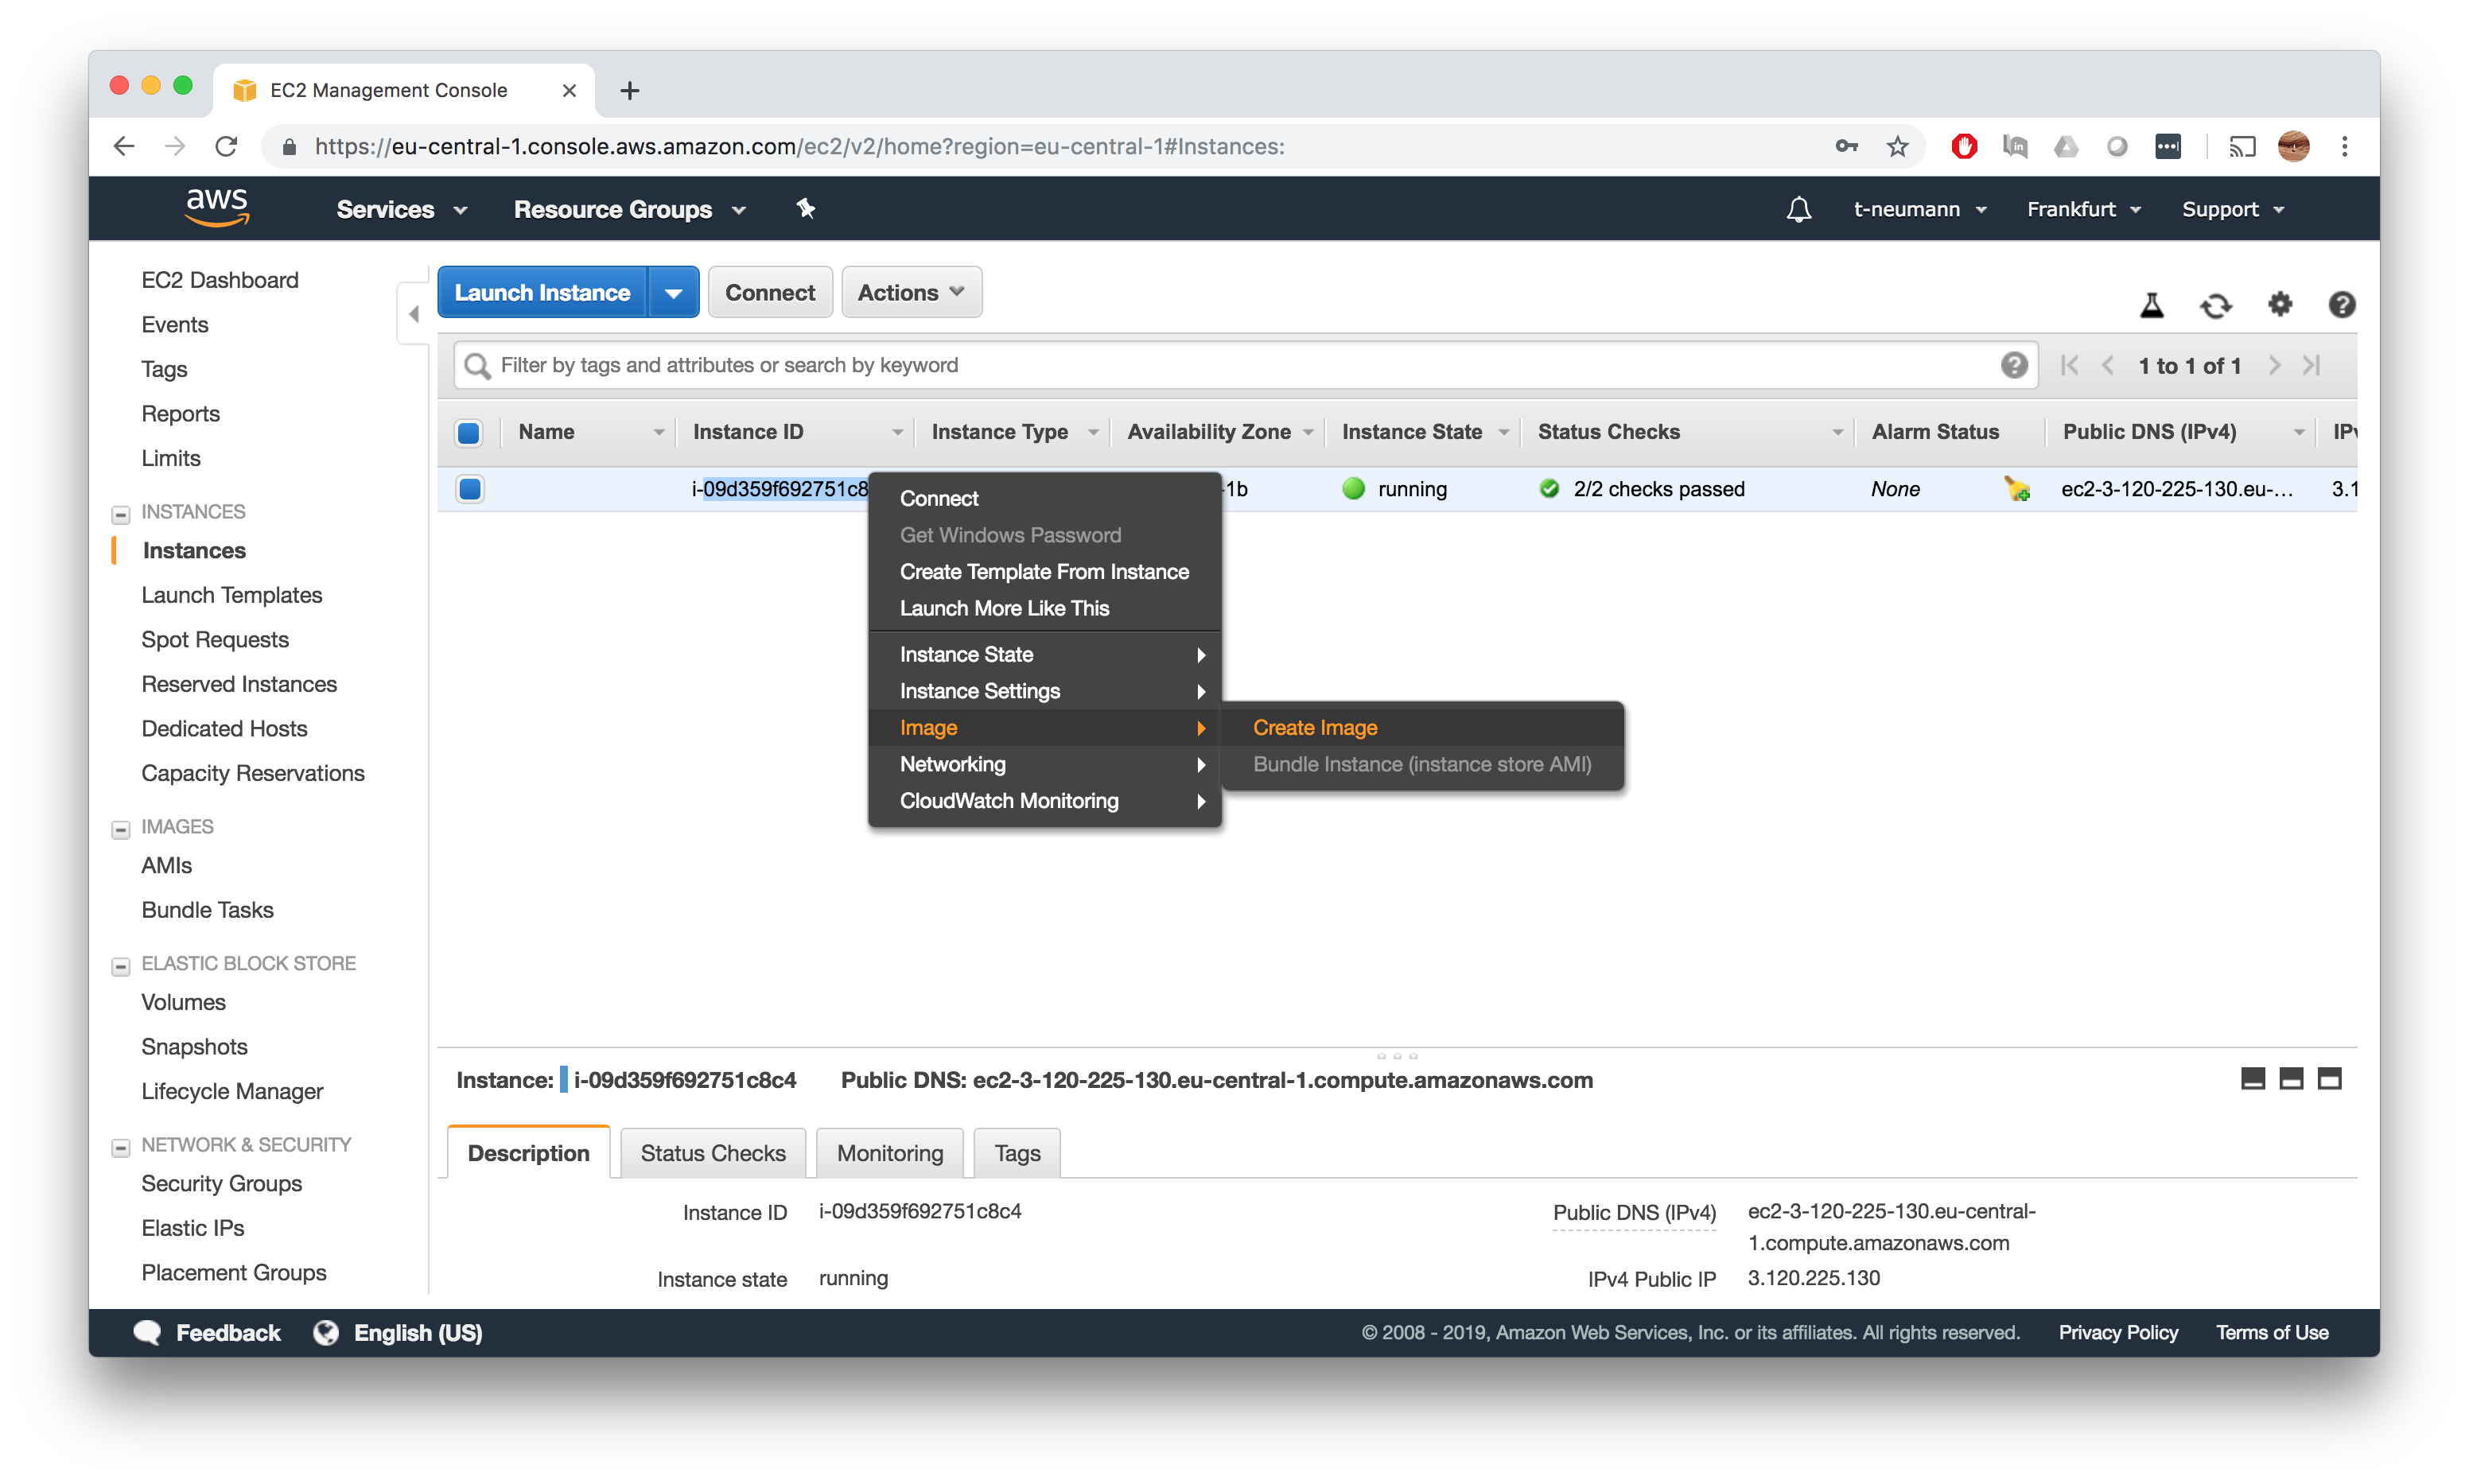
Congratulations you have created your first AMI!
Don’t forget to terminate your running EC2 instance from which you created the AMI to get prevent any running EBS and EC2 costs.
Step 3: Creating compute environments and job queues
Now it is time to create appropriate compute environments and their corresponding job queues. I usually like to create some baseline workload queue that should handle most of the jobs providing resources estimated from Step 1 and an excess queue with very extensive resources that handles the few jobs that overflow the workload resources, so that the entire batch is still successfully processed.
Overview
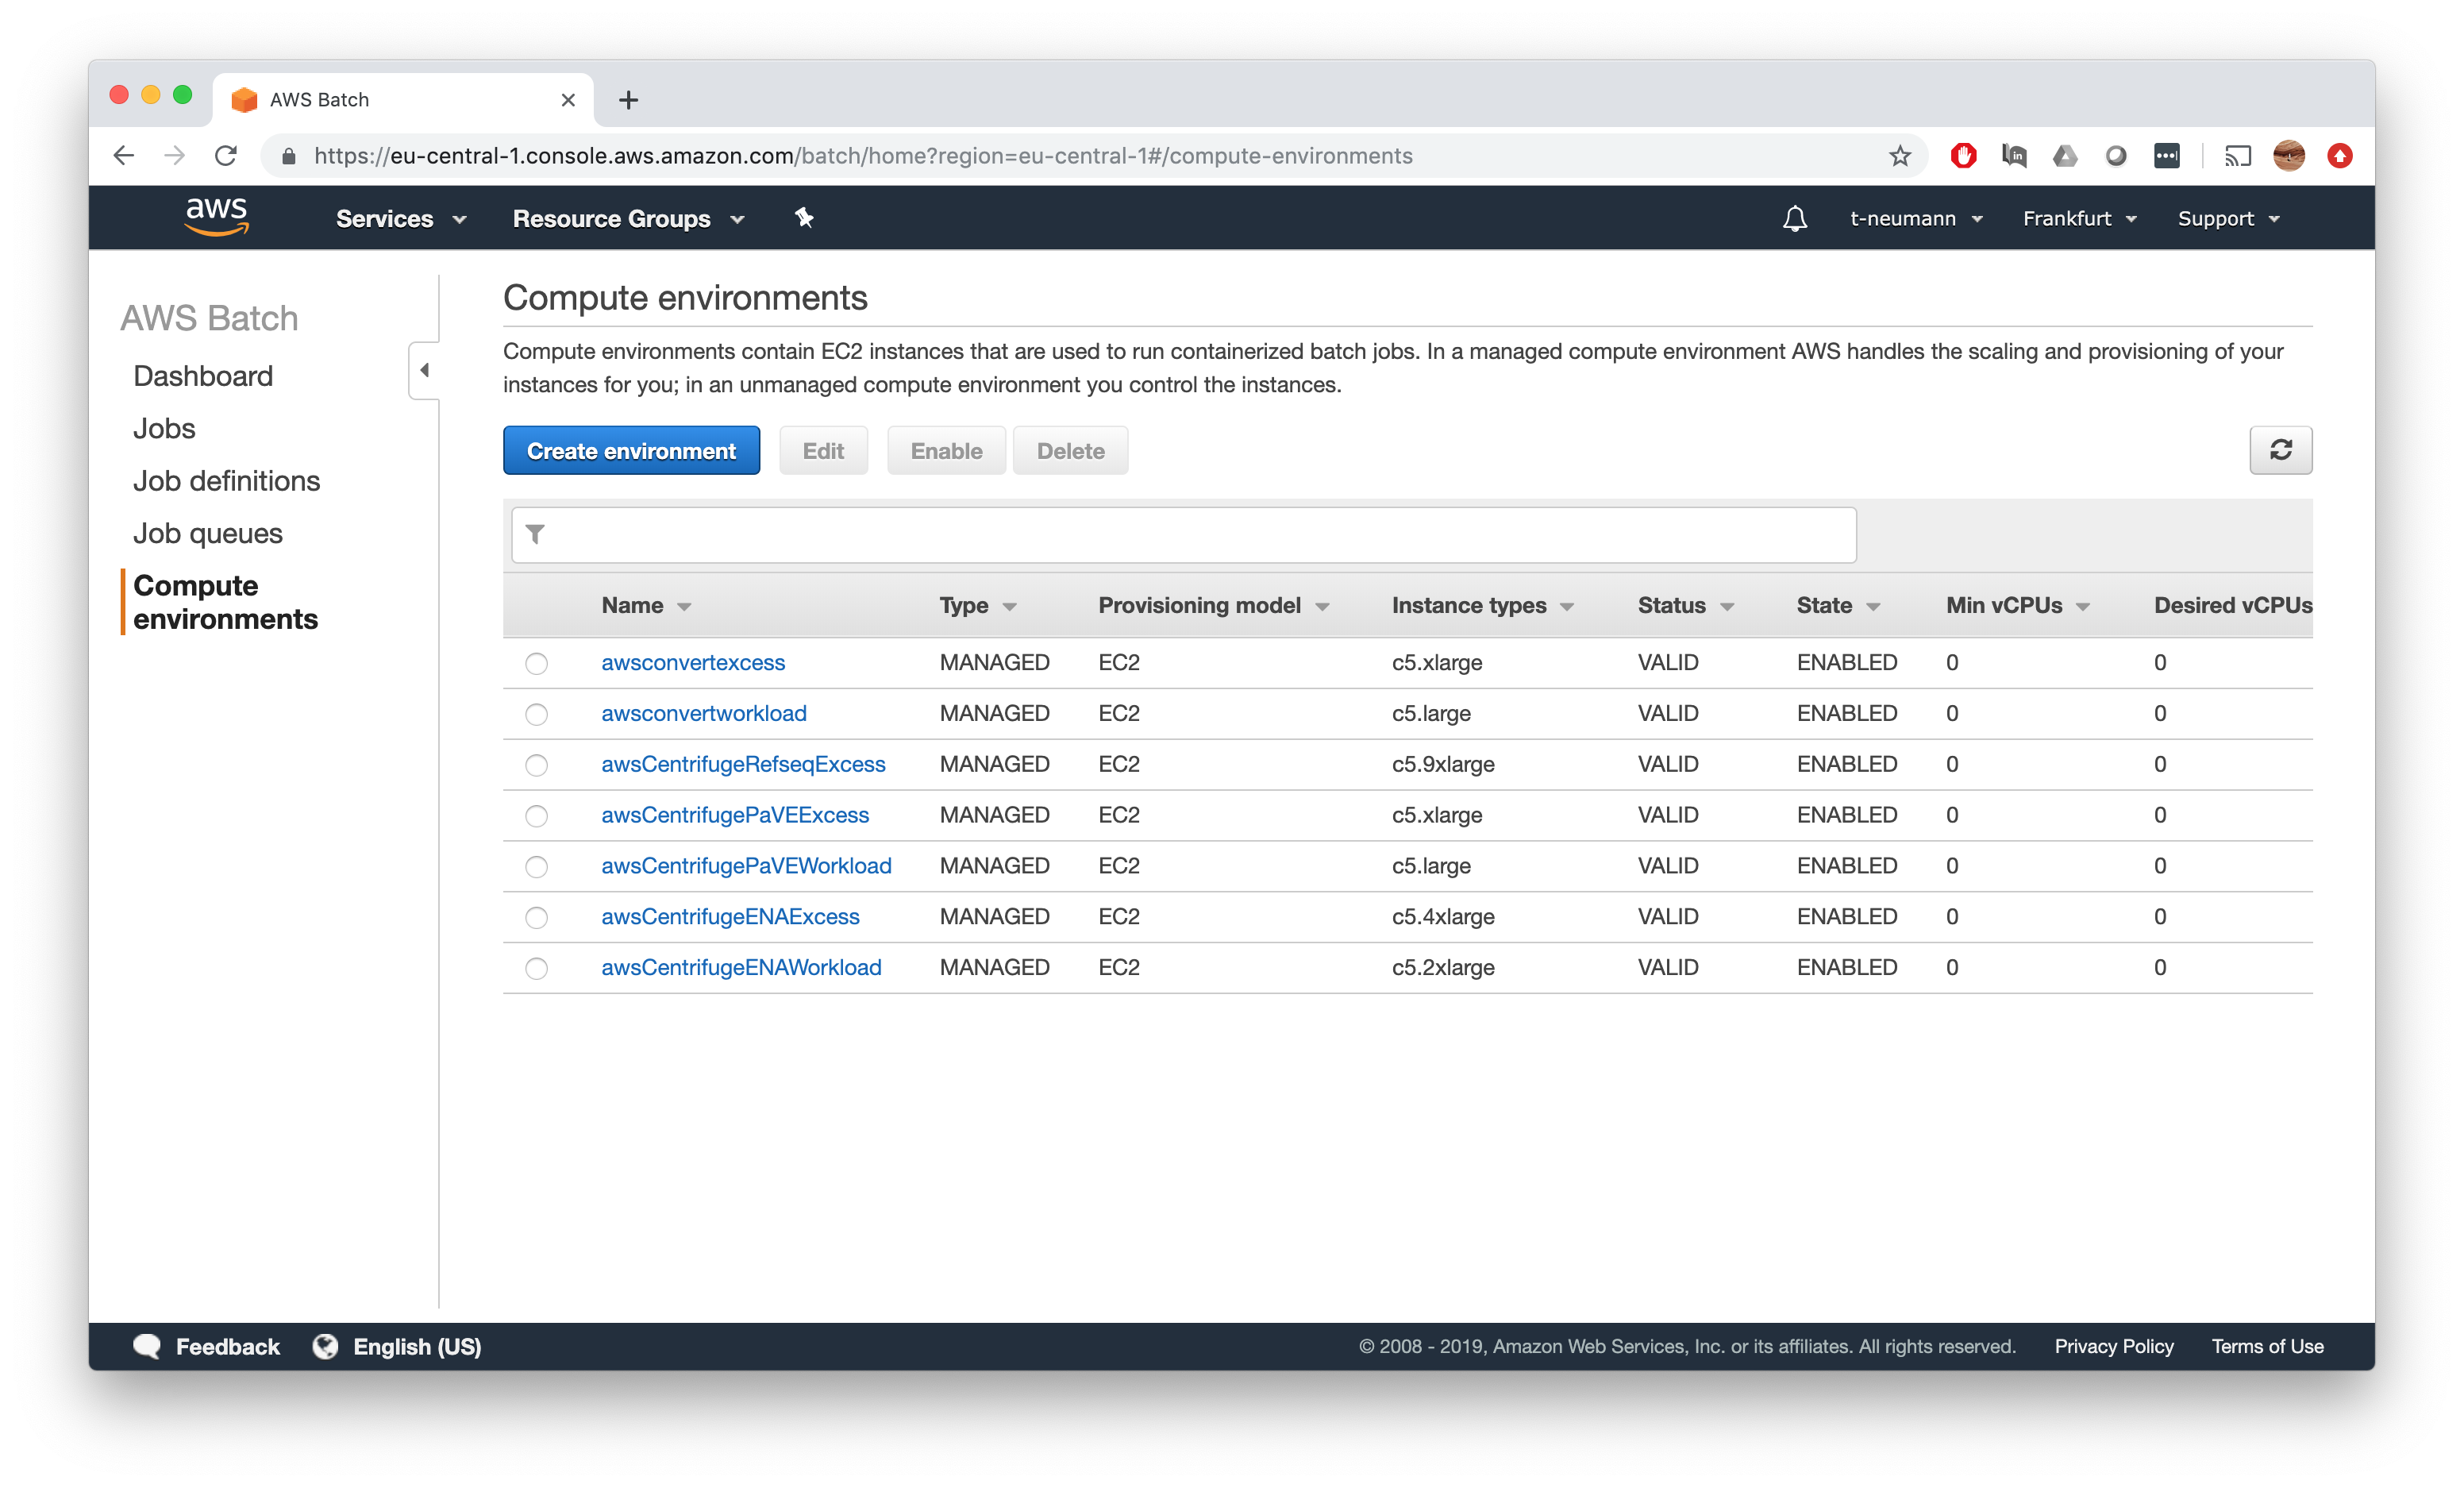
First, we want to create a new compute environment upon which we can base job queues. For this, go to the AWS Batch dashboard -> Compute Environments.
I have already created some production environments, for you this overview will probably be empty. Then go to Create Environment.
Naming, roles and permissions
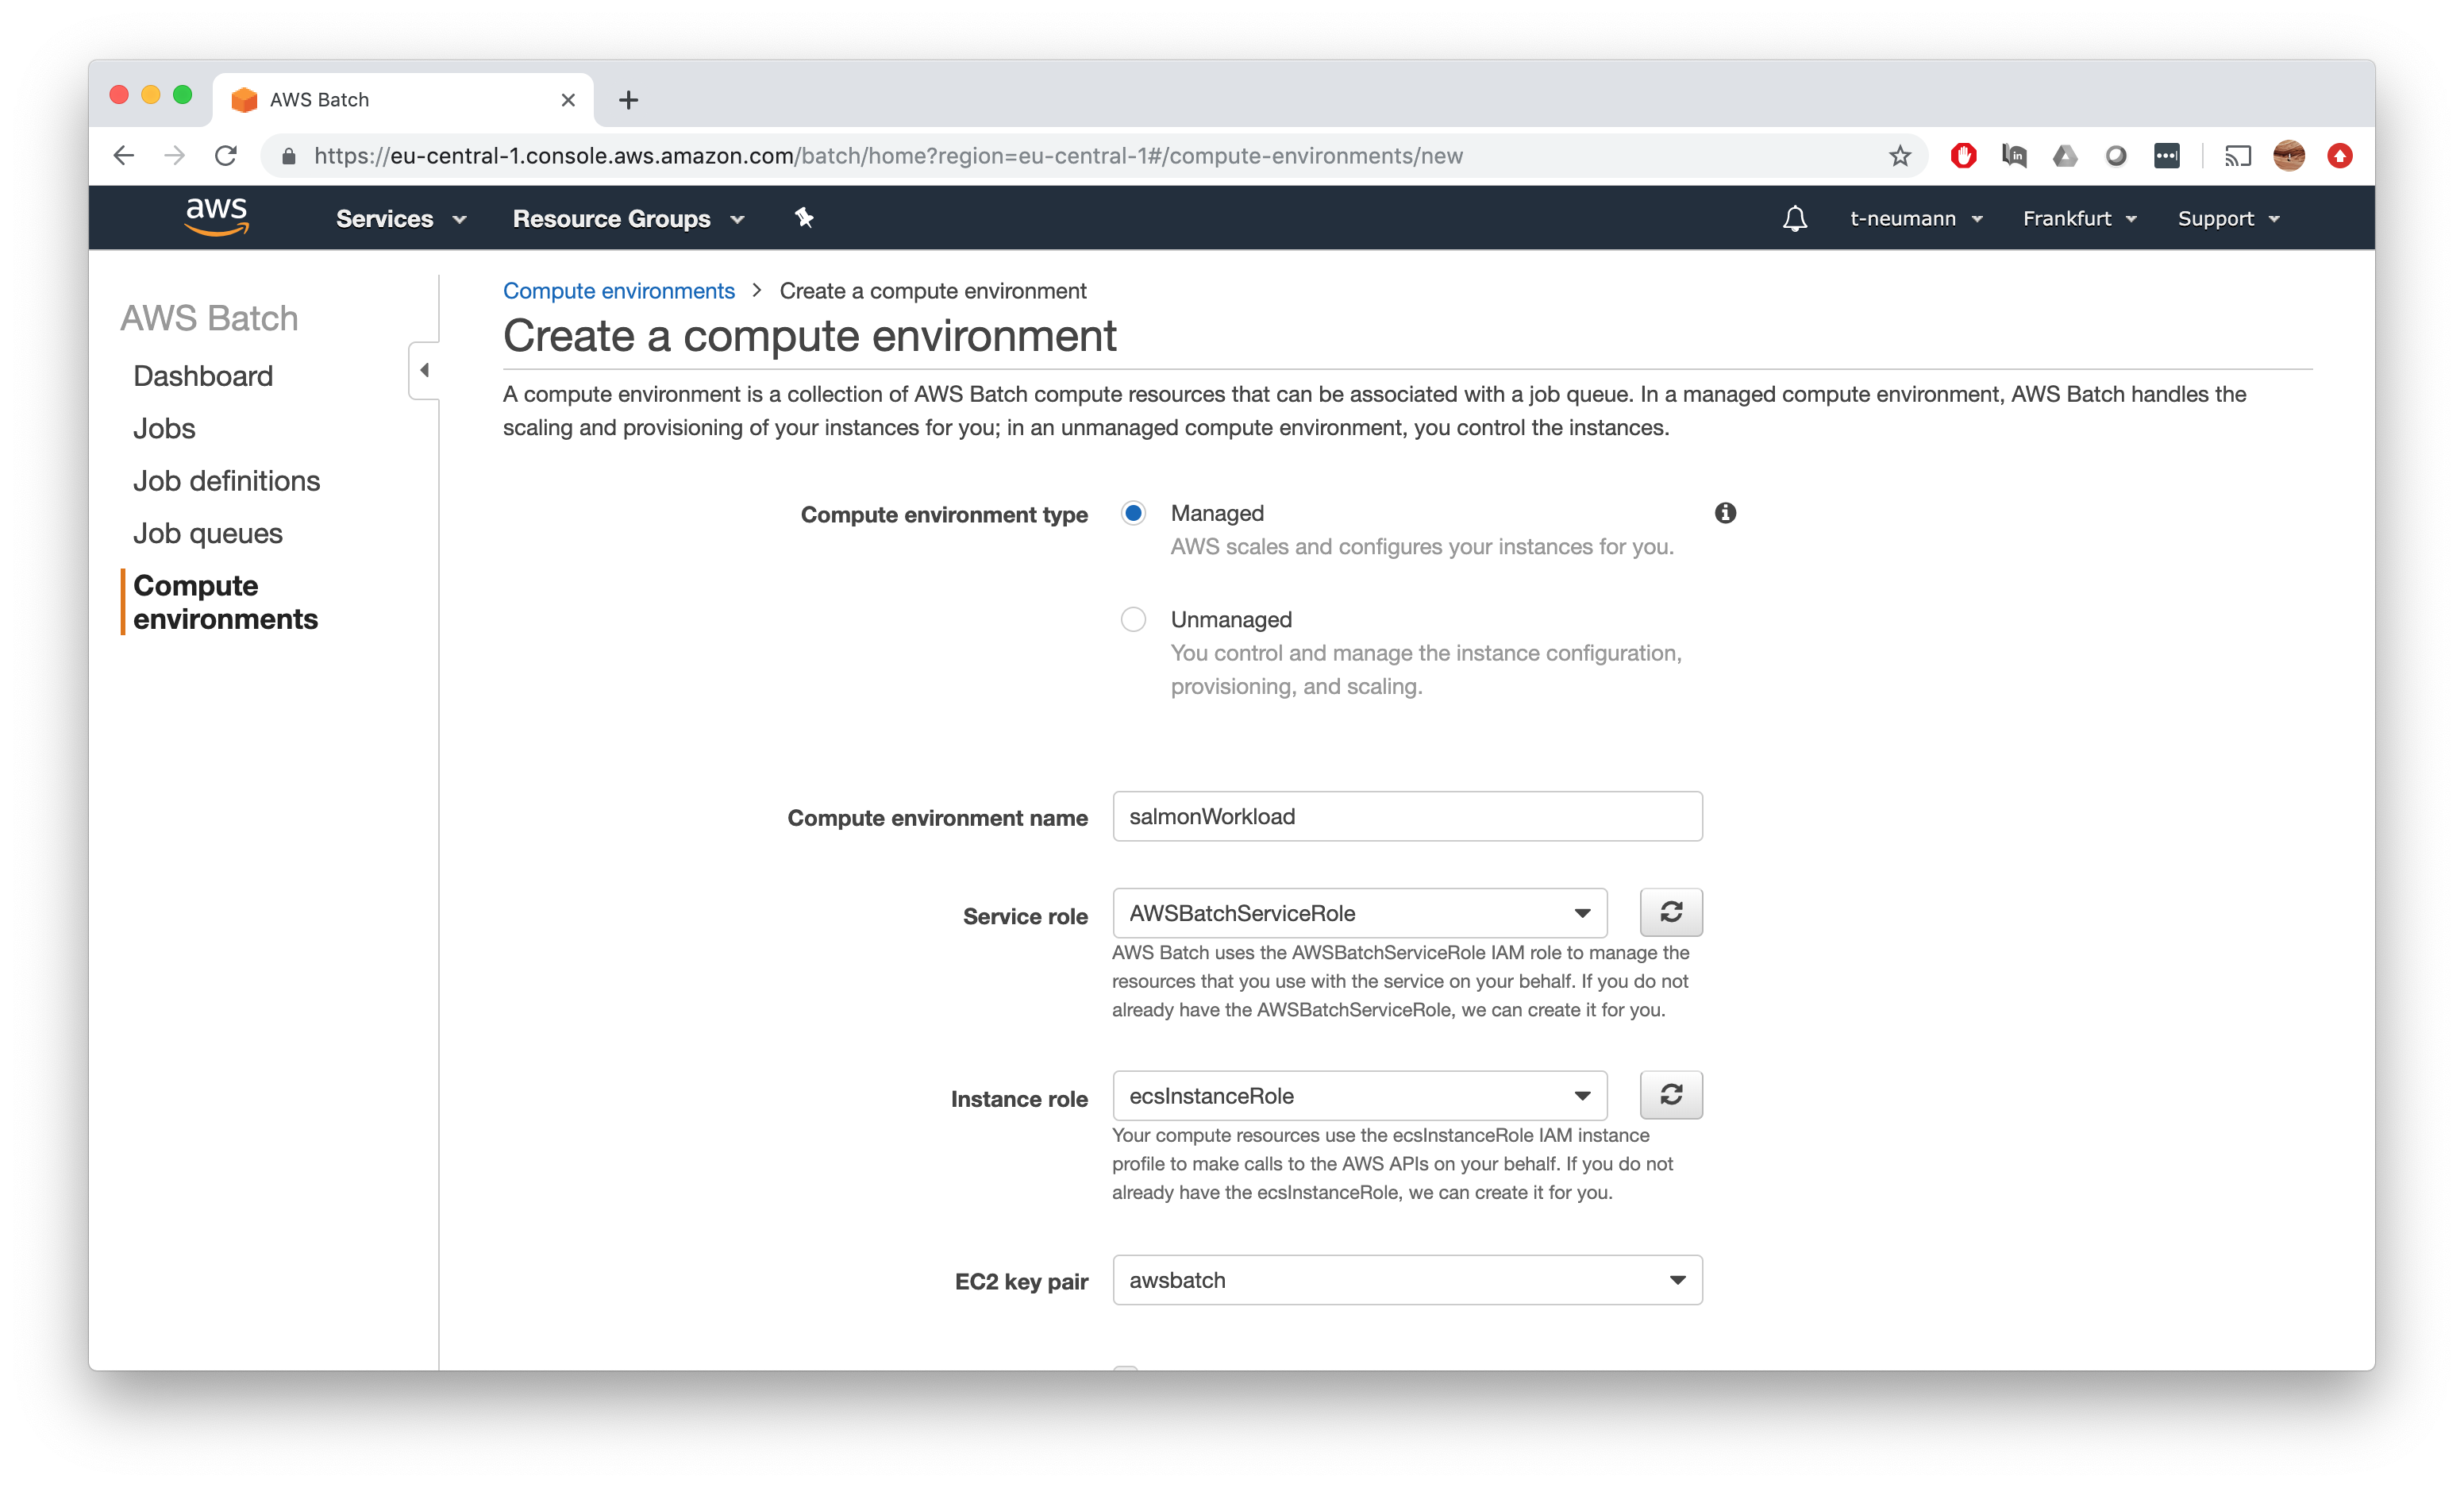
First, we want to have a managed environment, so AWS Batch can do configuration and scaling for us. Now, we can name our compute environment. I chose to create first a workload compute environment, thus naming it salmonWorkload. Then we simply select the service and instance roles as well as keypairs we created earlier in the prerequisite section, there should be only one option to choose from.
Some words on instance types and vCPU limits
In my opinion, this part is the most crucial part of setting up an optimal environment both in terms of computation and cost efficiency. So pay special attention here!
First of all, I hope you did a good enough job in Step 1 of estimating your resource requirements per task.
These are the punchlines you have to consider now for fixing instance types and vCPU limits for your compute environment:
Fit only 1 task in 1 instance!
If you look at the instance pricing table, you will see that prices linearly scaling with instance types - meaning doubling resources results in double prices. You will not save anything by running more jobs on a single larger instance, but you will pay for it since from experience the Docker daemon on the instance sometimes gets confused and hung-up when there’s multiple tasks run on the instance.
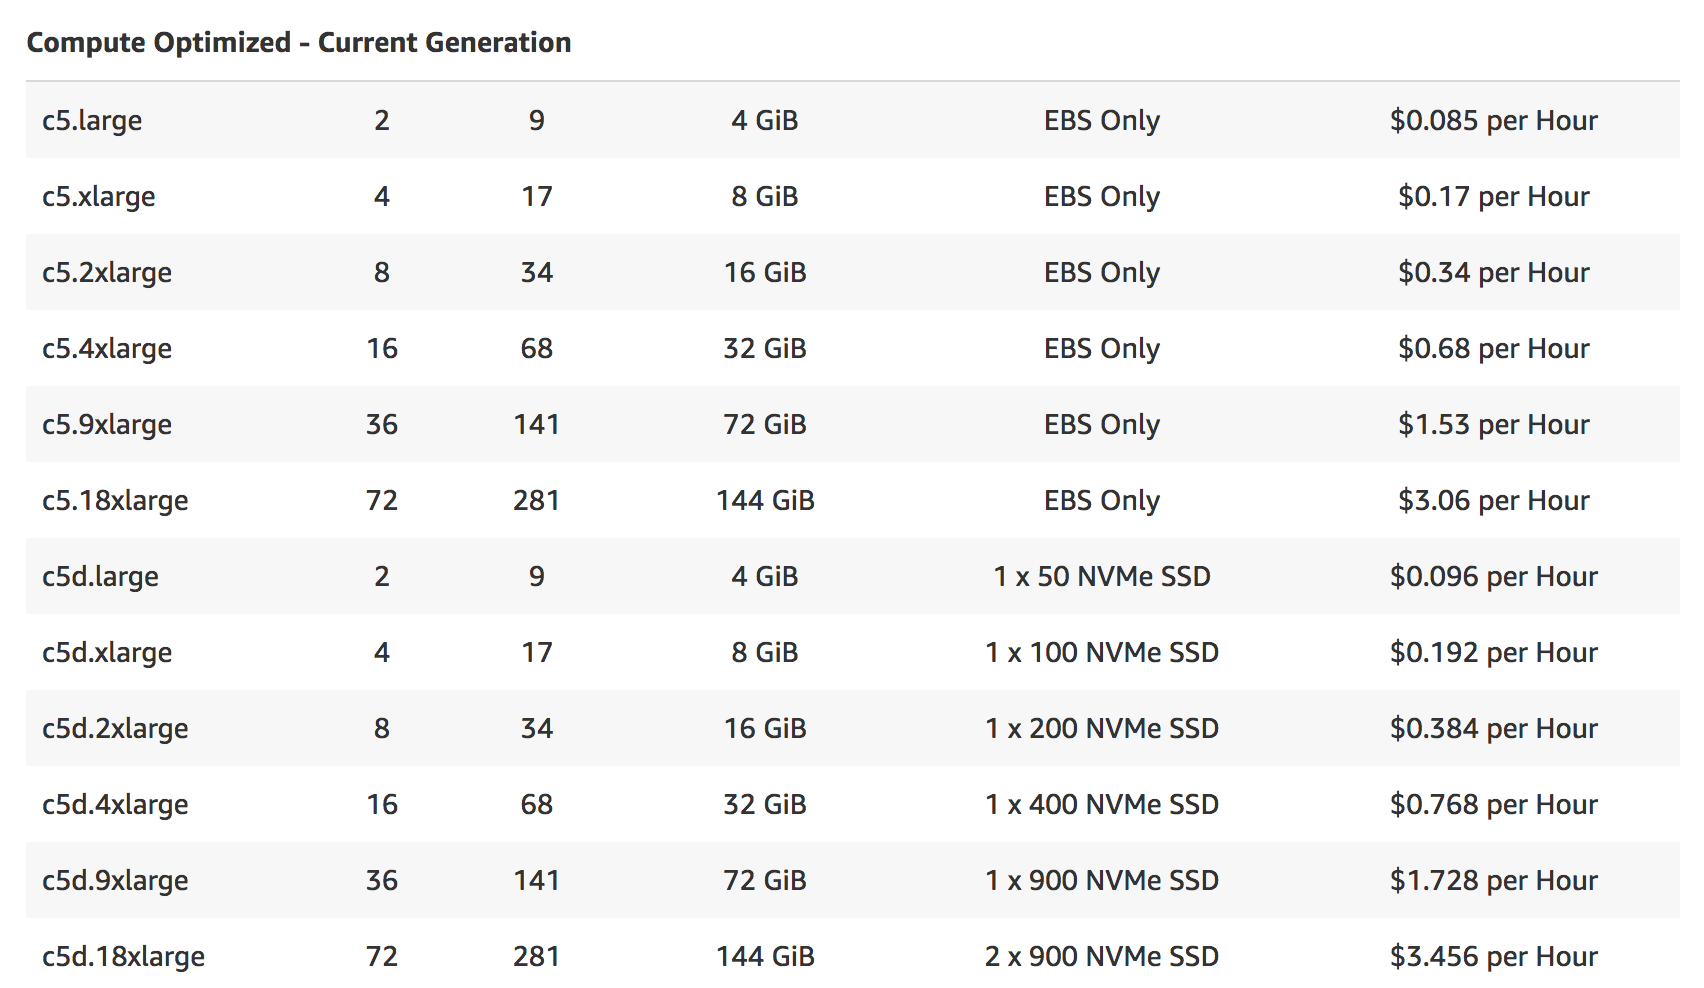
vCPUs refers to the total number of vCPUs of your environments
This got me confused also when trying to figure out, how many instances will be fired up in total. Essentially you have to divide this number by the number of vCPUs provided by your instance type of choice and then you will get the number of instances that will be launched at peak times.
So let’s say you chose c5.2xlarge as your instance type with 8 vCPUs and your specified Maximum vCPUs is 100, then 100 / 8 = 12 instances will be launched in total if the entire compute environment is utilized.
Keep some spare memory for instance services
I will address this in detail later, but keep in mind that not the entire memory listed in the instance type specification can be used, since some of it will be occupied with running basic instance services.
Keep homogeneous compute environments
Since we did a careful resource requirement estimation, I find it easiest for keeping track of cost and also ensuring that the tasks will actually finish, to have homogeneous compute environments - meaning one environment will only allow for one specific instance type.
Specifying instance types and vCPU limits
Now let’s put it all together. First up, let’s quickly refresh the resource requirements we had per Salmon task:
- We need an instance to provide 8 GB of memory to fit index + data
- If we run our tasks on a 6 thread instance, it will run 2:30 mins
Now if we check the instance type table, we find there is actually 2 types of instances that would cover these requirements:
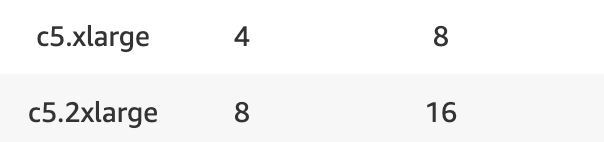
The c5.xlarge comes with 8 GB of memory and 4 vCPUs, the c5.2xlarge with double the memory and vCPUs. So in principal, we could fit on average on task in the smaller instance, but remember you will have some overhead of services running on the instance that effectively reduces these 8 GB and second these requirements are average requirements, so anything above average will fail to run in such an instance. Therefore, we should definitely go for a c5.2xlarge here.
- Choose
c5.2xlargeas your only instance type and deleteoptimal - Set
Minimum vCPUsandDesired vCPUsboth to 0 to have no idle running instances in background - Tick the
Enable user-specified Ami ID, copy theAMI IDfrom theAMIwe created and validate it
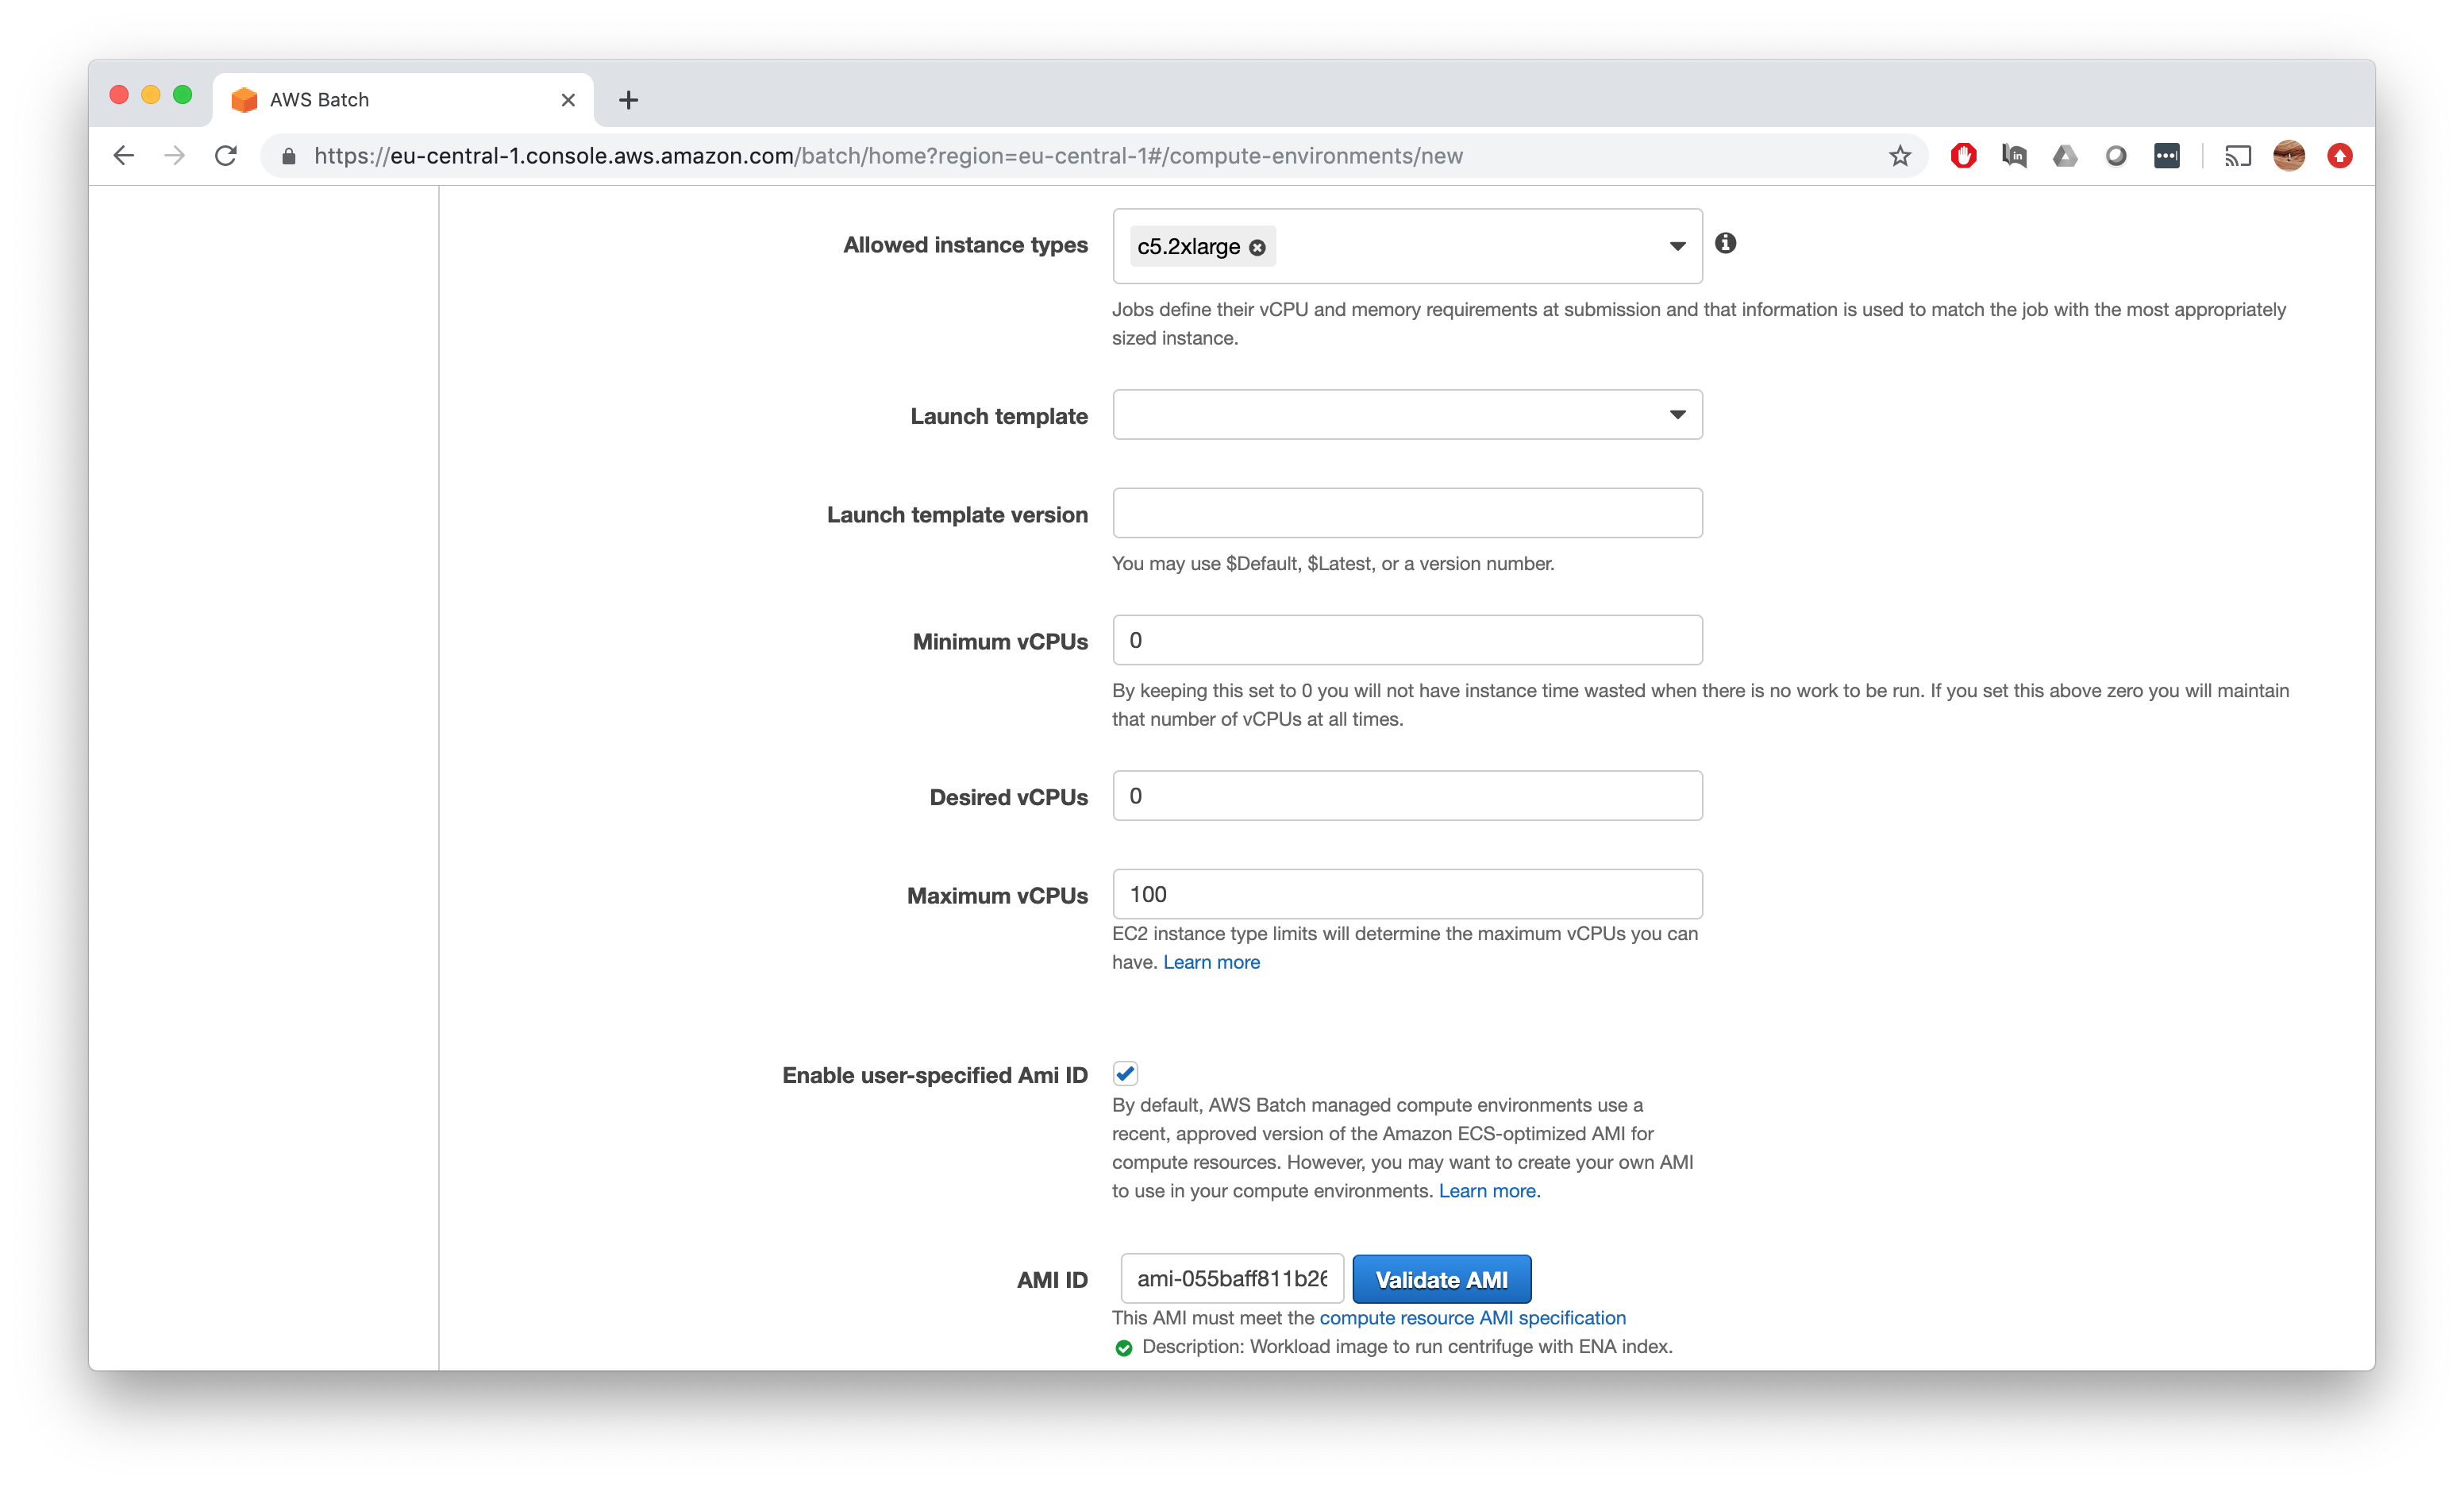
Everything else you can leave empty and click Create.
Congratulations, you have created your first compute environment!
Step 4: Creating job queues
Now we need to create a job queue and associated this with our compute environment. This step is actually pretty easy and straightforward.
First go to Job queues and click Create Queue.
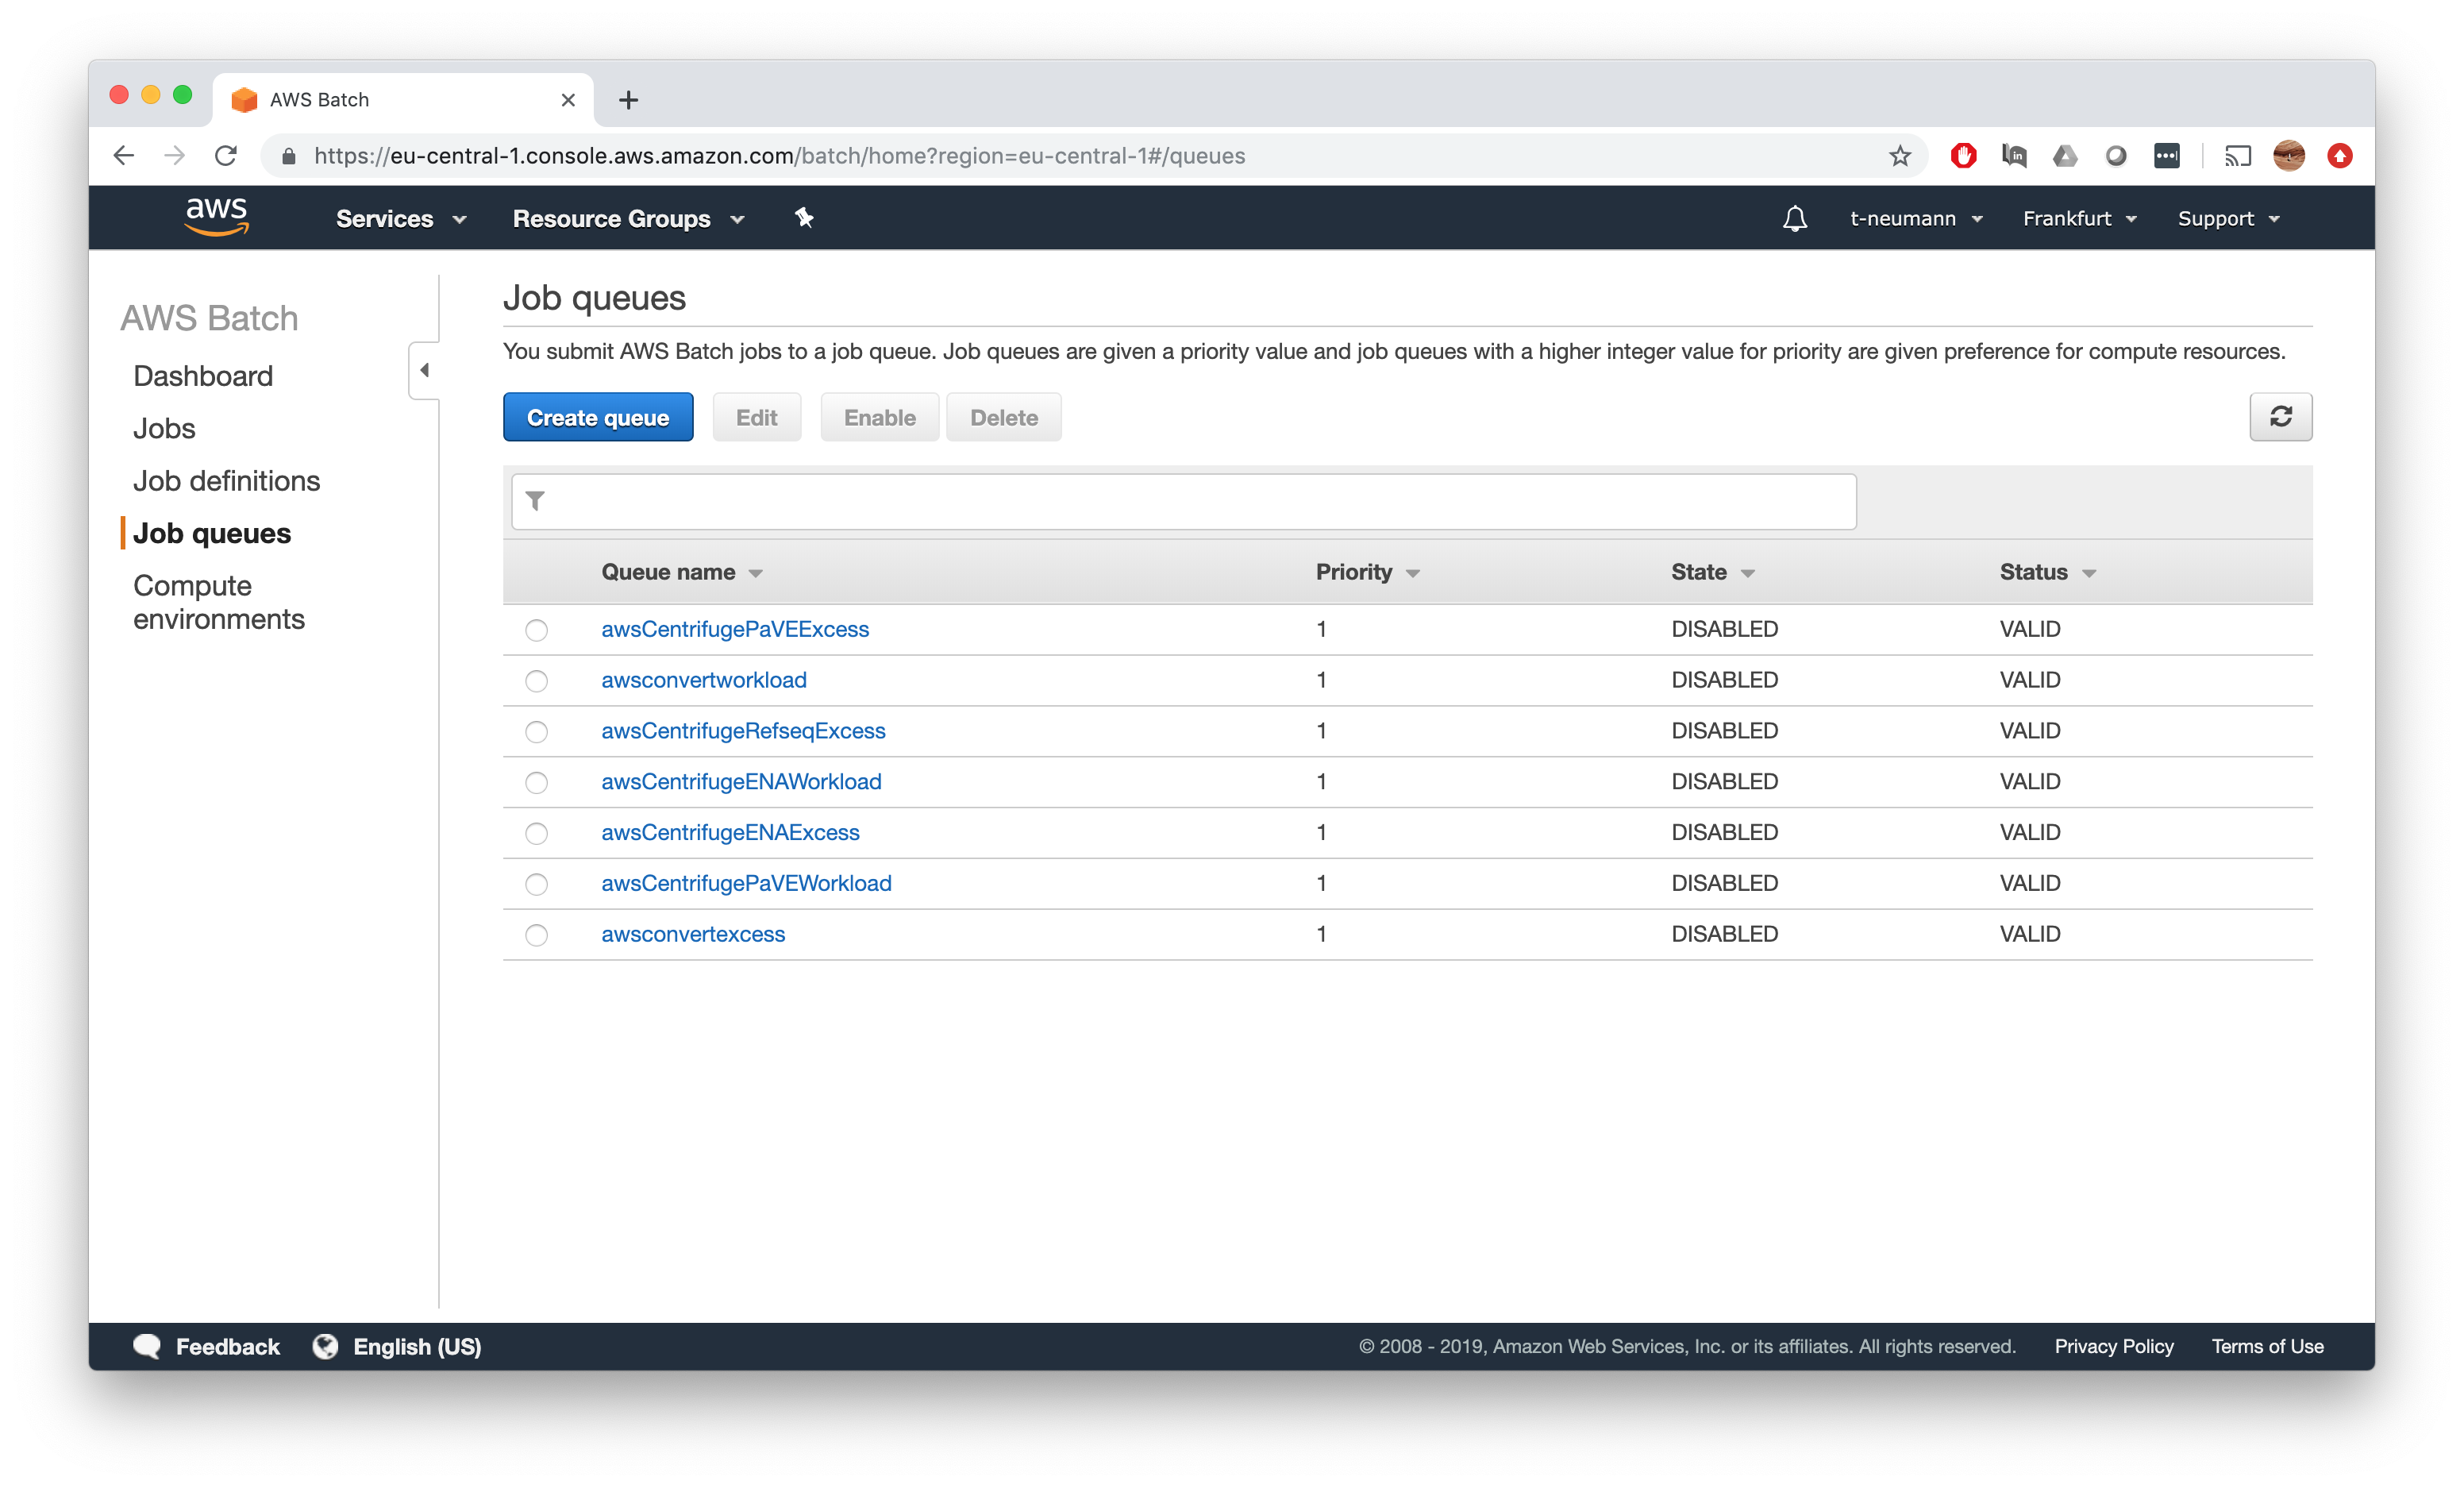
Now you can pick a name for your job queue - in our simple case I give it the same name as our compute environment salmonWorkload. You can in principal assign multiple job queues to one compute environment and set priorities via the Priority field, but we can simply put 1 in there.
Finally, associated the job queue with our salmonWorkload compute environment. Note again here, you can in principal assign multiple compute environments to a given job queue.
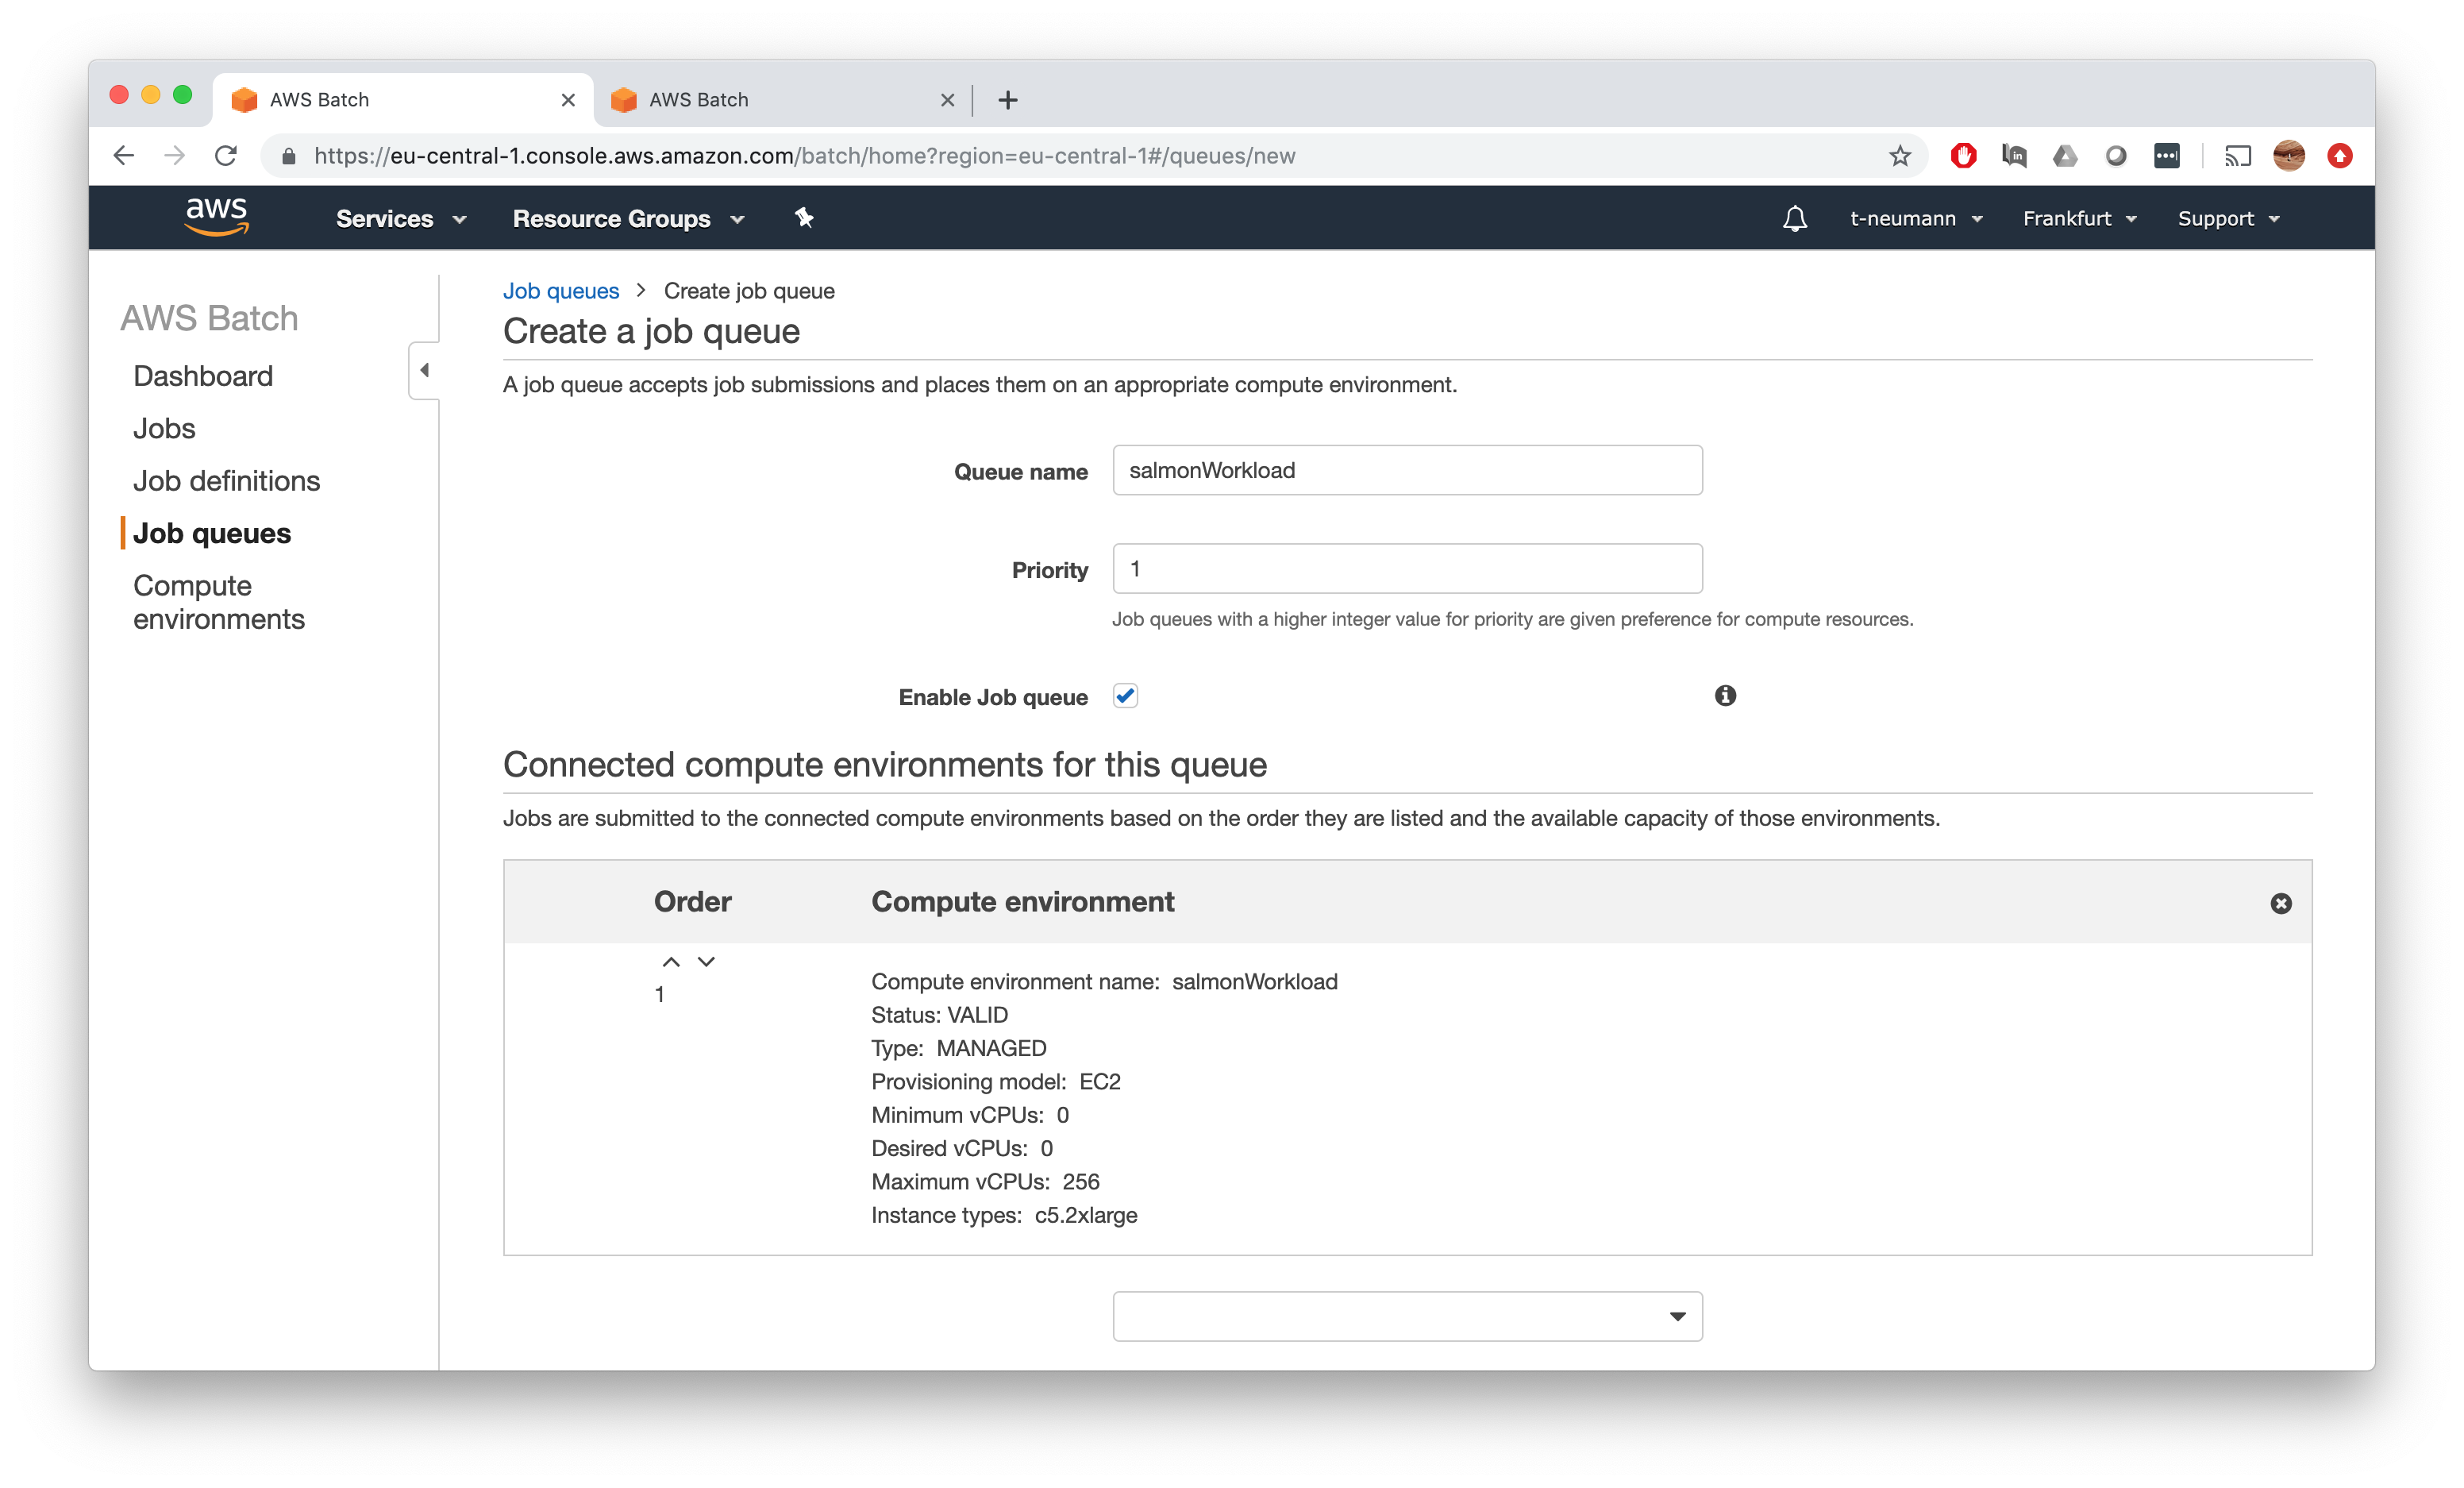
That’s it - click Create job queue and you have successfully created your first job queue!
Excess queue
Now that we have our workload compute environment and job queues, we want to do the same with for our excess compute environment and job queues to handle any datasets with overshooting resource requirements.
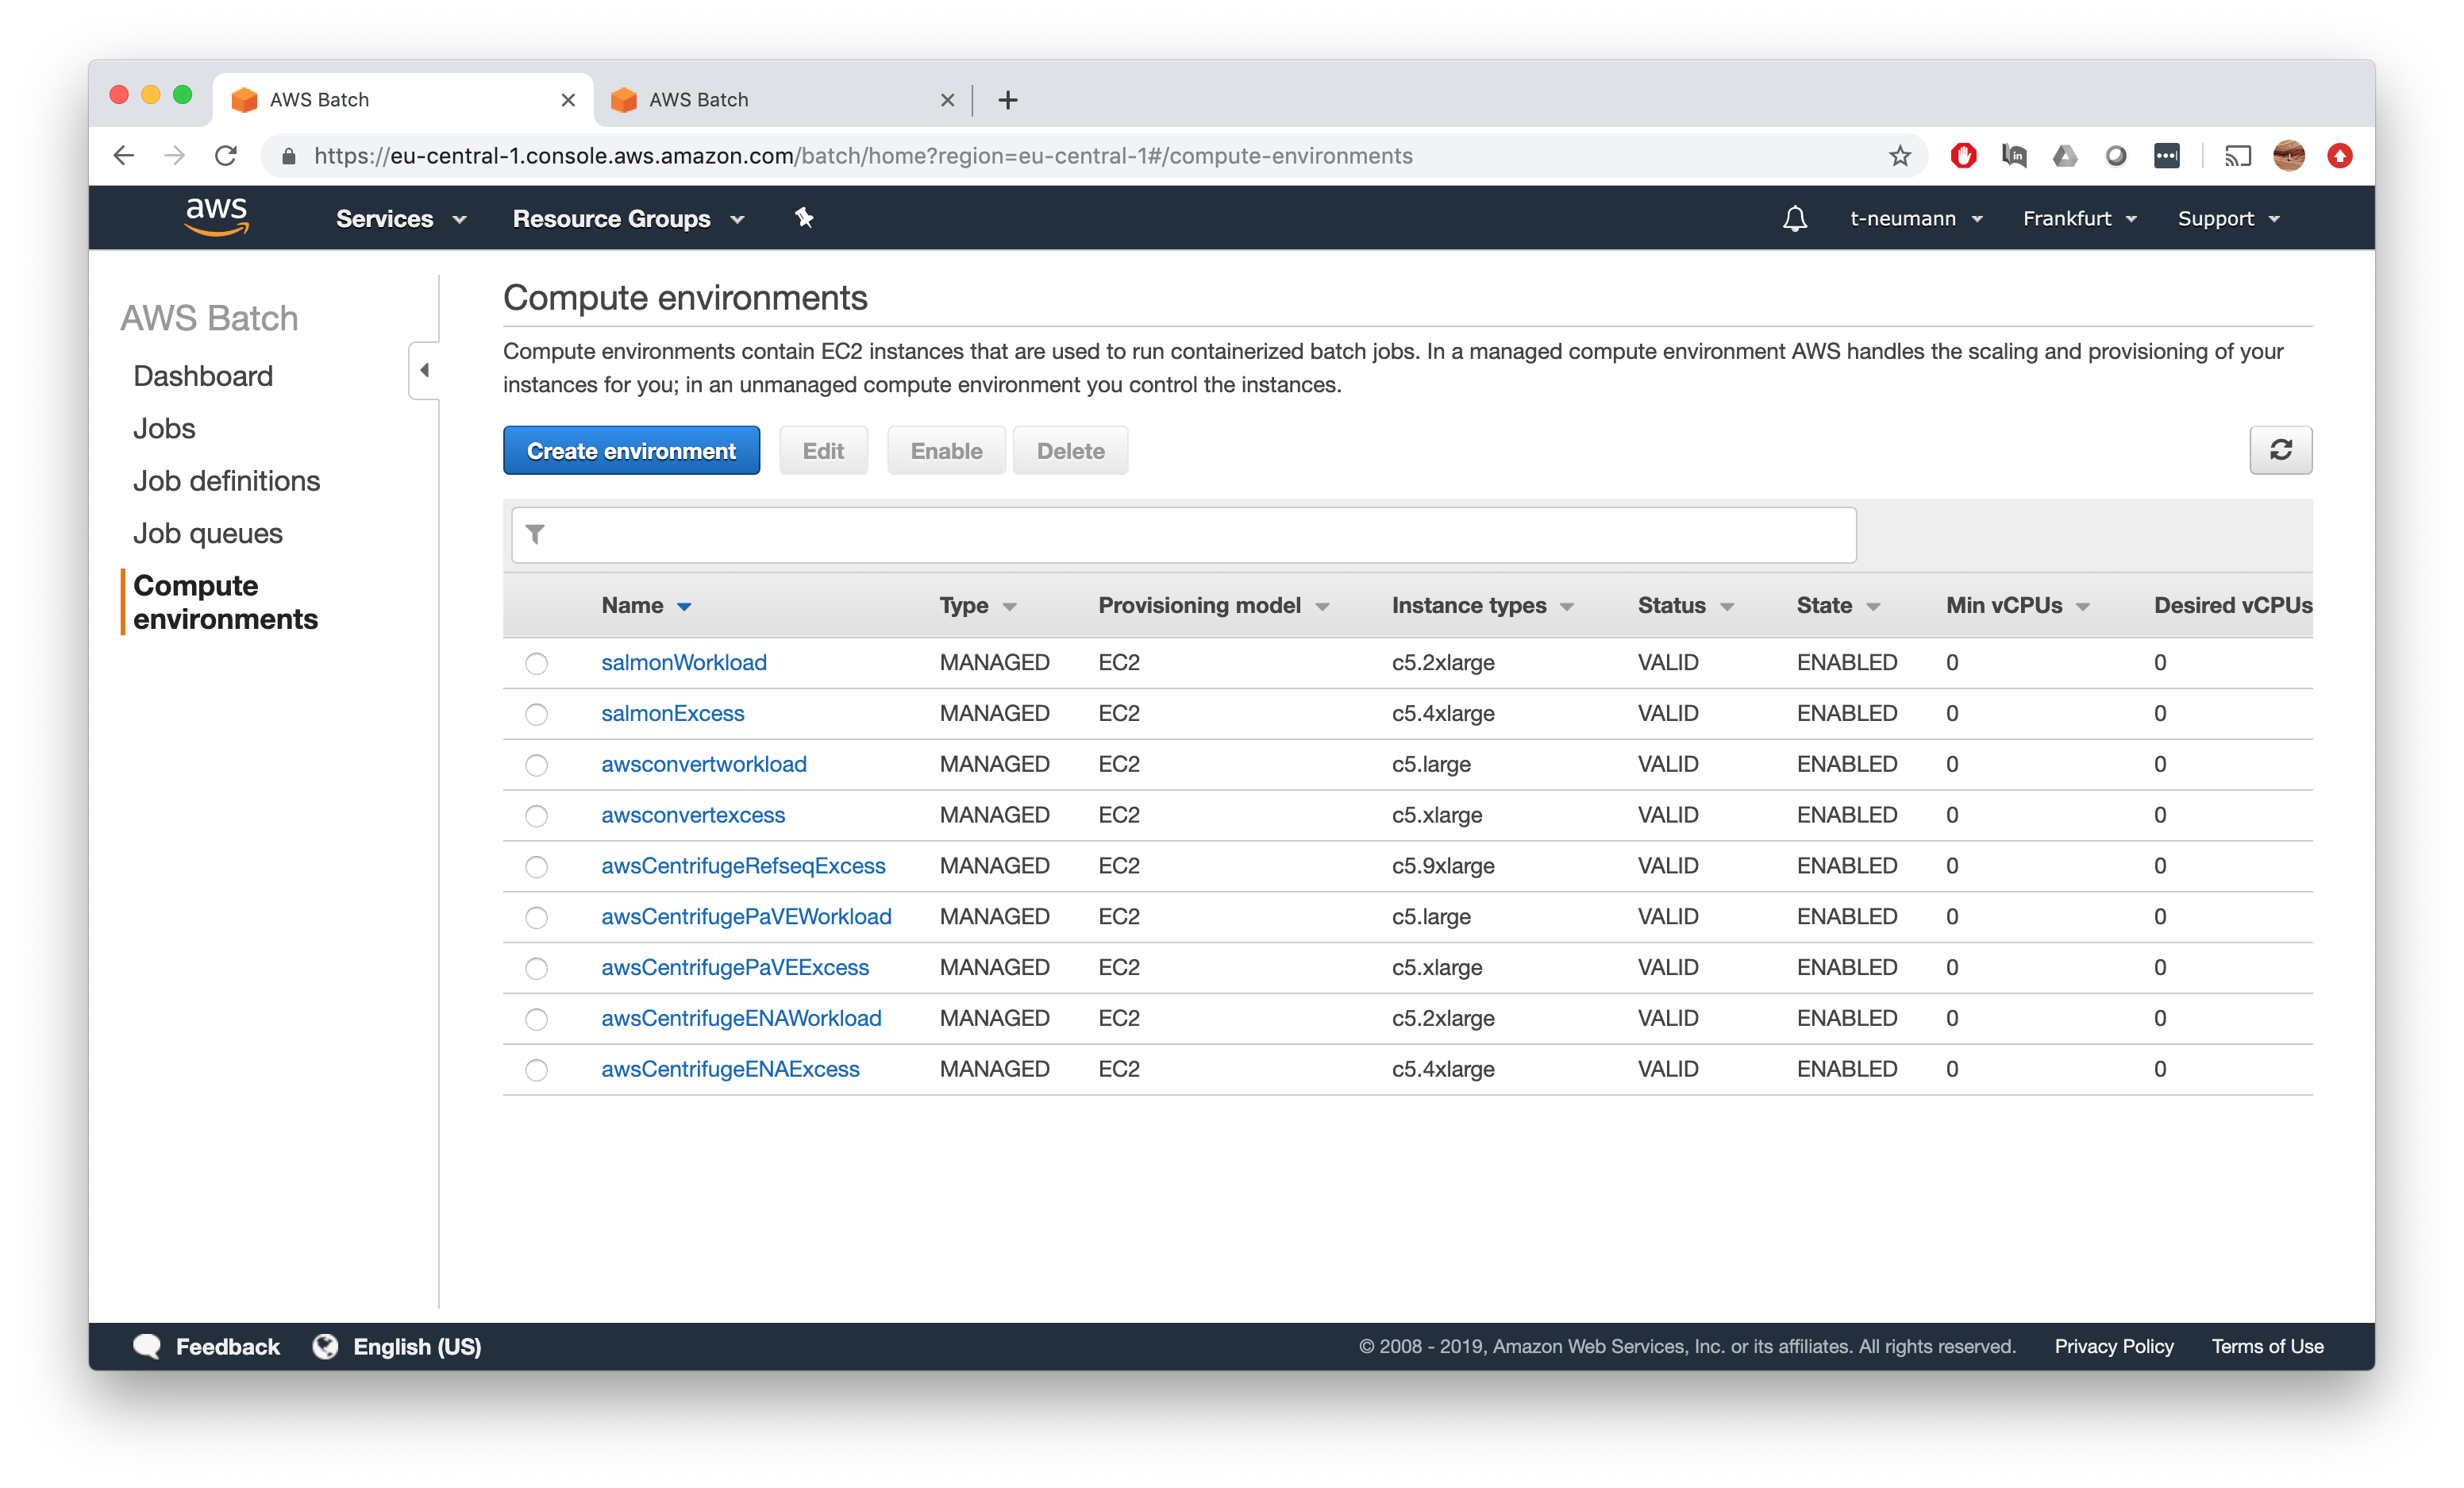
Therefore, we repeat the steps starting from Step 3 to create a salmonExcess compute environment and job queue based on c5.4xlarge instances with double the resources compared to our salmonWorkload queue.
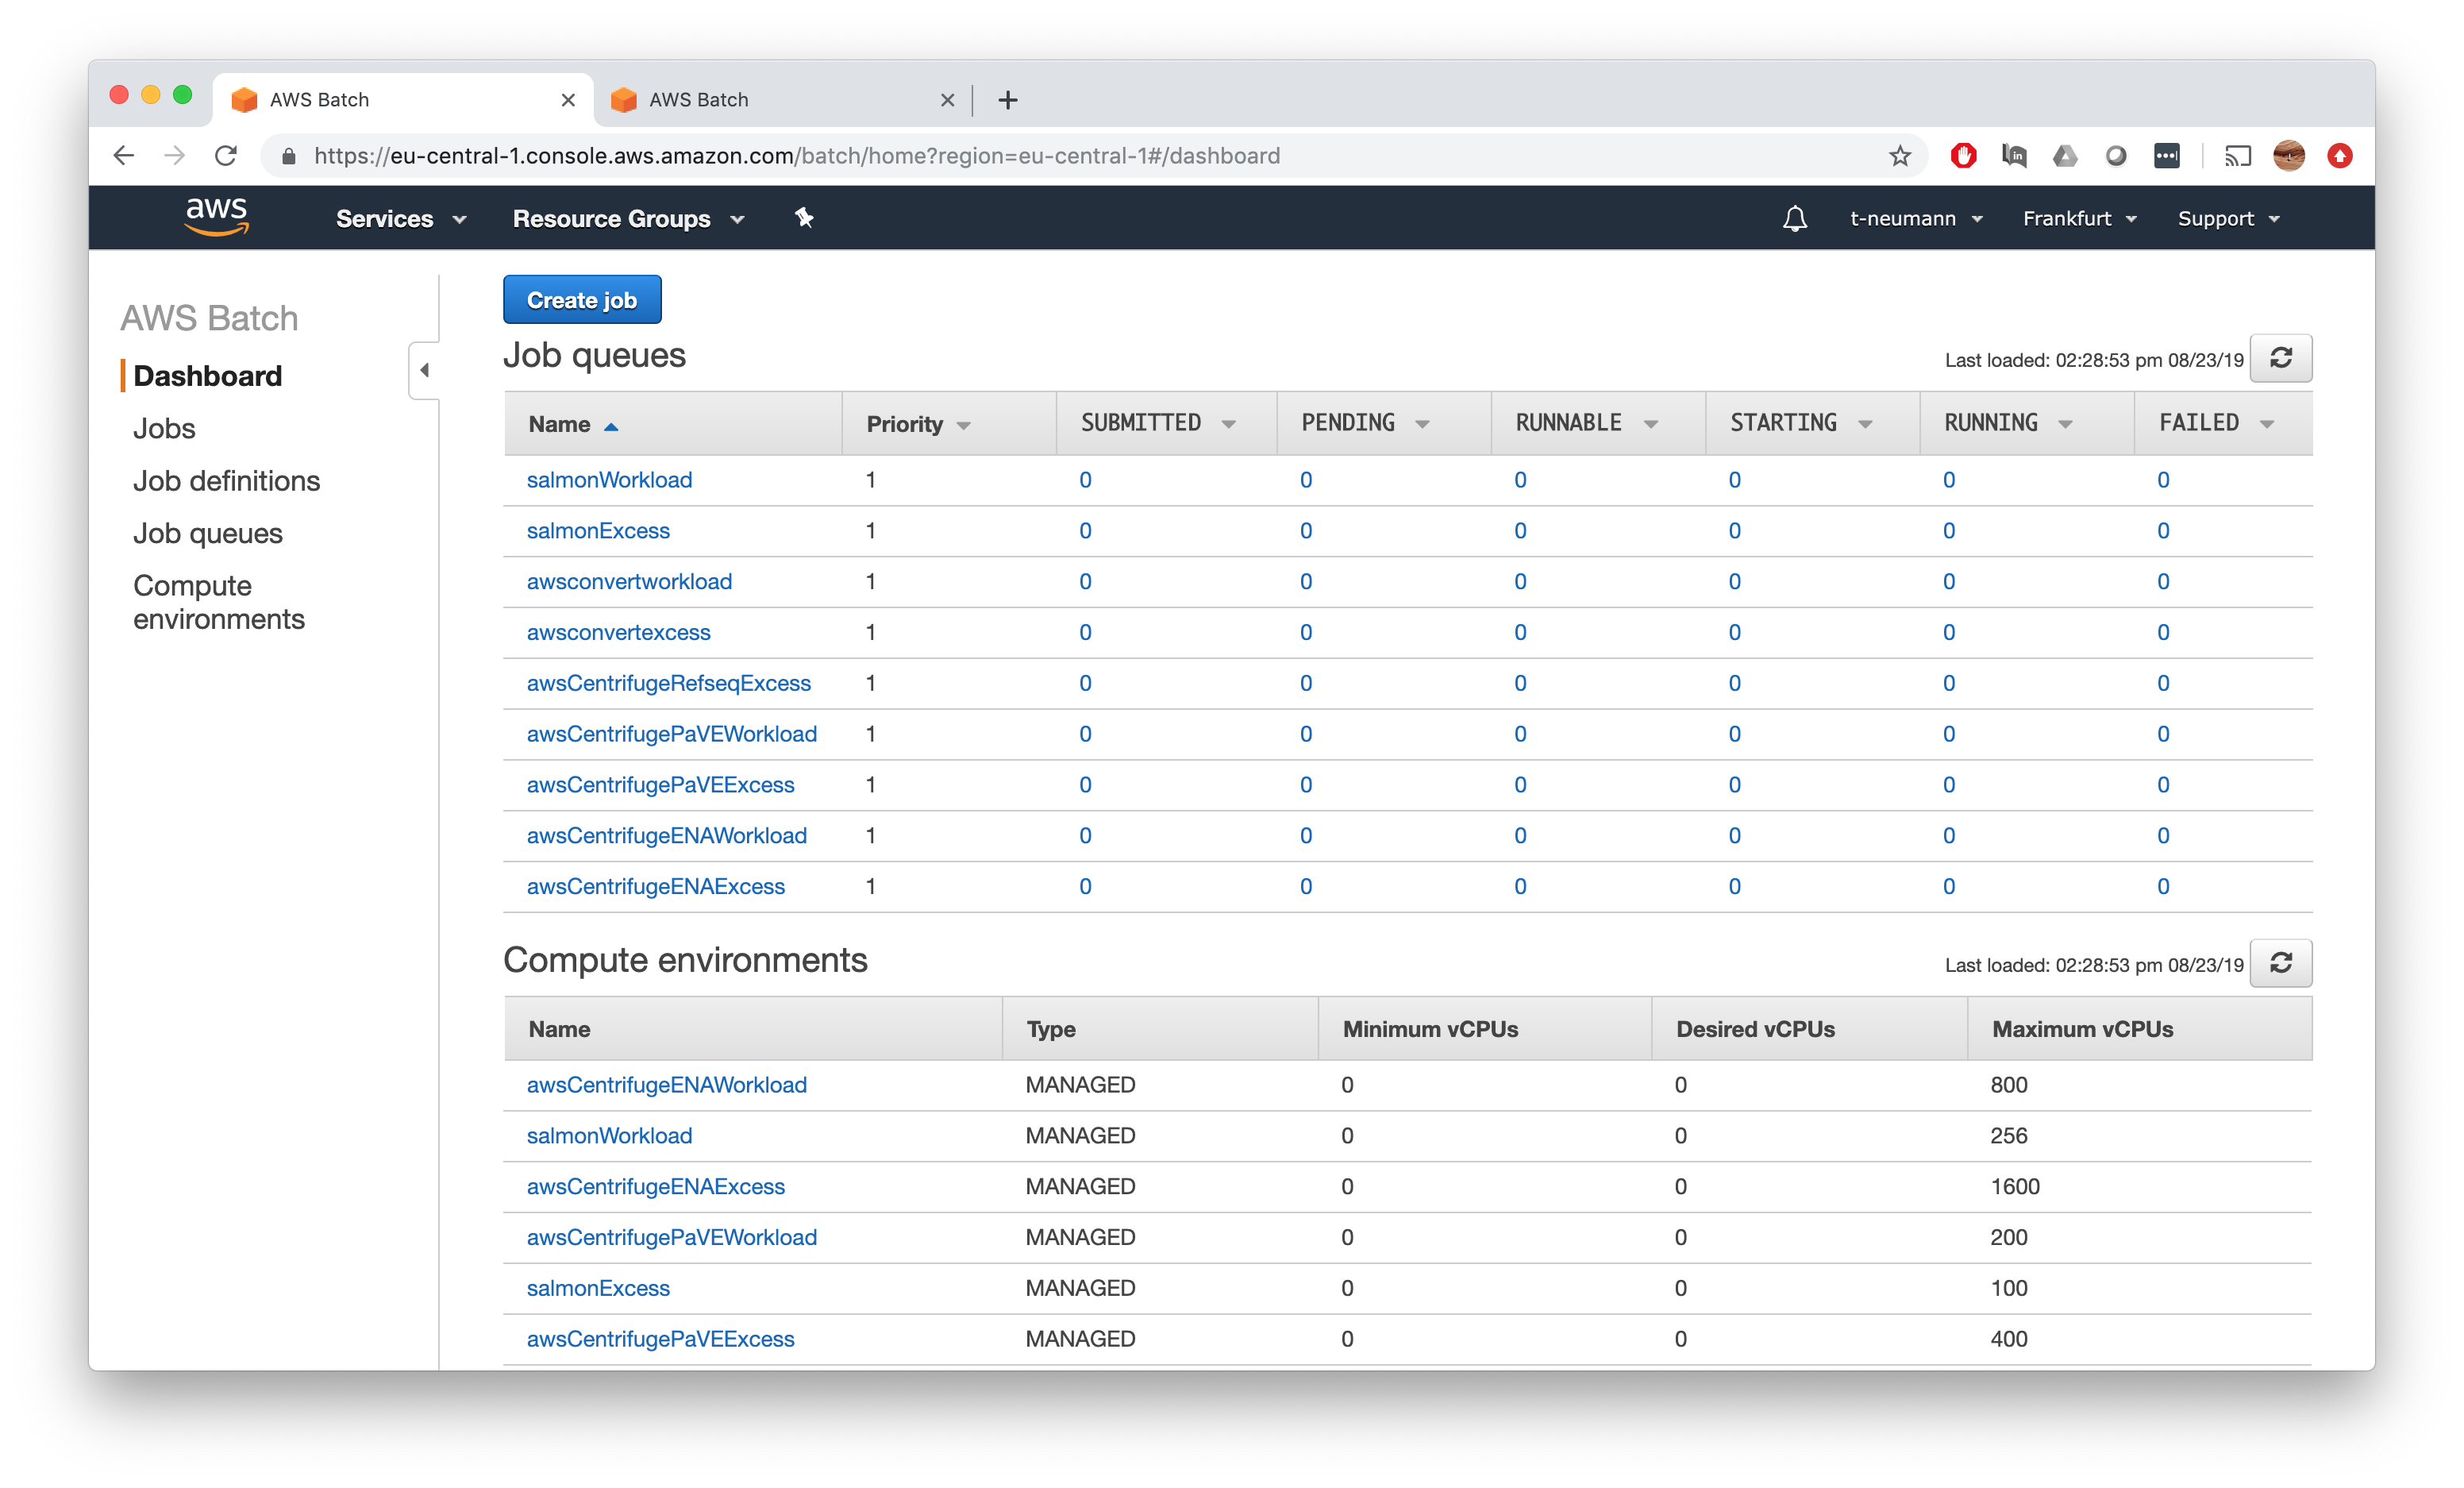
This should leave you know with the following compute environments and job queues and finally ready to specify our final resource constraints before submitting our first jobs.
Step 5: Adjusting resources
Ok so now that we have set all the compute environments with associated instance types as well as job queues up on the AWS end, we know what resources we have available and how much of those will be consumed by our tasks.
Resource definition
So naïvely we can directly enter the specifications of our EC2 instance type of choice in the awsbatch.config file of our salmon-nf Nextflow workflow, since we know the salmonWorkload queue consists of c5.2xlarge instances with 16 GB memroy and 8 vCPUs each and our salmonExcess queue of c5.4xlarge instances with 32 GB memory and 16 vCPUs each.
aws.region = 'eu-central-1'
aws.client.storageEncryption = 'AES256'
executor.name = 'awsbatch'
executor.awscli = '/home/ec2-user/miniconda/bin/aws'

process {
  queue = { task.attempt > 1 ? 'salmonExcess' : 'salmonWorkload' }
	memory = { task.attempt > 1 ? 32.GB : 16.GB }
	cpus = { task.attempt > 1 ? 16 : 8 }
}

params {

   salmonIndex = 's3://obenauflab/indices/salmon/gencode.v28.IMPACT'

}
Now just let’s quickly fast-forward and look what happens if we submit our jobs like this.
You will notice that we have one runnable job for each task, yet no instances will fire up.
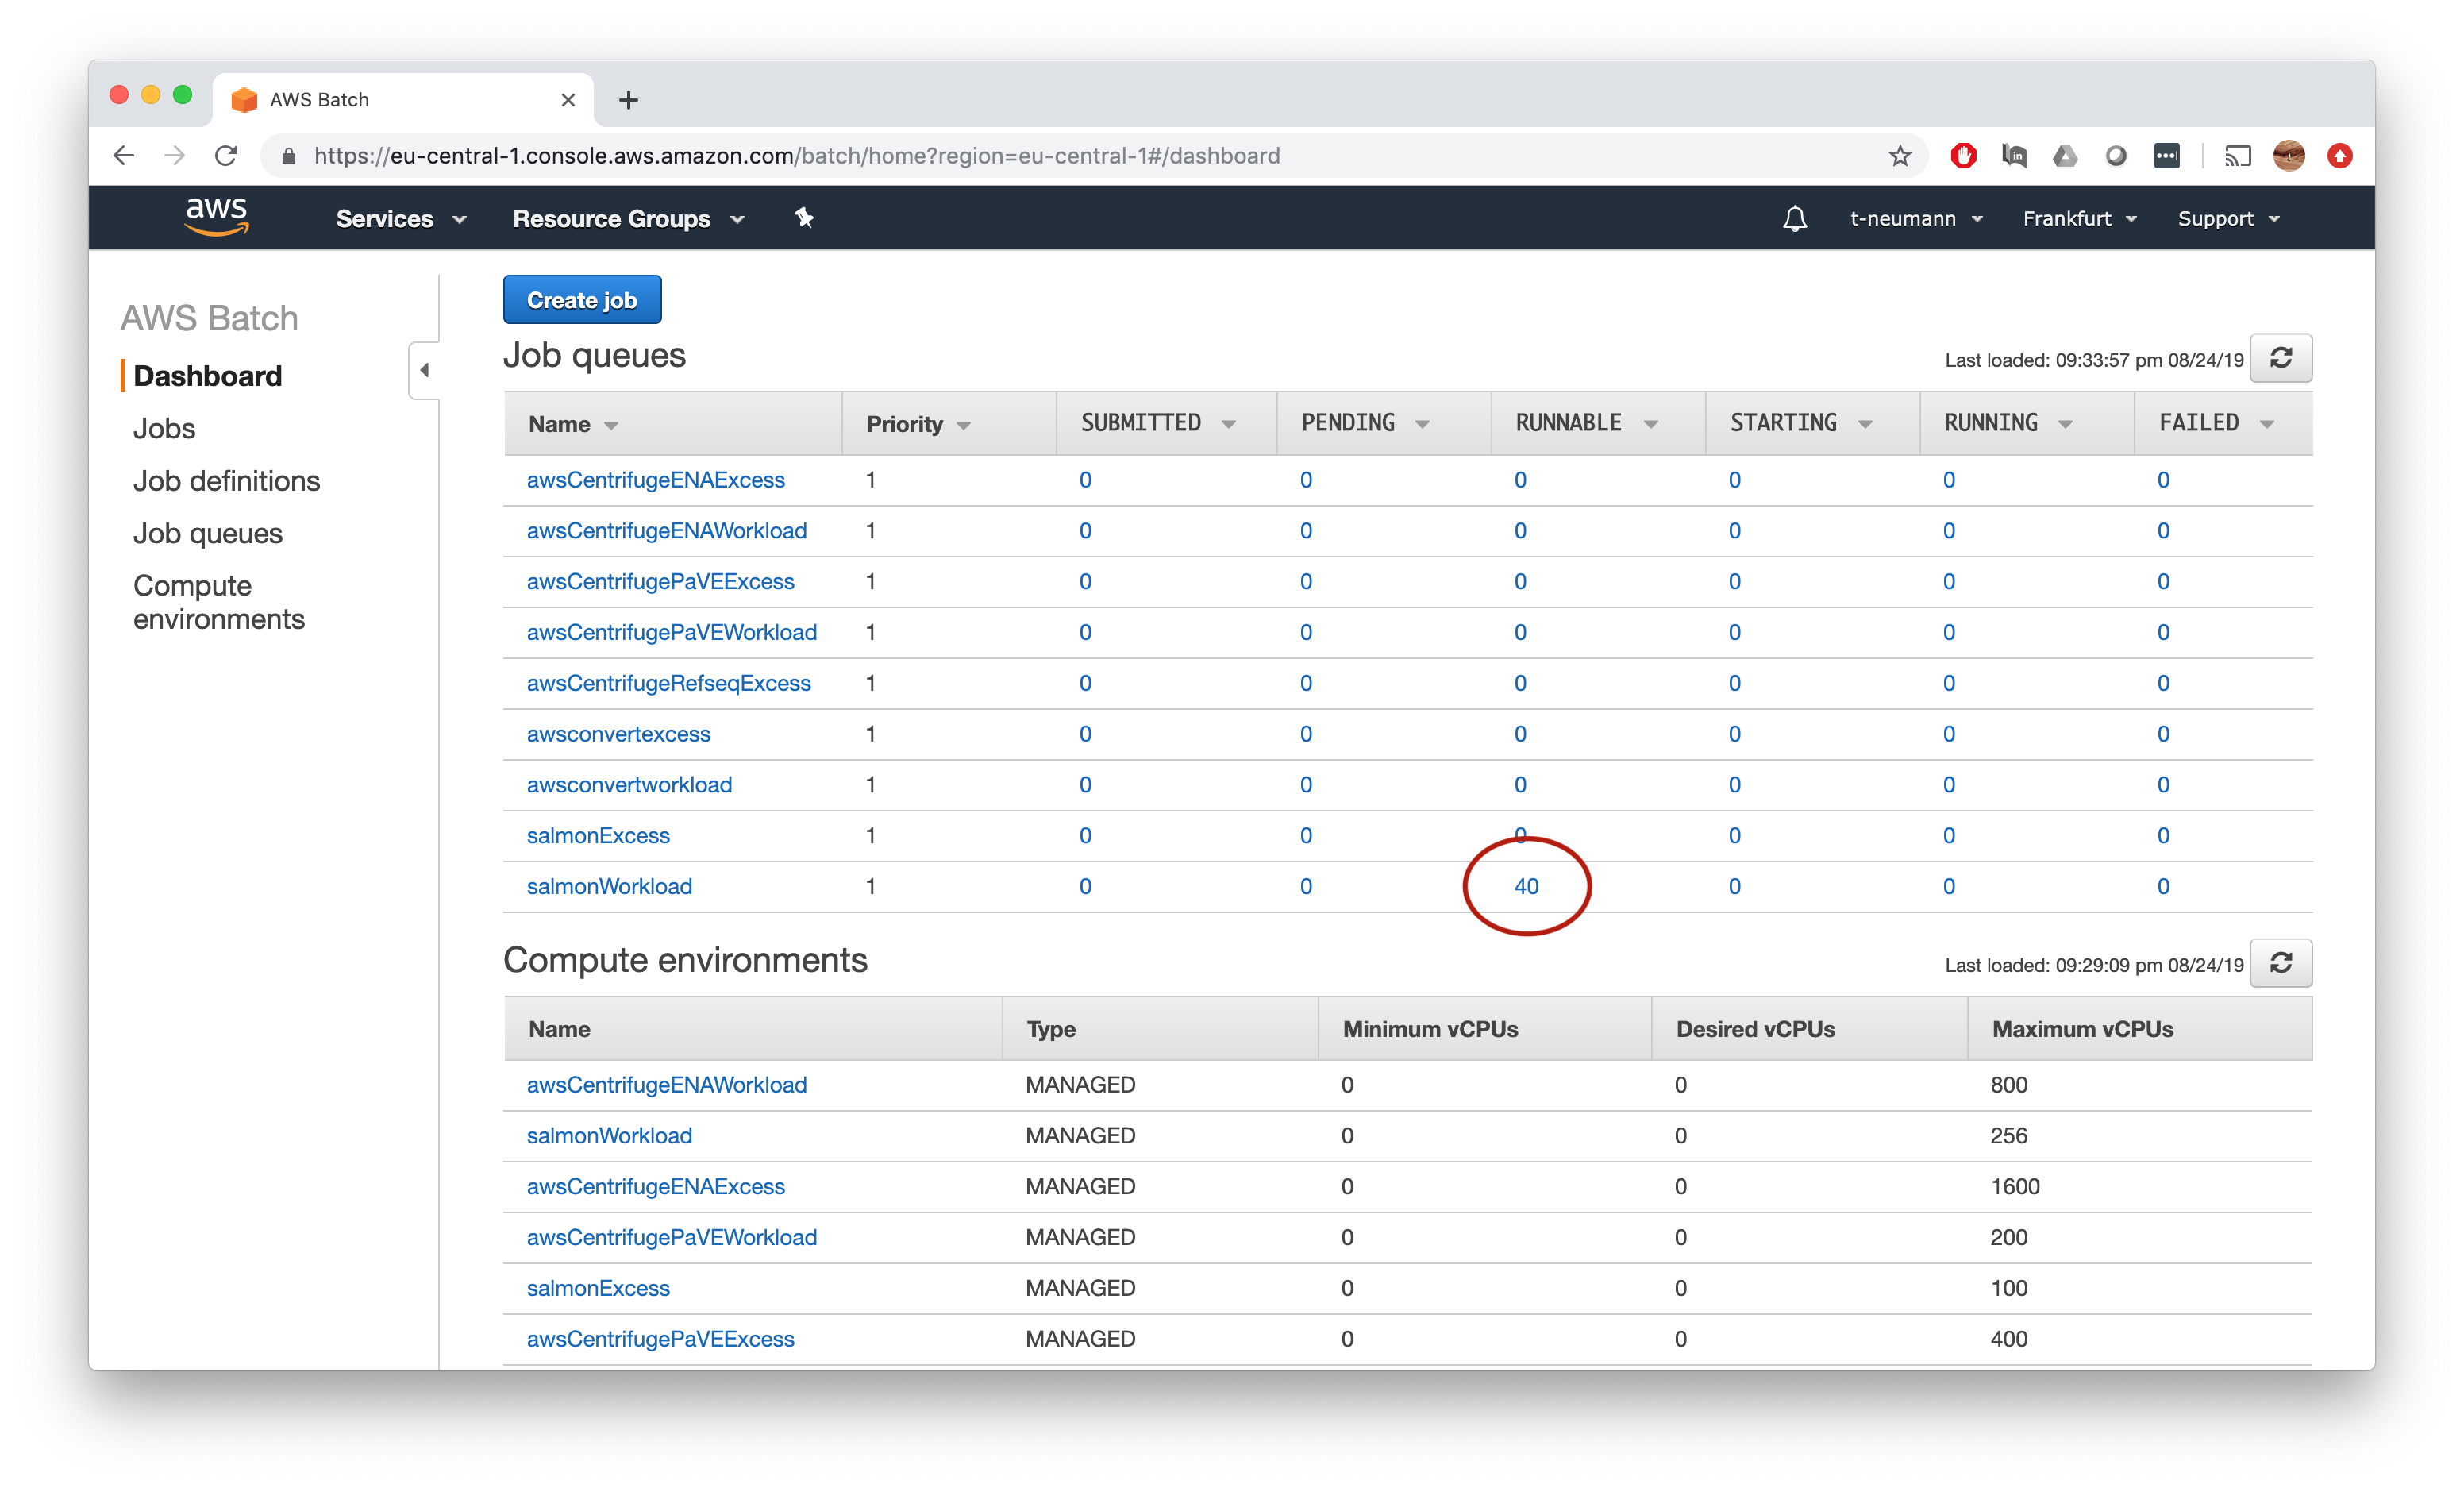
If we check one of the jobs, we will see that the environment requirements have been exactly set up as we specified in our Nextflow config which is also matched by the instance types of our job queue - so why does this not work?
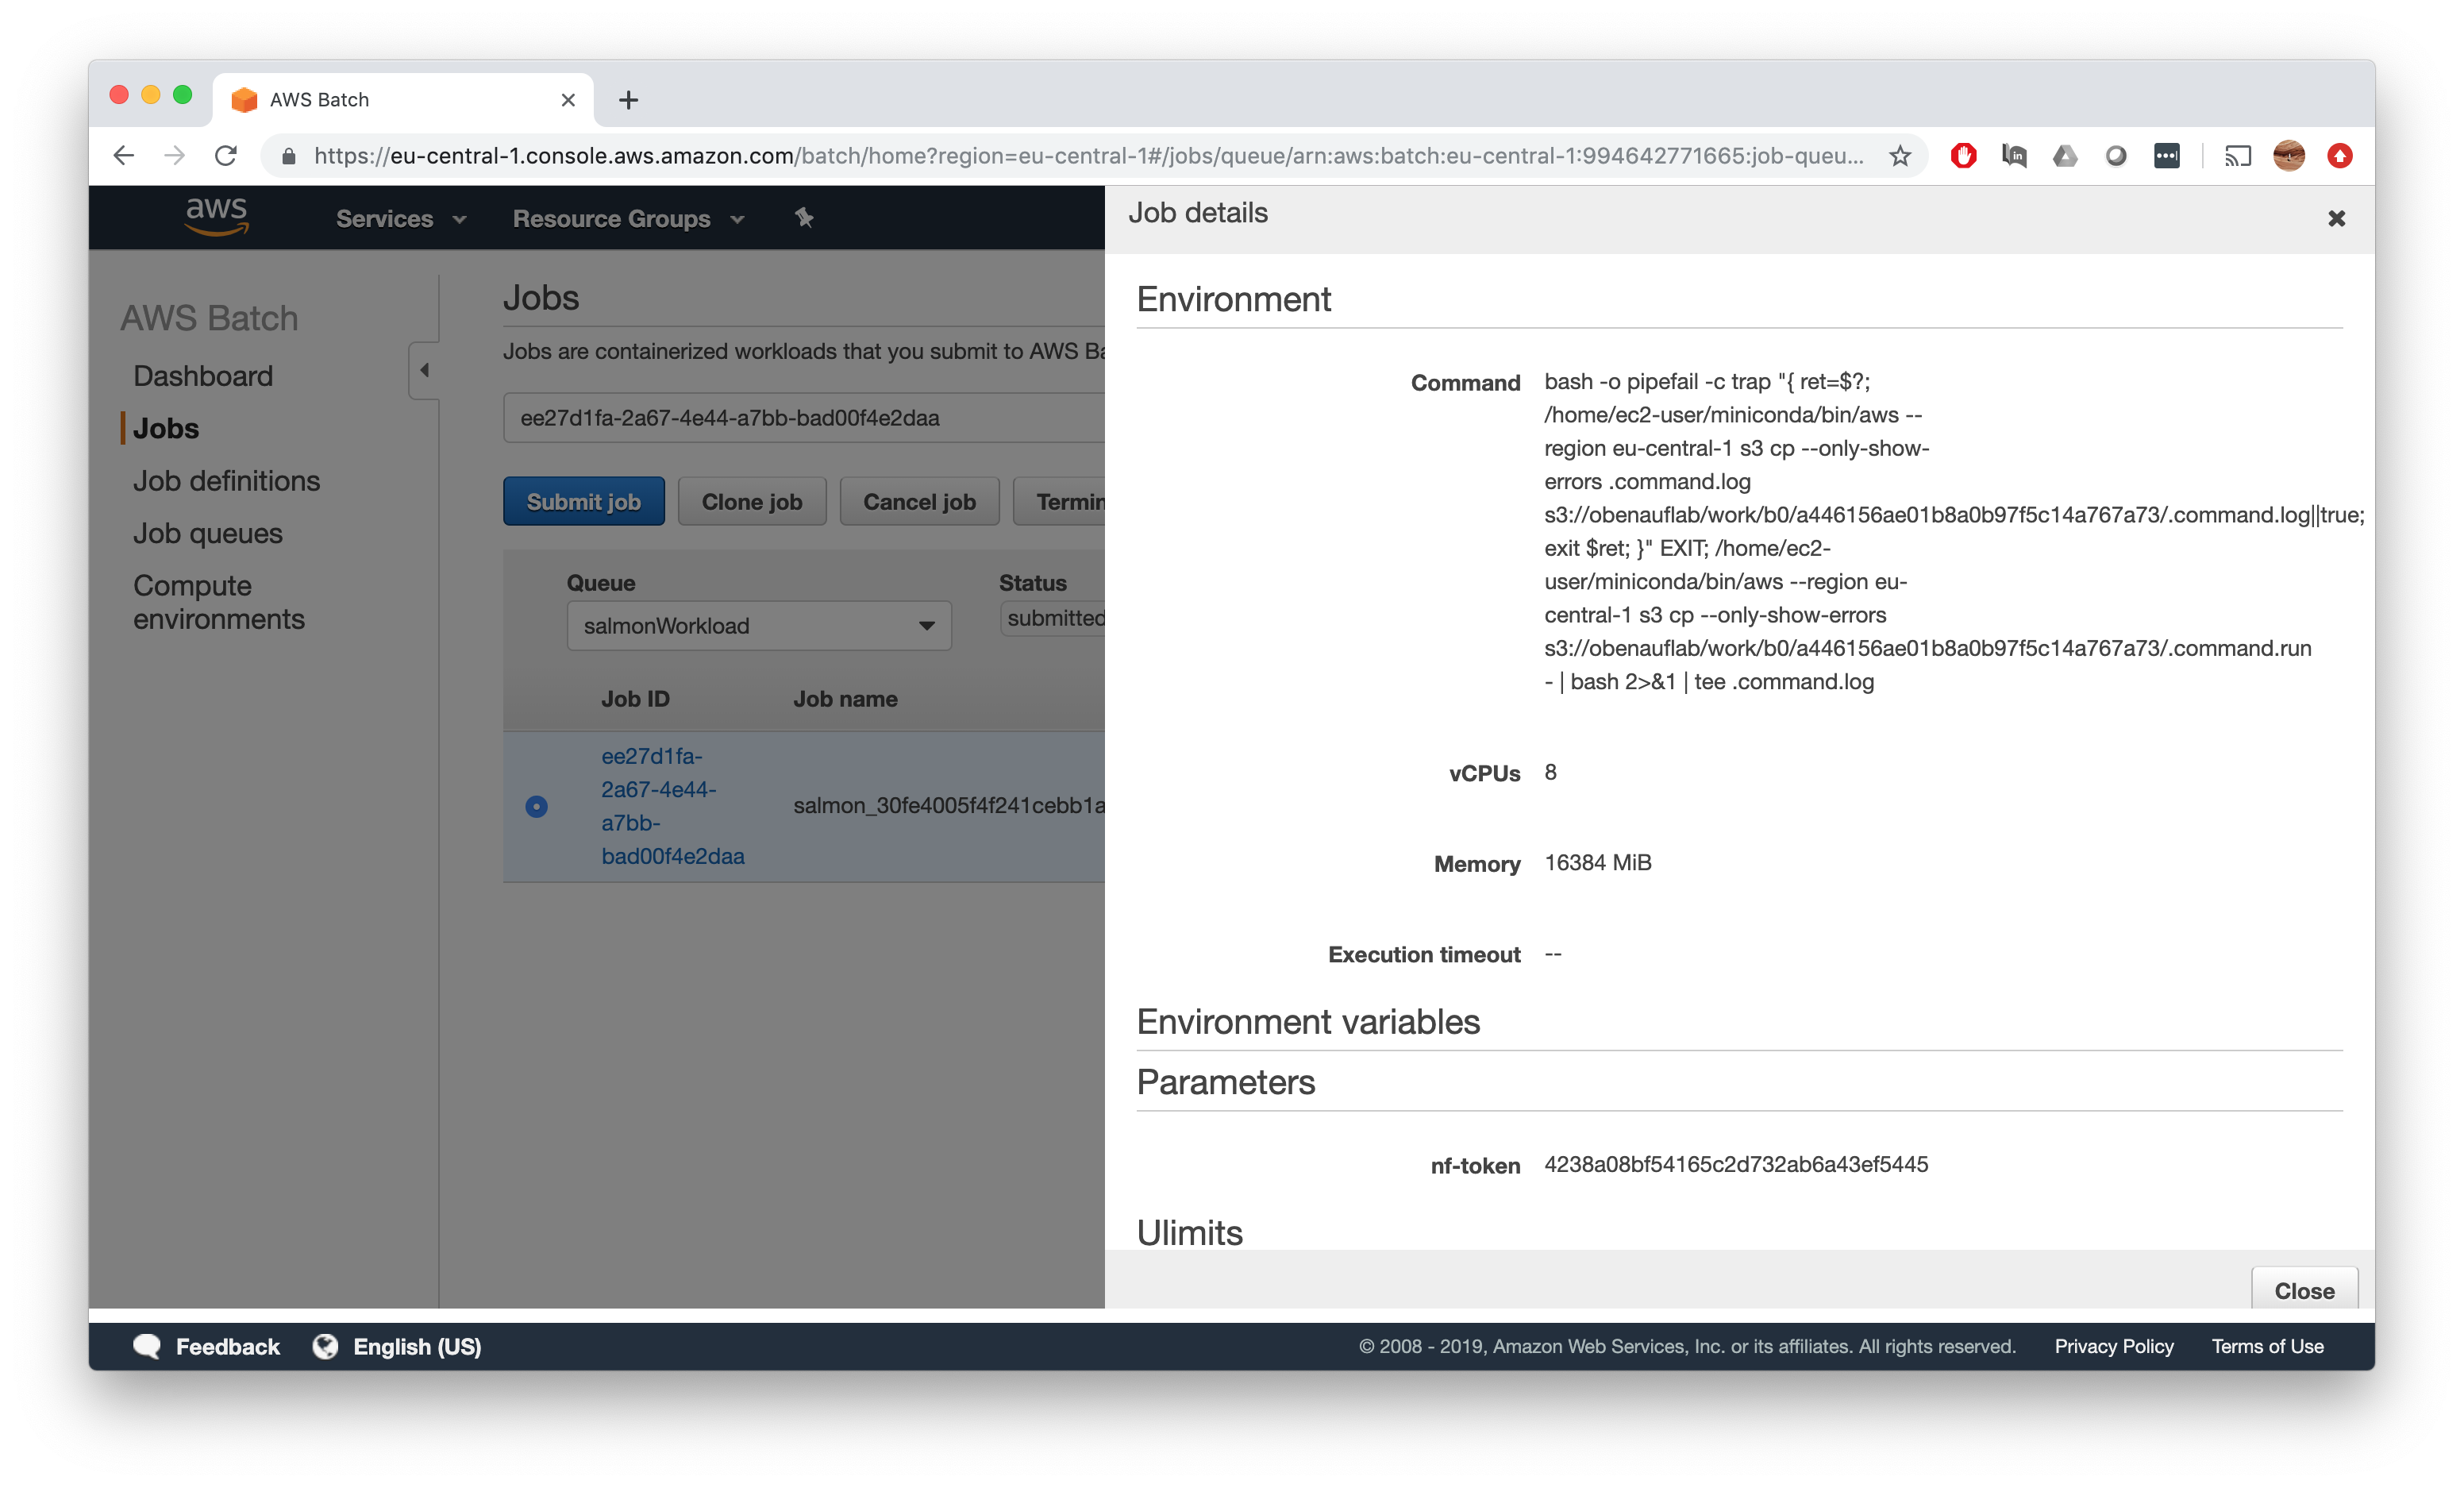
ECS overhead extraction
The solution for this is the fact, that there are overhead container services running in your instance which consume some chunk of your total available memory. So when you ask for X GB memory on an instance with X GB total memory, you have to be aware that there is Y GB memory preoccupied with service tasks, so your effective available memory will be X-Y.
To get your jobs running on such instances, you cannot request X GB memory then, but rather the X-Y chunk. How do we determine Y now?
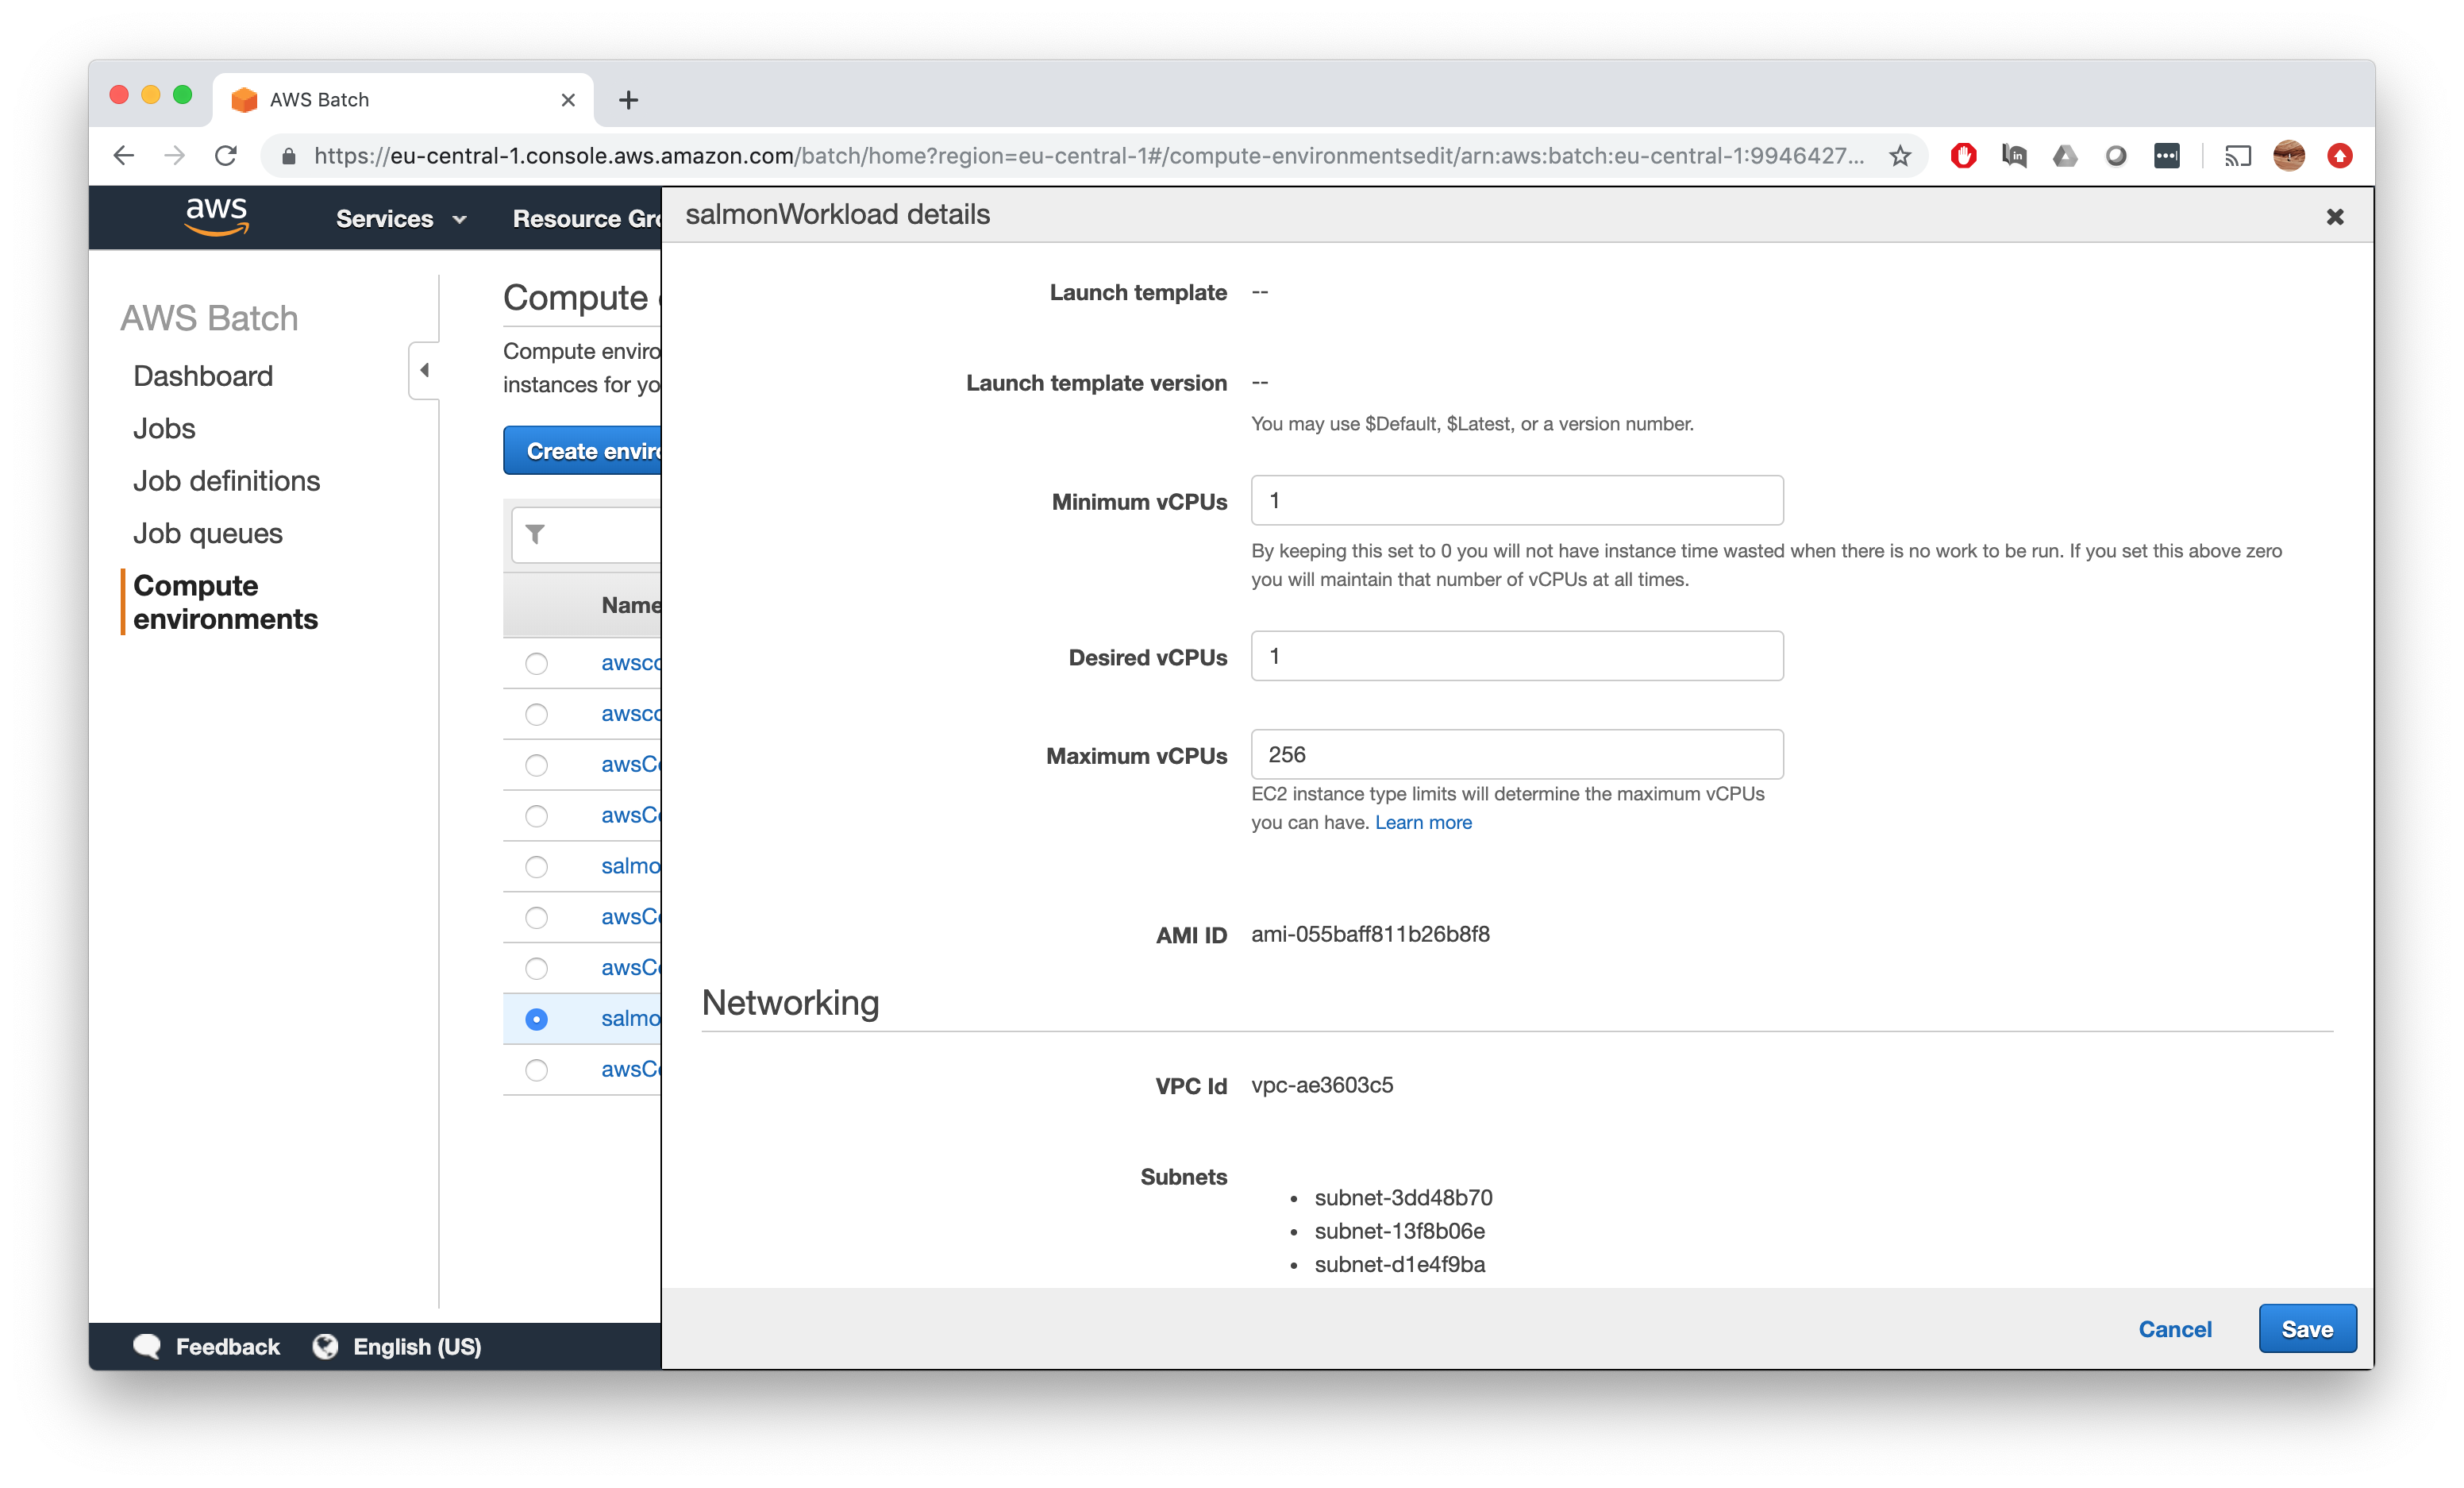
Let’s first fire up an instance of our compute environment by simply selecting our compute environment and clicking on Edit.
Now we select 1 minimum and desired vCPU to fire up one instance of the compute environment and Save.
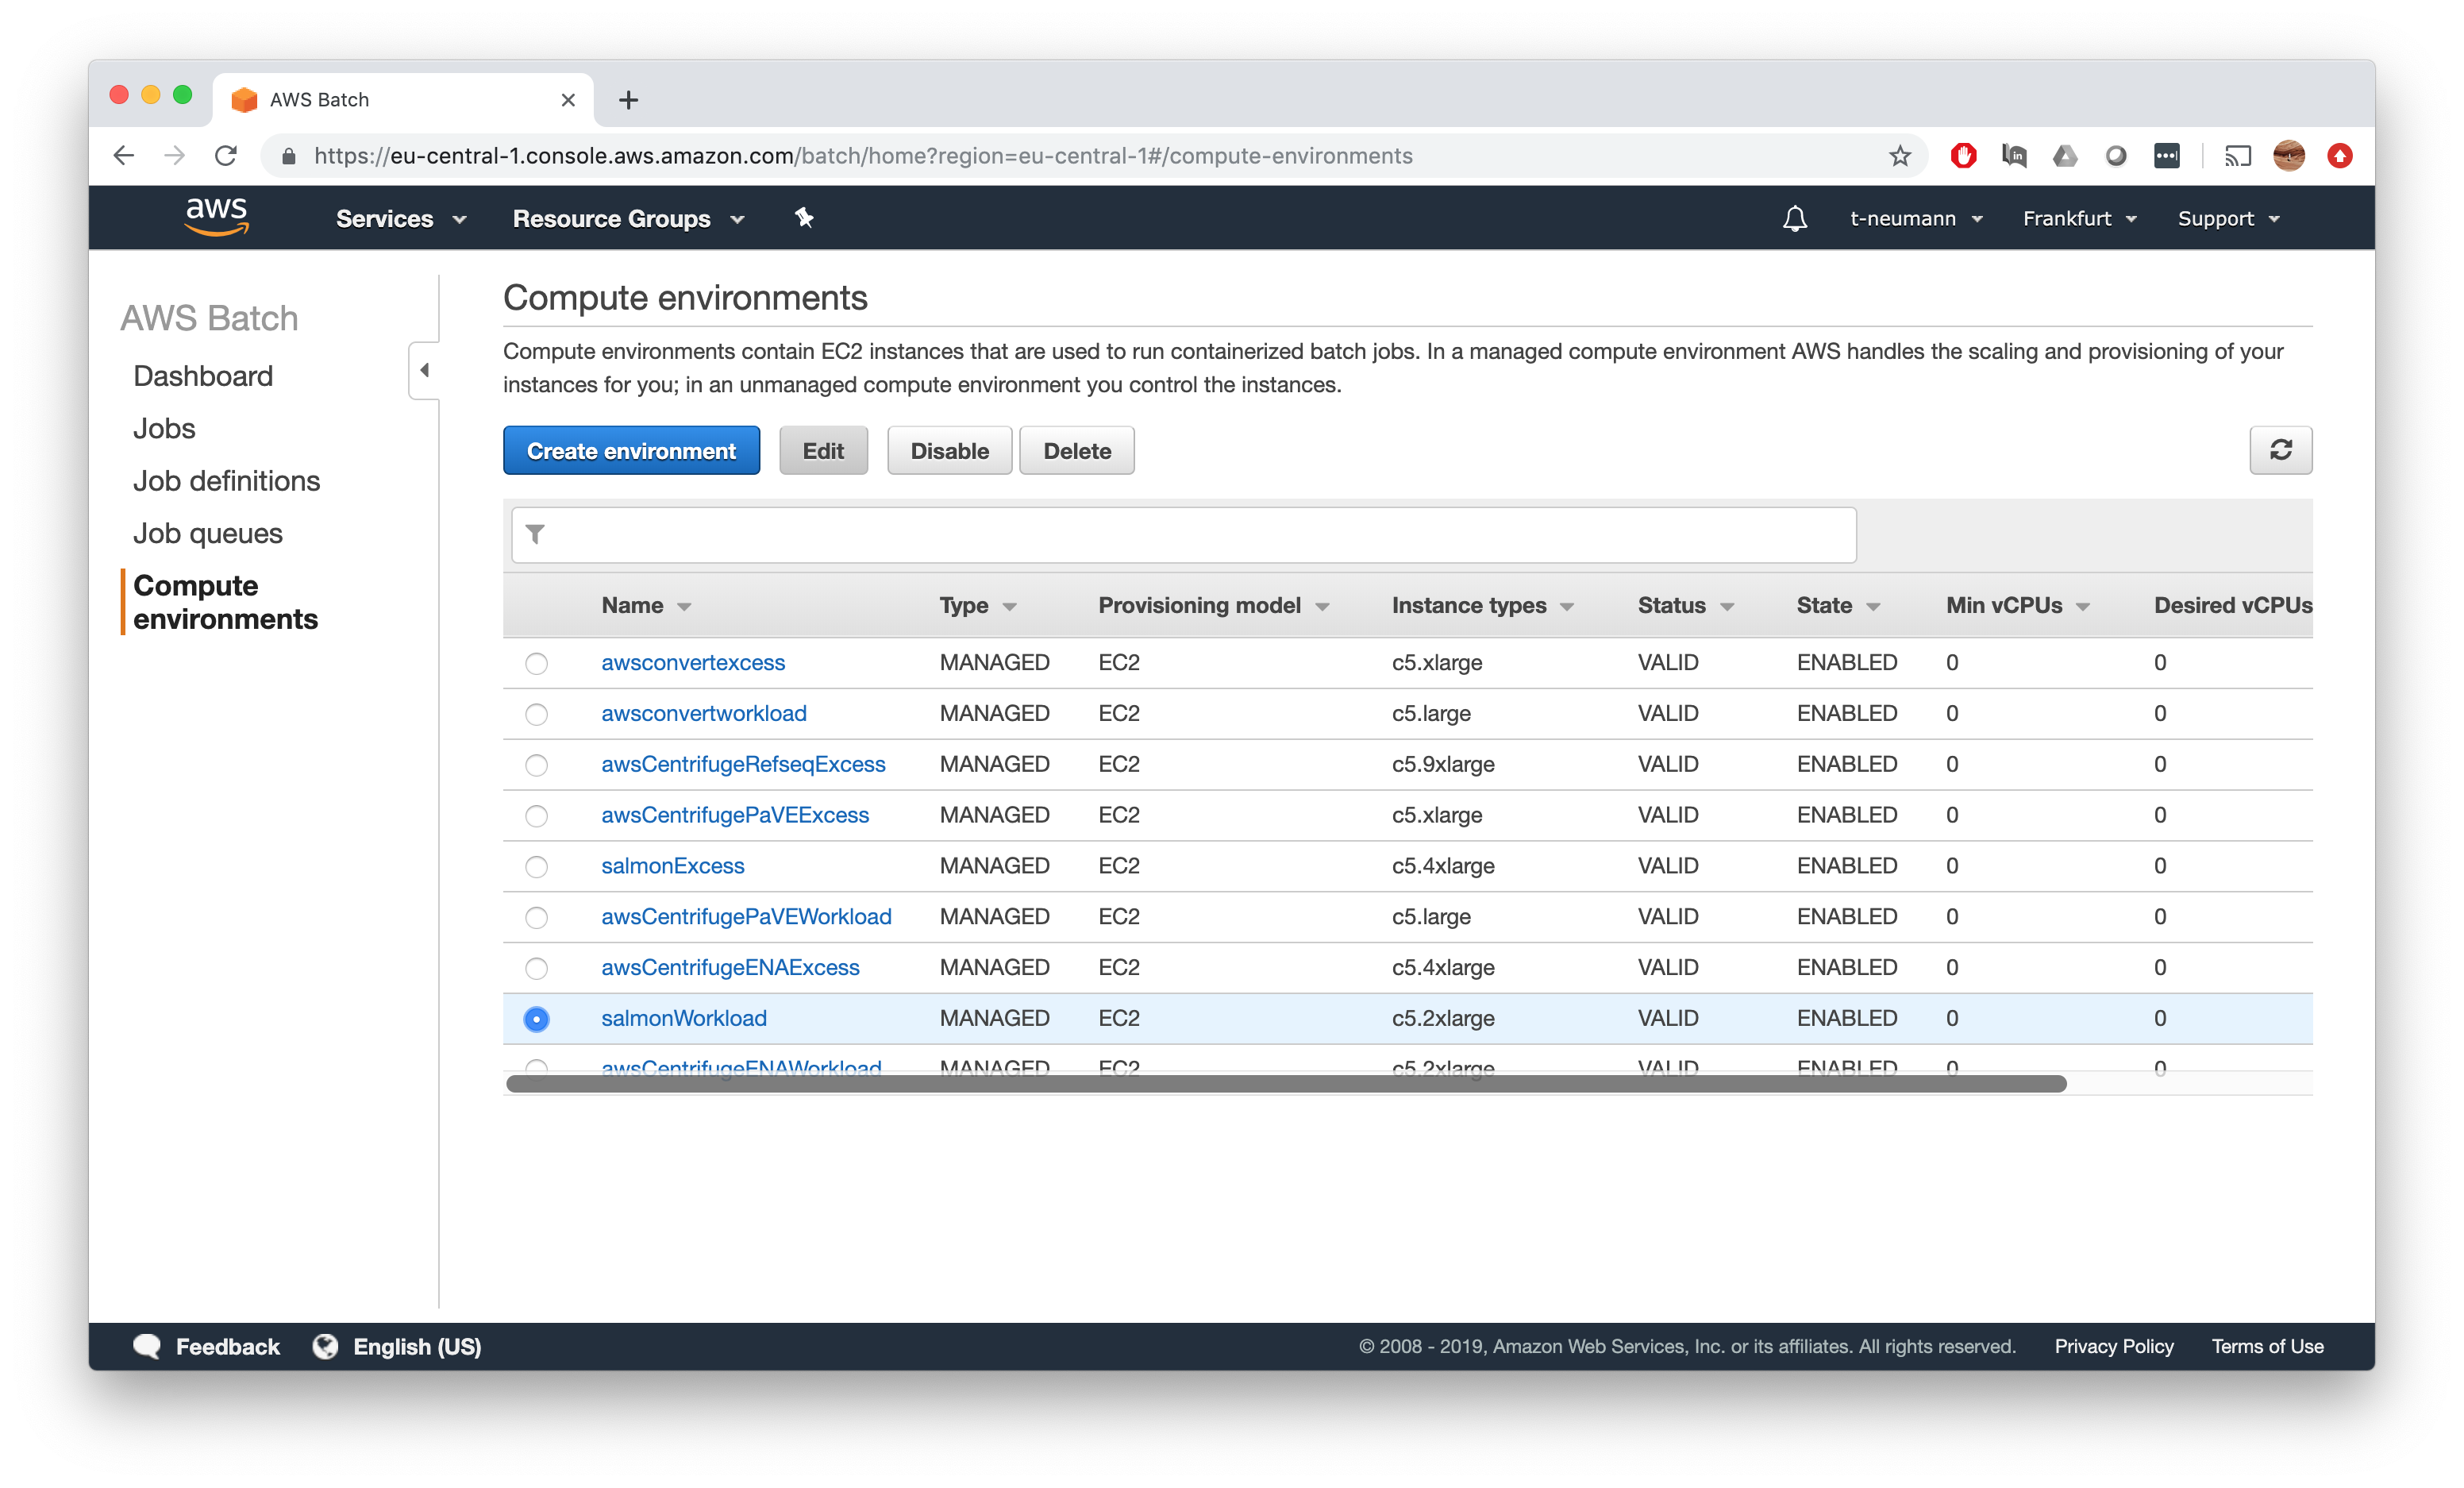
Wait a couple of minutes to let the EC2 instance fire up, then again click on your compute environment. Follow the link given in ECS Cluster name.
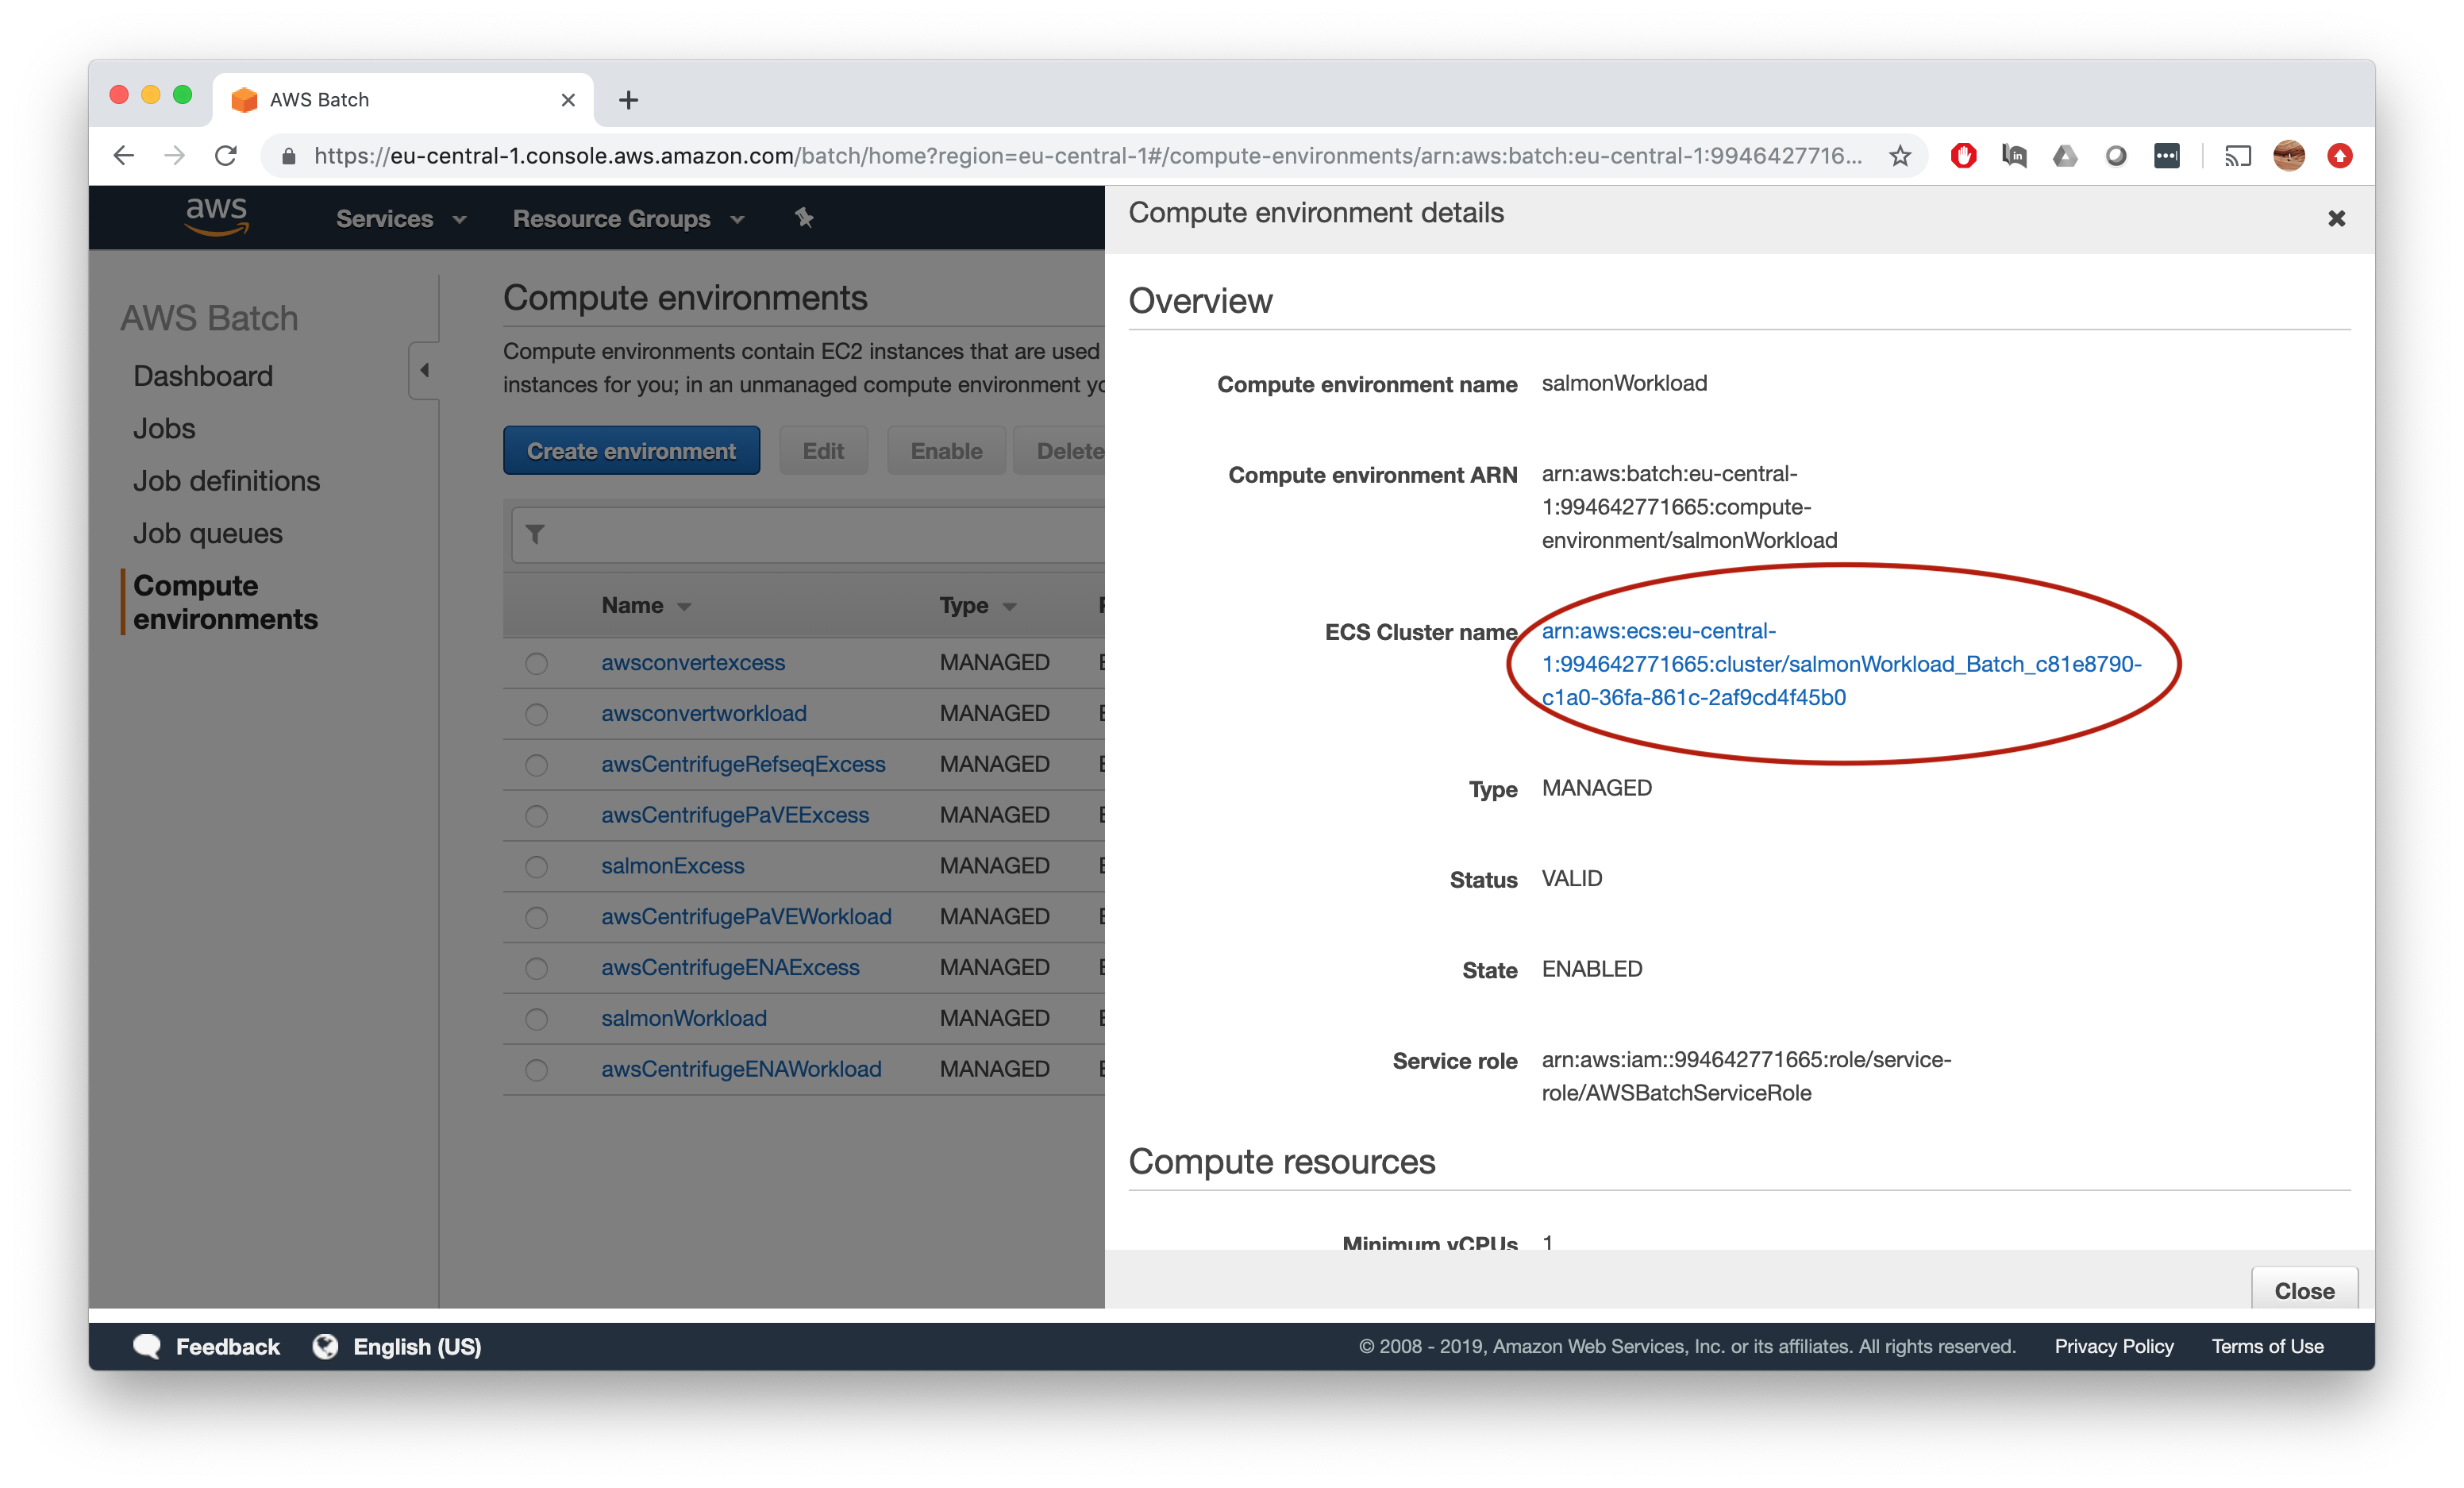
This will bring you to the cluster overview page, where you need to click on ECS instances.
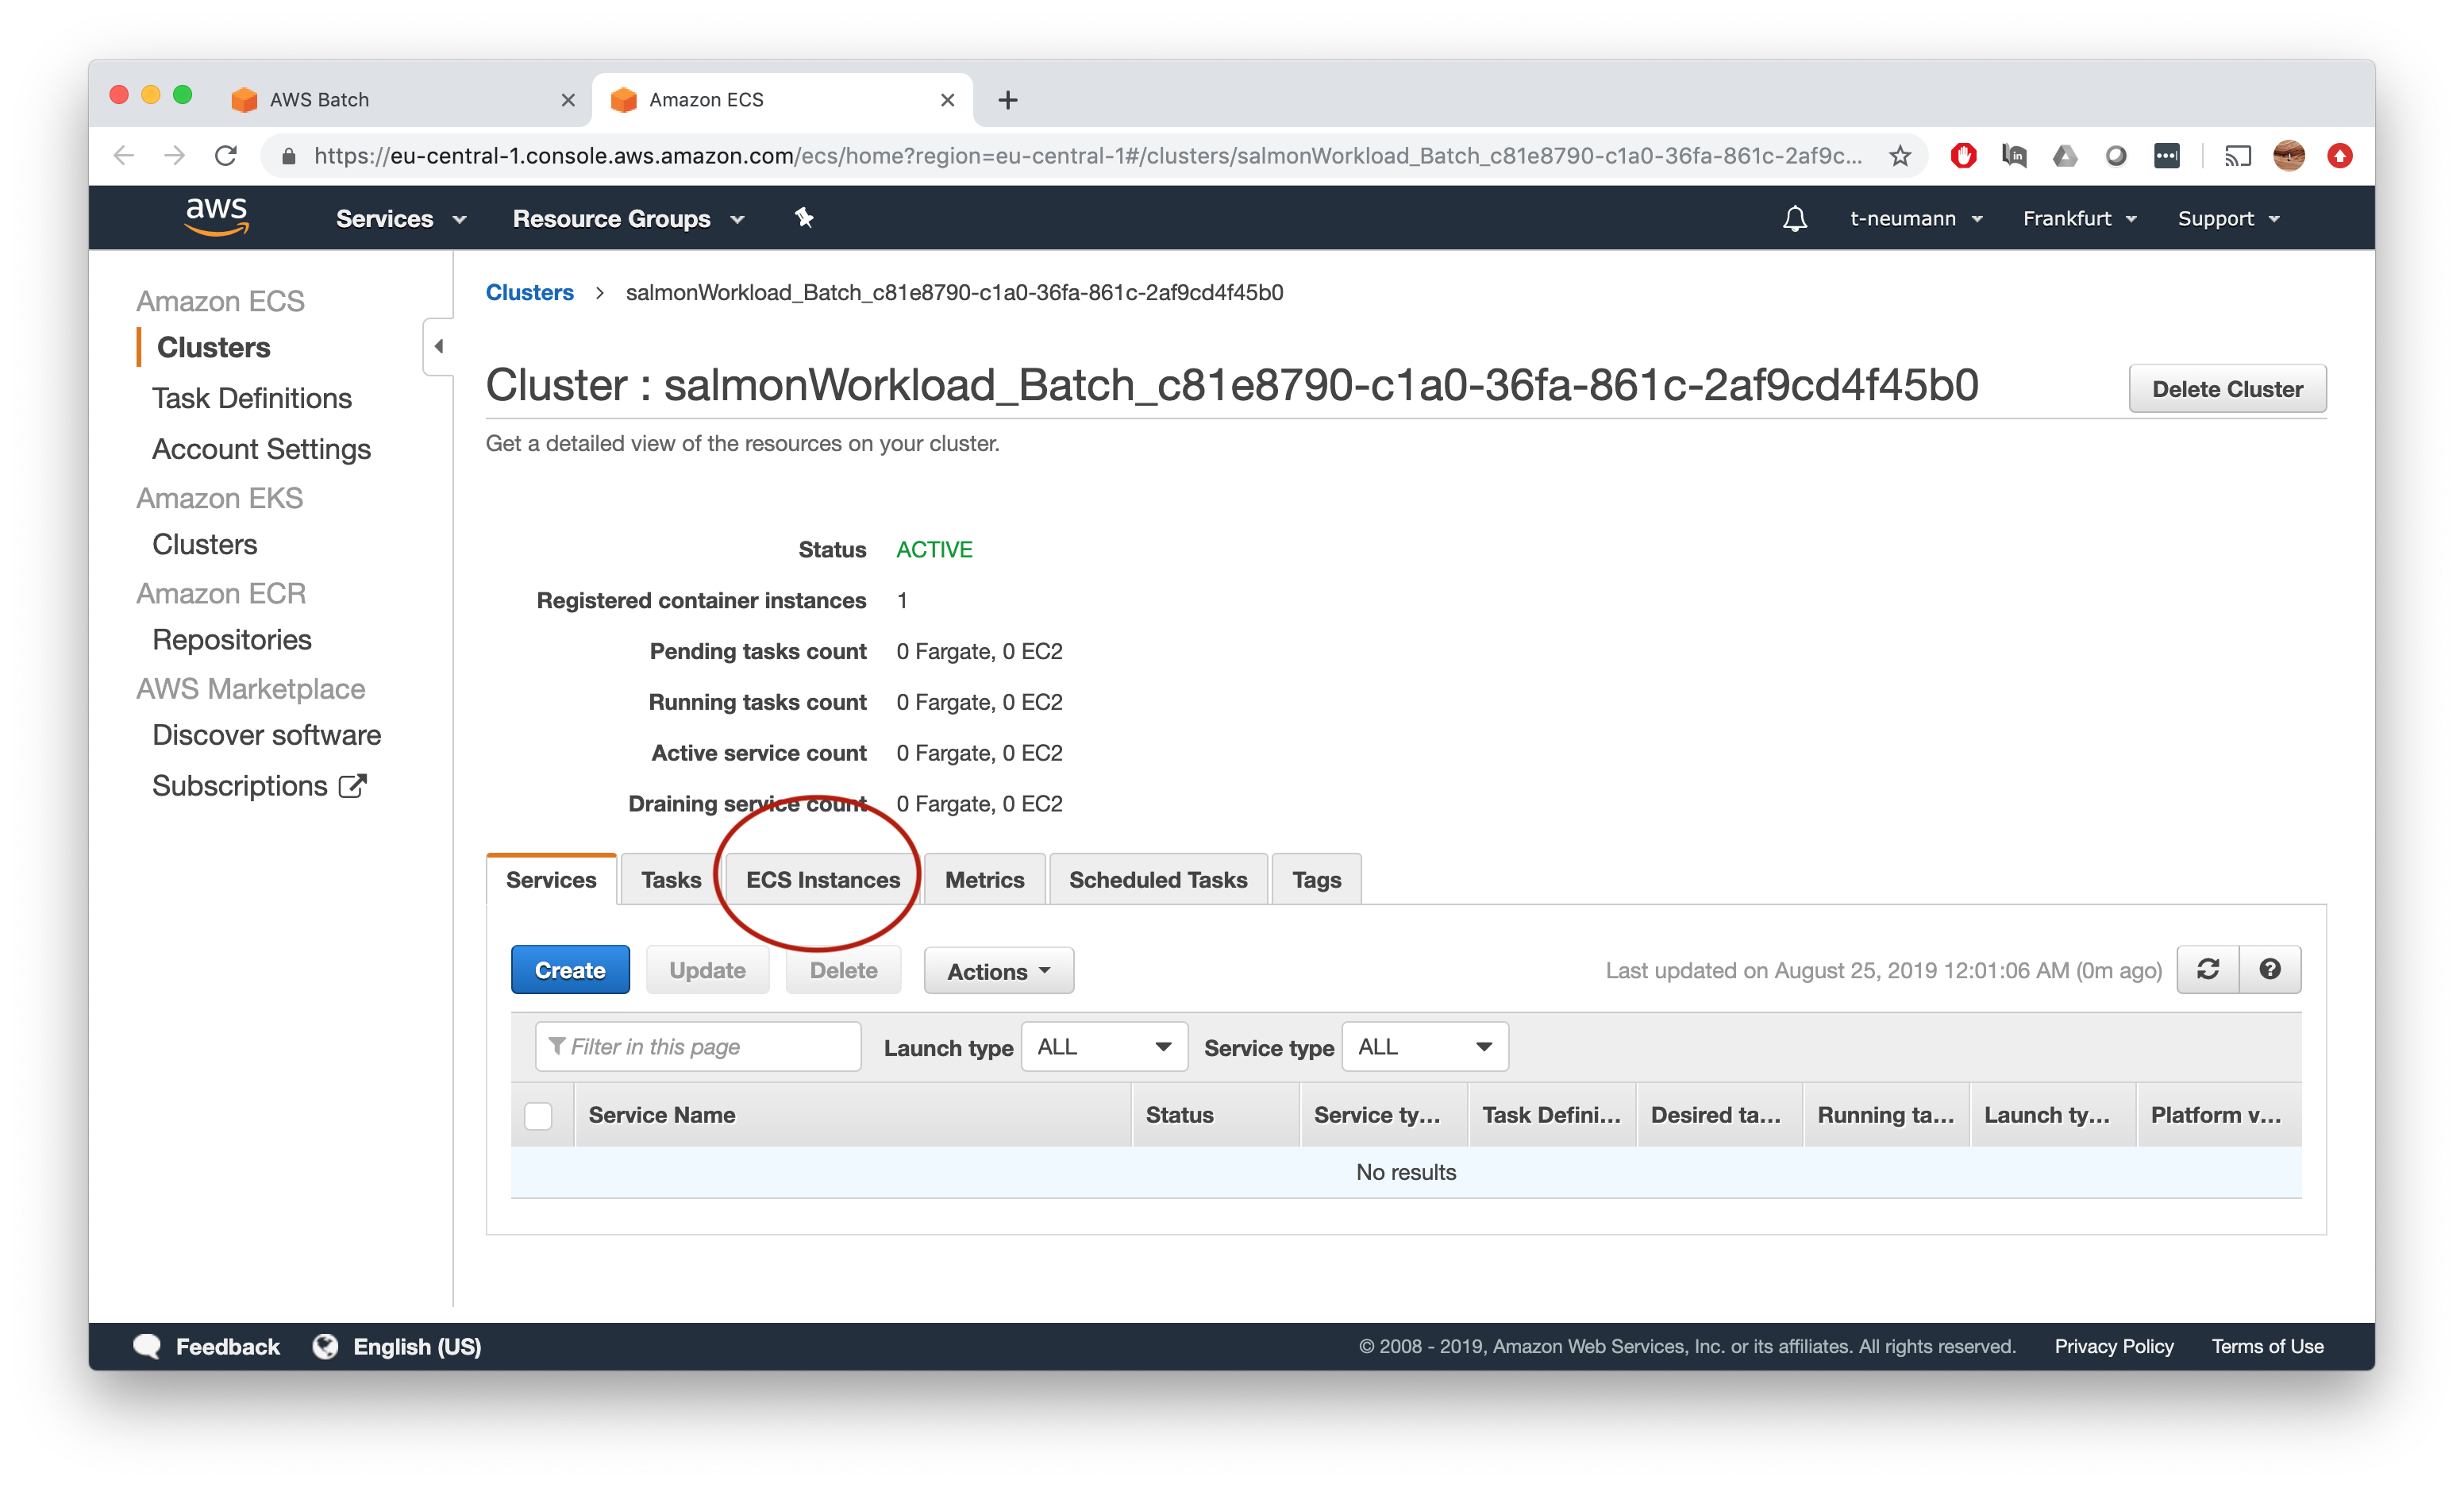
Now finally we get what we want - the actual amount of memory available on a given instance on this ECS cluster.

According to the ECS tab, we have 15,434 MB memory available on our salmonWorkload queue - repeat the same procedure to get the numbers for our salmonExcess queue.
Updated resource definition
Having obtained the mysterious actual available memory X-Y on our EC2 instances of our compute environment, we can finally enter the final numbers in our awsbatch.config definition of our salmon-nf Nextflow pipeline.
aws.region = 'eu-central-1'
aws.client.storageEncryption = 'AES256'
executor.name = 'awsbatch'
executor.awscli = '/home/ec2-user/miniconda/bin/aws'

process {

queue = {
	task.attempt > 1 ? 'salmonExcess' : 'salmonWorkload' }
	memory = { task.attempt > 1 ? 31100.MB : 15400.MB }
	cpus = { task.attempt > 1 ? 16 : 8 }
}

params {

   salmonIndex = 's3://obenauflab/indices/salmon/gencode.v28.IMPACT'

}
Finally, we are ready to testdrive our salmon-nf Nextflow pipeline on our AWS job queue!
Step 6: Running jobs with AWS Batch
Allright, now things are getting serious, just a little more preparation needed to finally run our salmon-nf Nextflow pipeline on AWS:
- Upload our index file to
s3 - Upload our input
fastqfiles tos3 - Launch a submission
EC2instance for running oursalmon-nfNextflow pipeline - Enter credentials
- Go!
Upload files to s3
To upload files to s3, I recommend you to use the AWS CLI.
For installation just follow the instructions. Important afterwards it to expose your AWS credentials which you obtained when creating your IAM user to Nextflow which can be done in 2 ways:
- Exporting the default
AWSenvironment variables
export AWS_DEFAULT_REGION=<REGION IDENTIFIER>
export AWS_ACCESS_KEY_ID=<YOUR S3 ACCESS KEY>
export AWS_SECRET_ACCESS_KEY=<YOUR S3 SECRET KEY>
- Specify your credentials in the Nextflow configuration file
aws {
    region = '<REGION IDENTIFIER>'
    accessKey = '<YOUR S3 ACCESS KEY>'
    secretKey = '<YOUR S3 SECRET KEY>'
}
I personally prefer option 1 to not accidentally commit and push any of my credentials to my Nextflow Github repo.
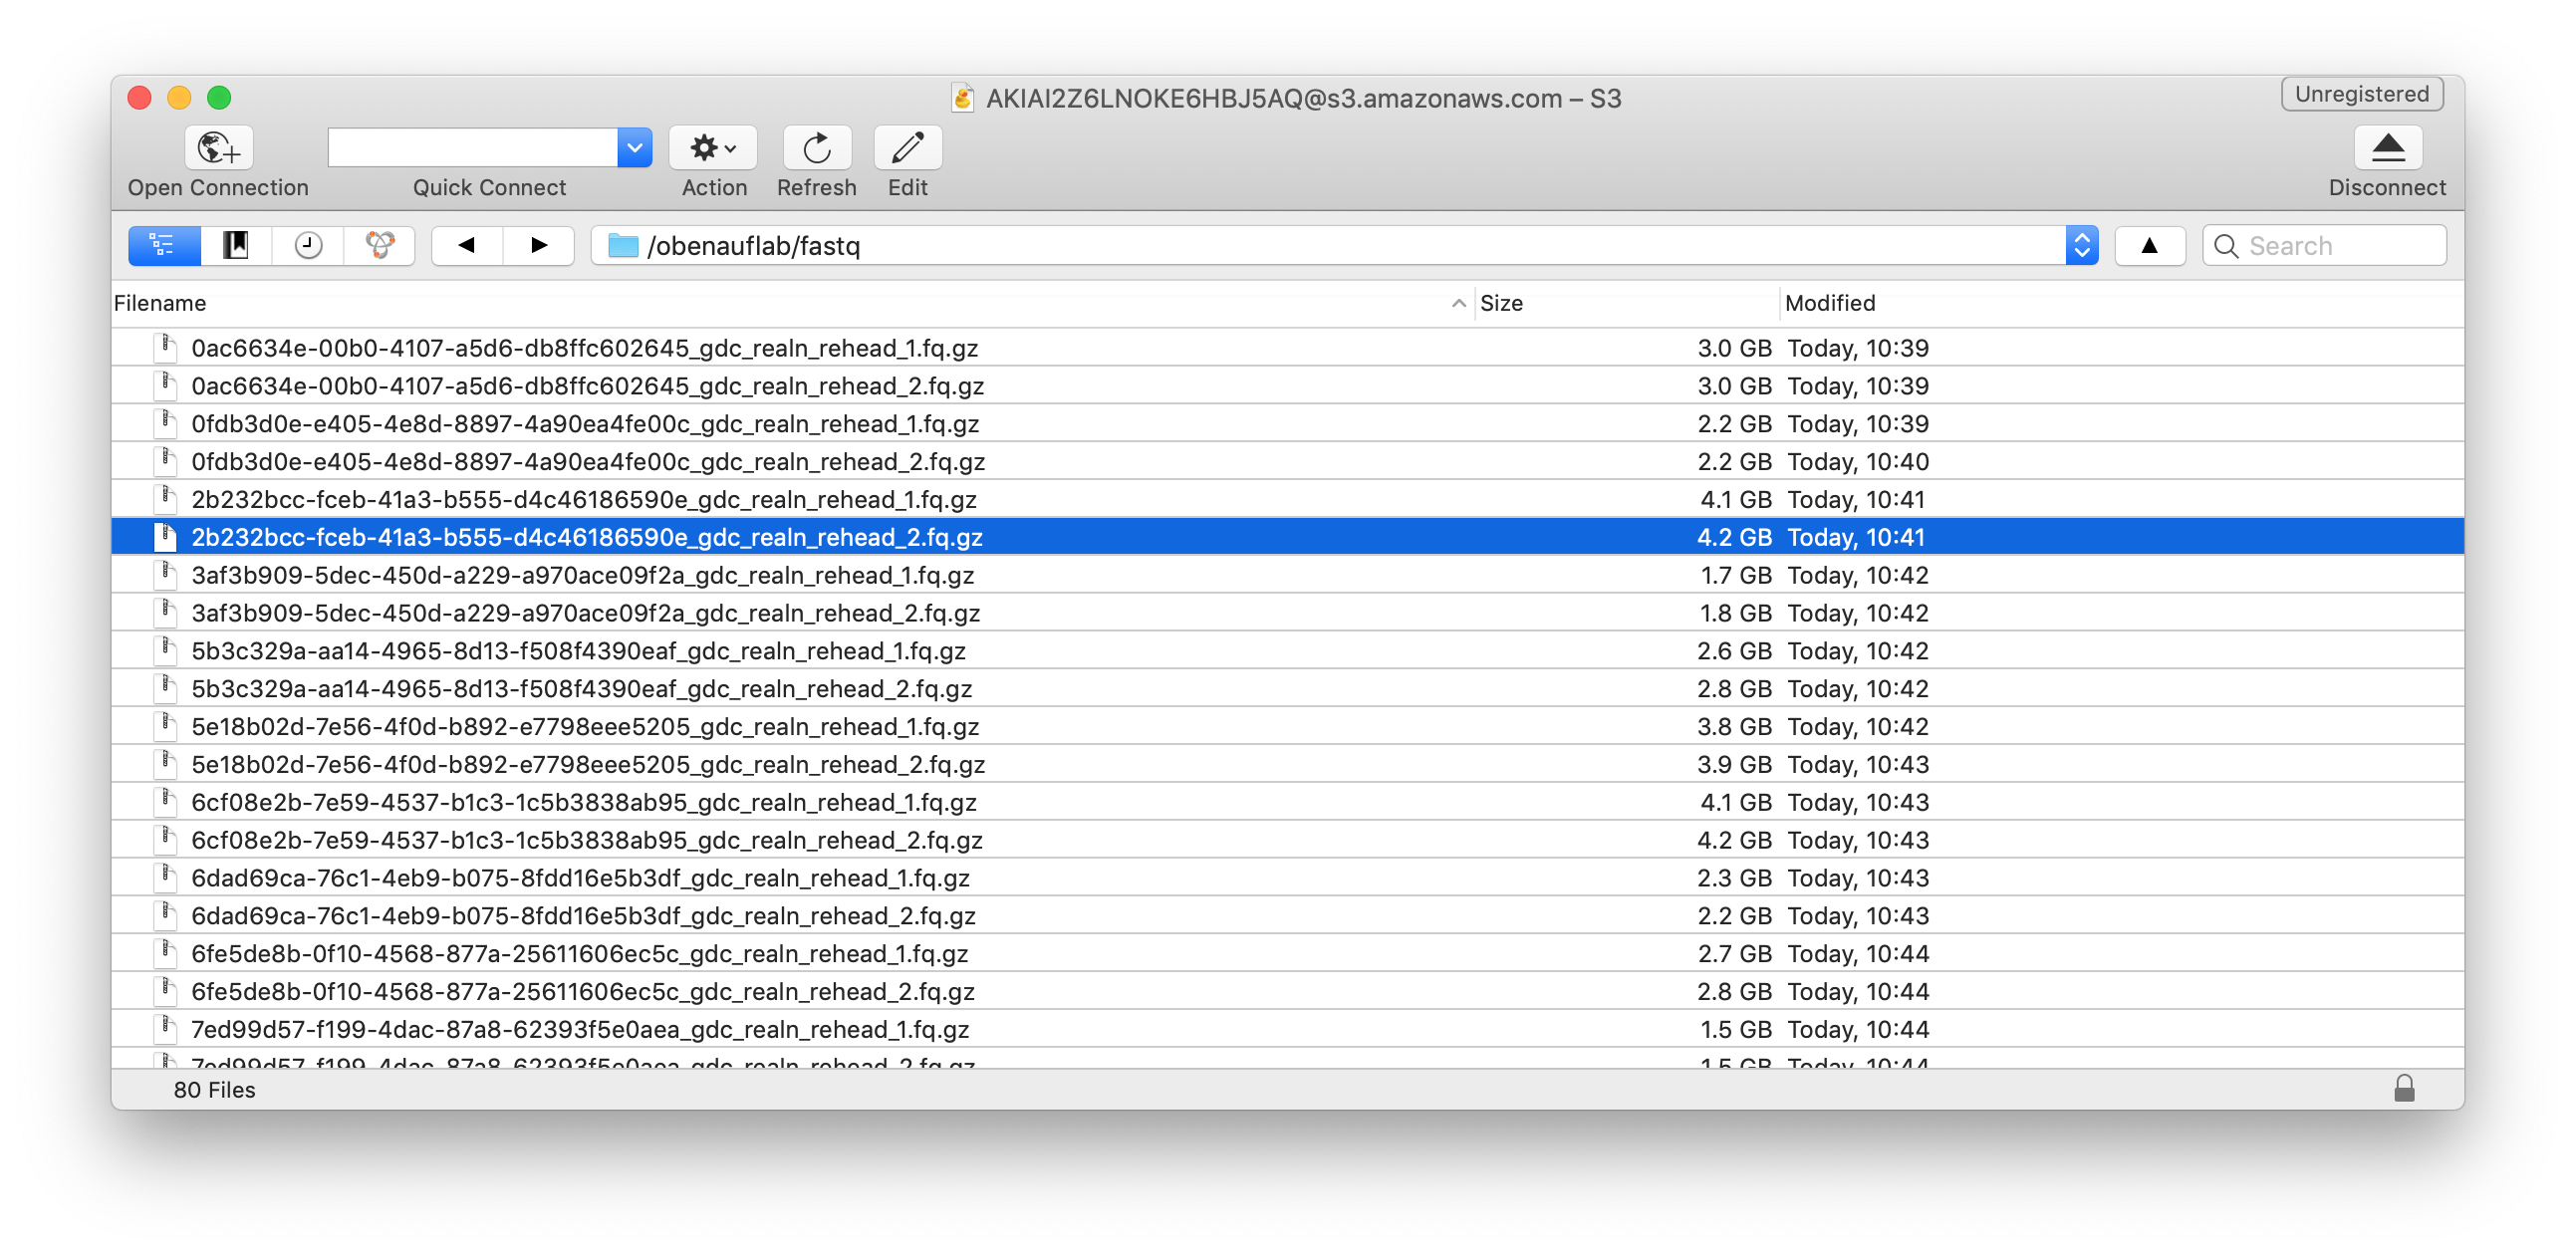
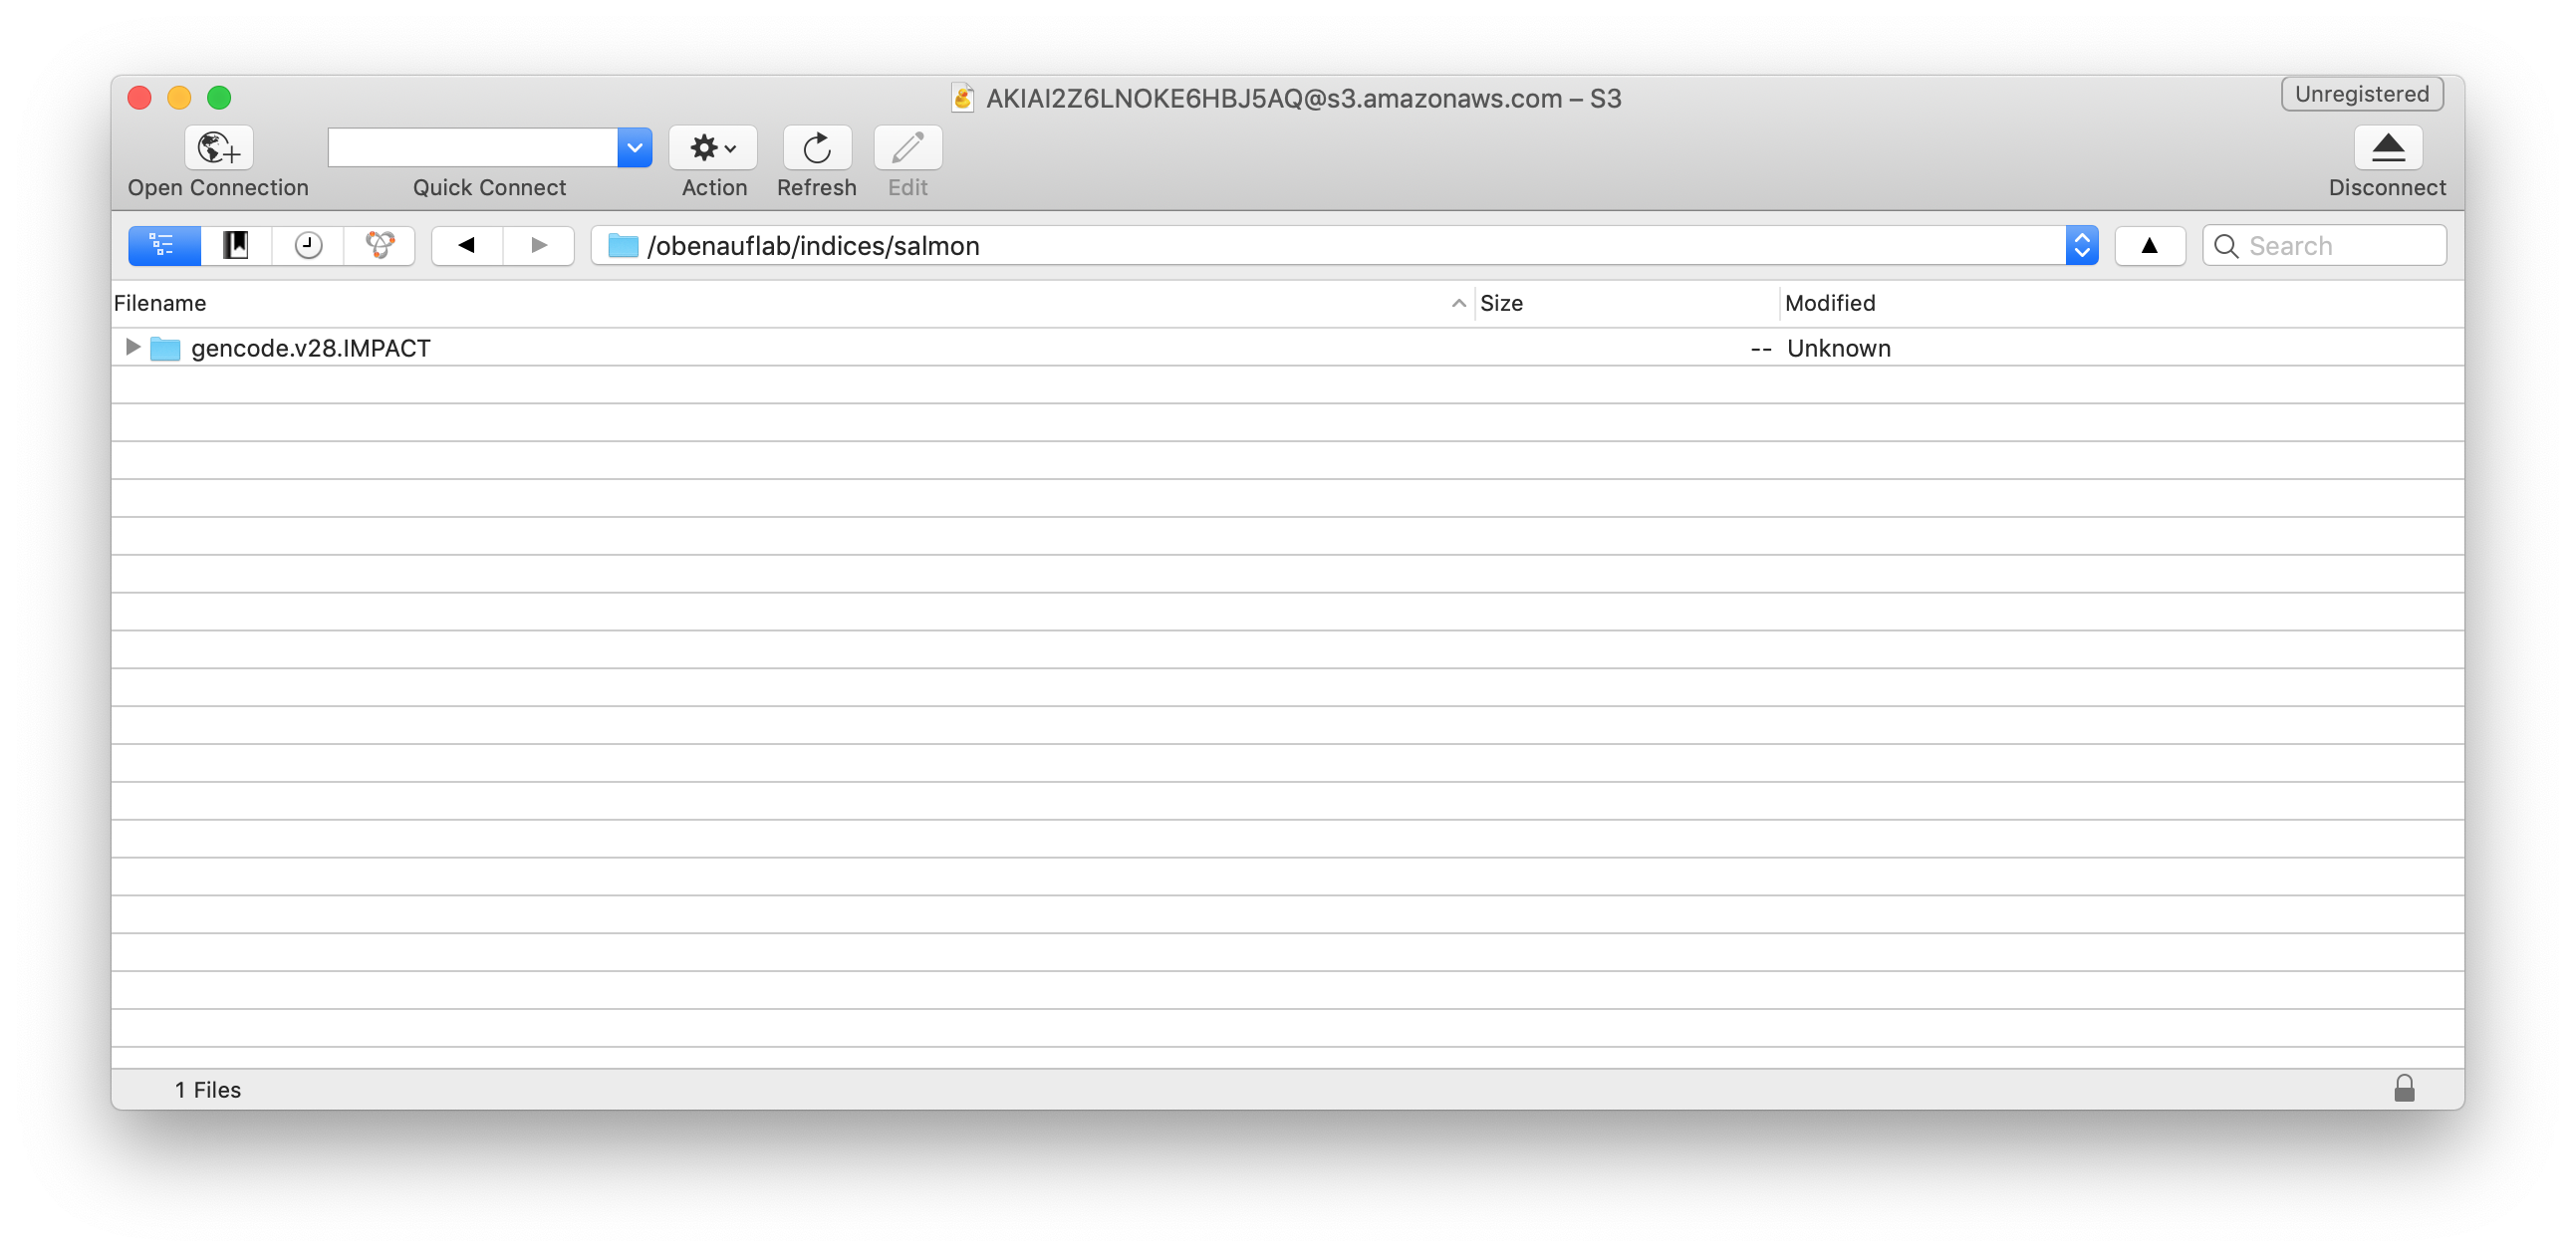
Now we can upload our fastq files to our target destination in our s3 bucket, assuming you are in the directory where your fastq files are stored:
aws s3 cp . s3://obenauflab/fastq --recursive --include "*.fq.gz"
Repeat the same with your index files to your s3 bucket destination and you now all files we need for running salmon-nf are ready. You can view them via numerous clients, I used Cyberduck for Mac. Below you will see that my 40 testsamples and index files have been uploaded in the appropriate locations in my s3 bucket.
Launch and prepare your submission instance
Finally, we need some machine where we run our Nextflow master process that submits jobs to the AWS Batch queues. You can of course to this locally on your machine or have a long running job in our HPC environment.
But for heavy, long-running workloads it definitely makes sense to have a dedicated instance to run the Nextflow process on to not run into troubles.
Fortunately, we only need a very minimal EC2 instance for this, which is available from AWS under the so-called Free Tier - meaning it’s free, yay!
So this is what we will do - first go to your EC2 dashboard and select Launch Instance.
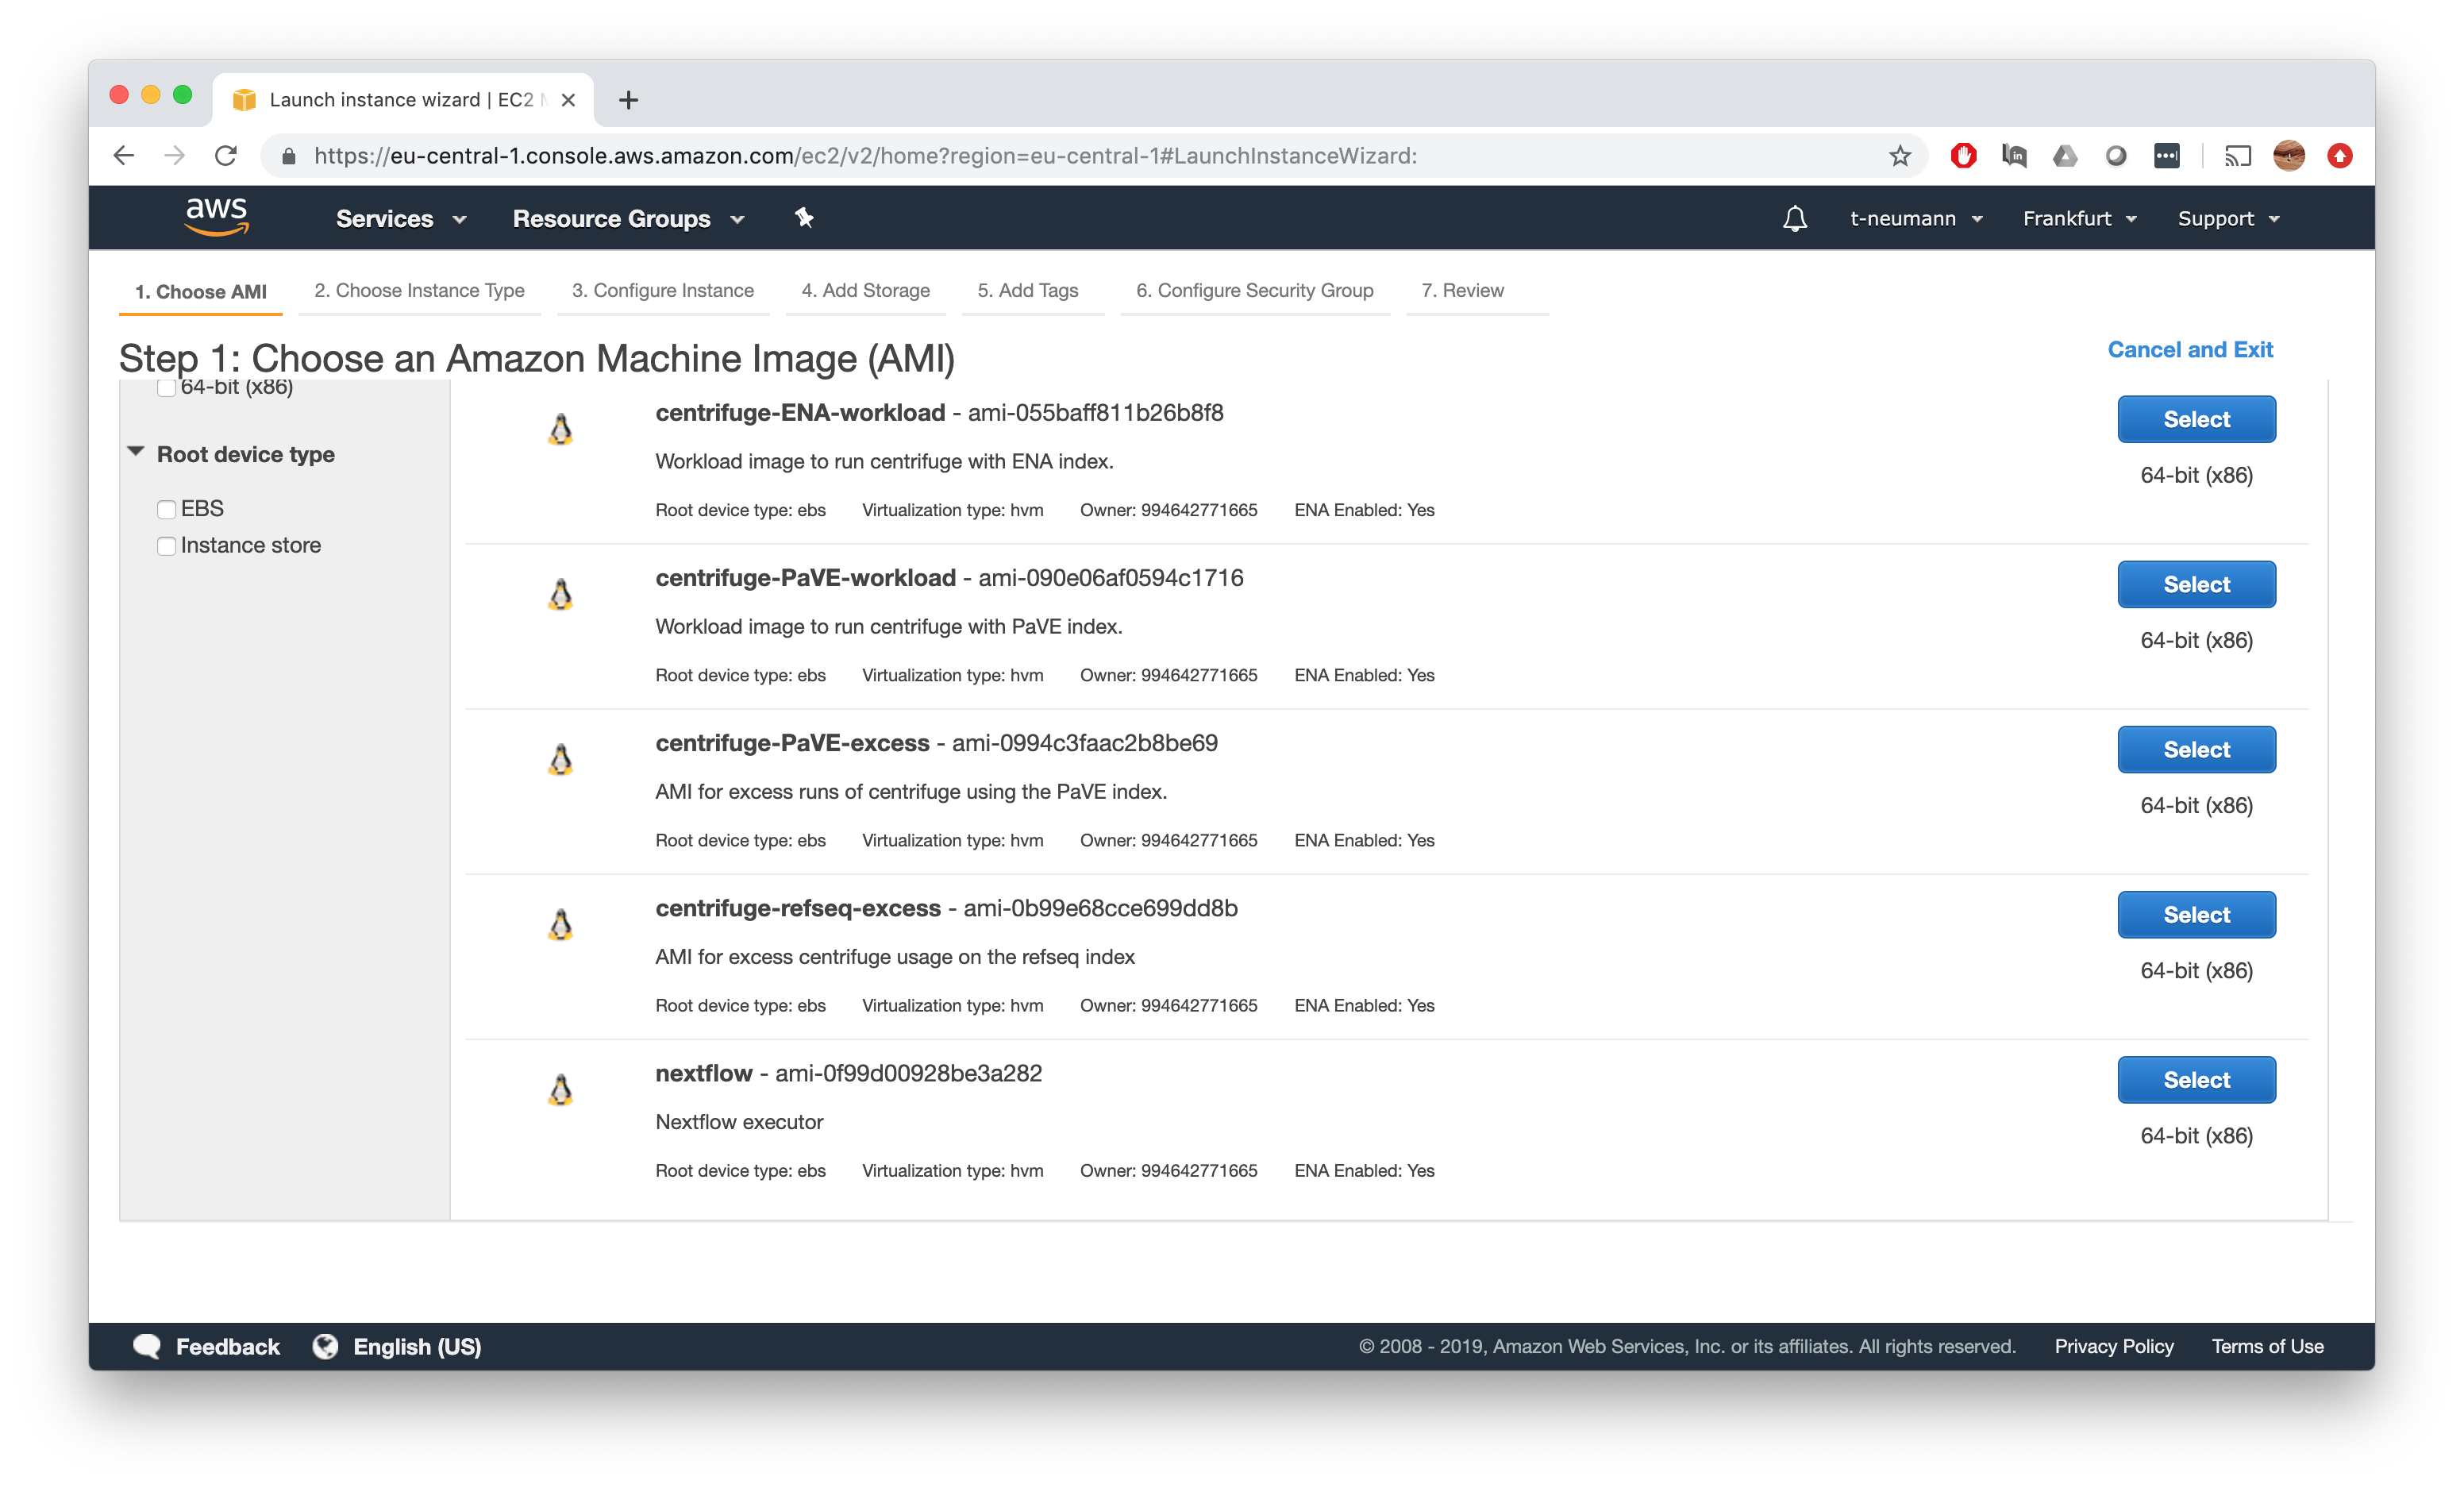
Next up, we have to select the AMI we want to run on our instance. I have already precreated a Nextflow AMI which is simply an AMI created as in Step 2, where I in addition installed Java 8 and Nextflow.
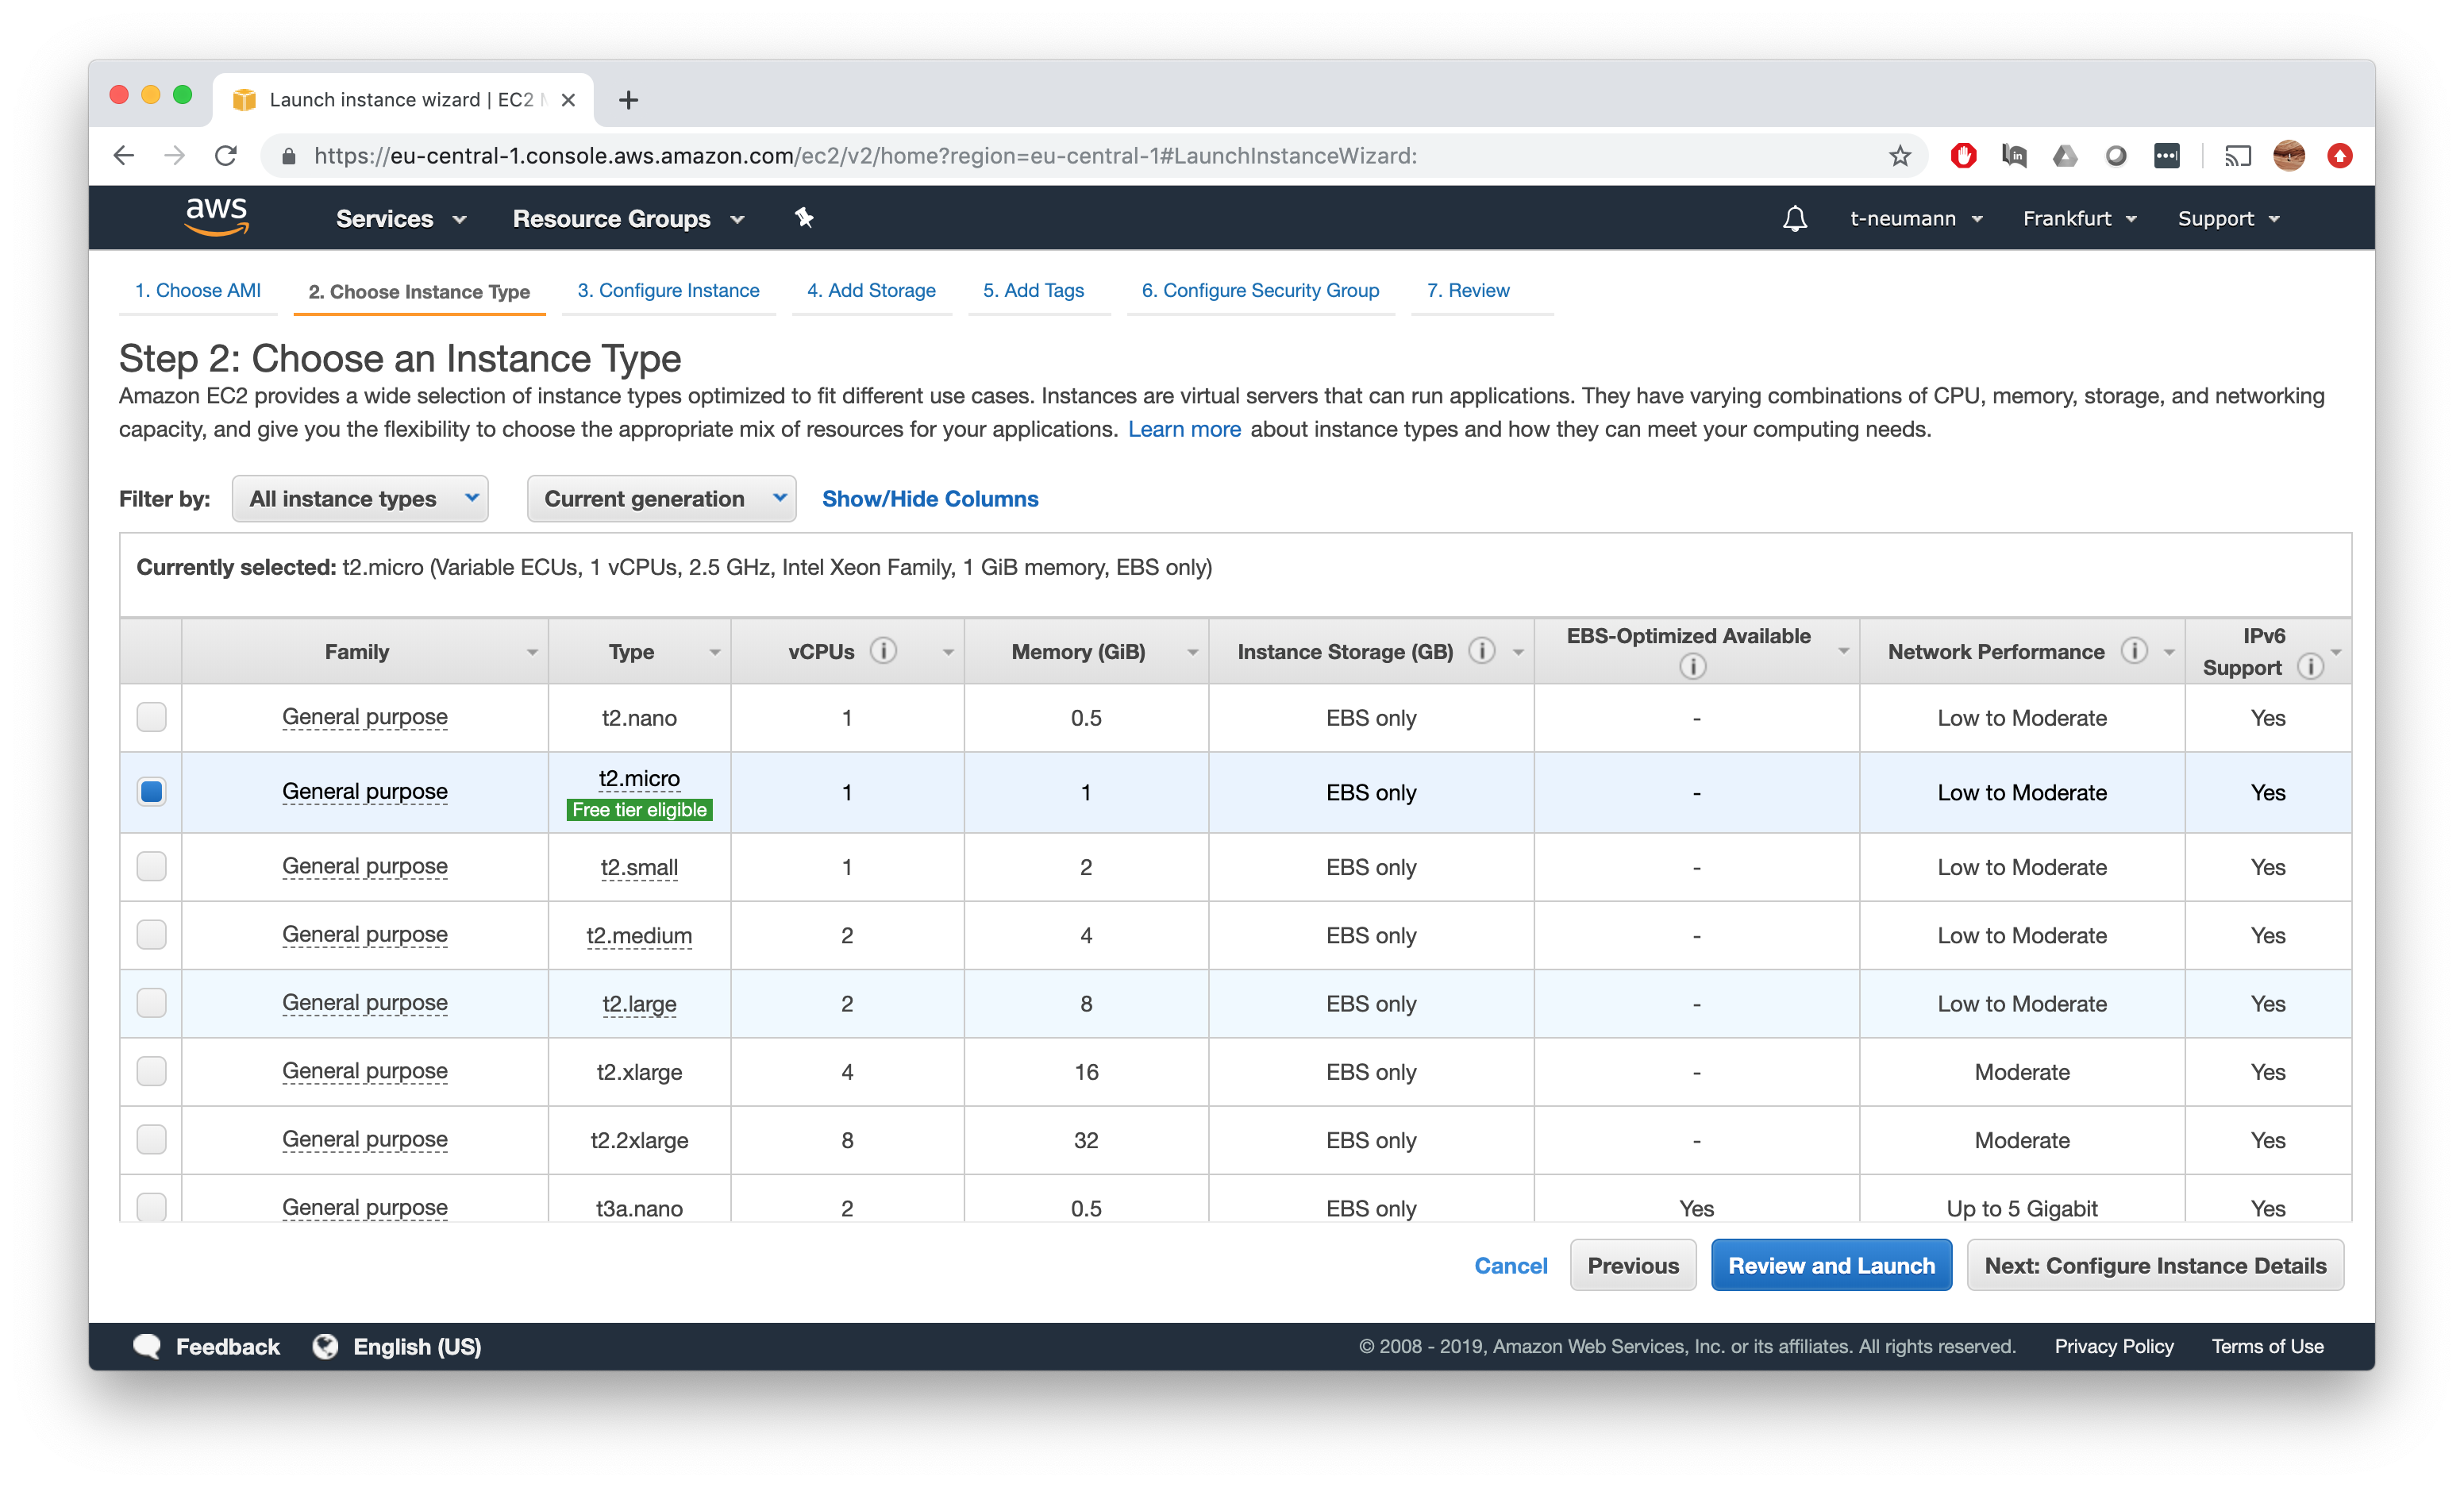
For the instance type, make sure to select something labeled as Free Tier eligible to not run into any costs for this instance, e.g. t2.micro in the example below. Then just hit Review and Launch and then Launch the instance.
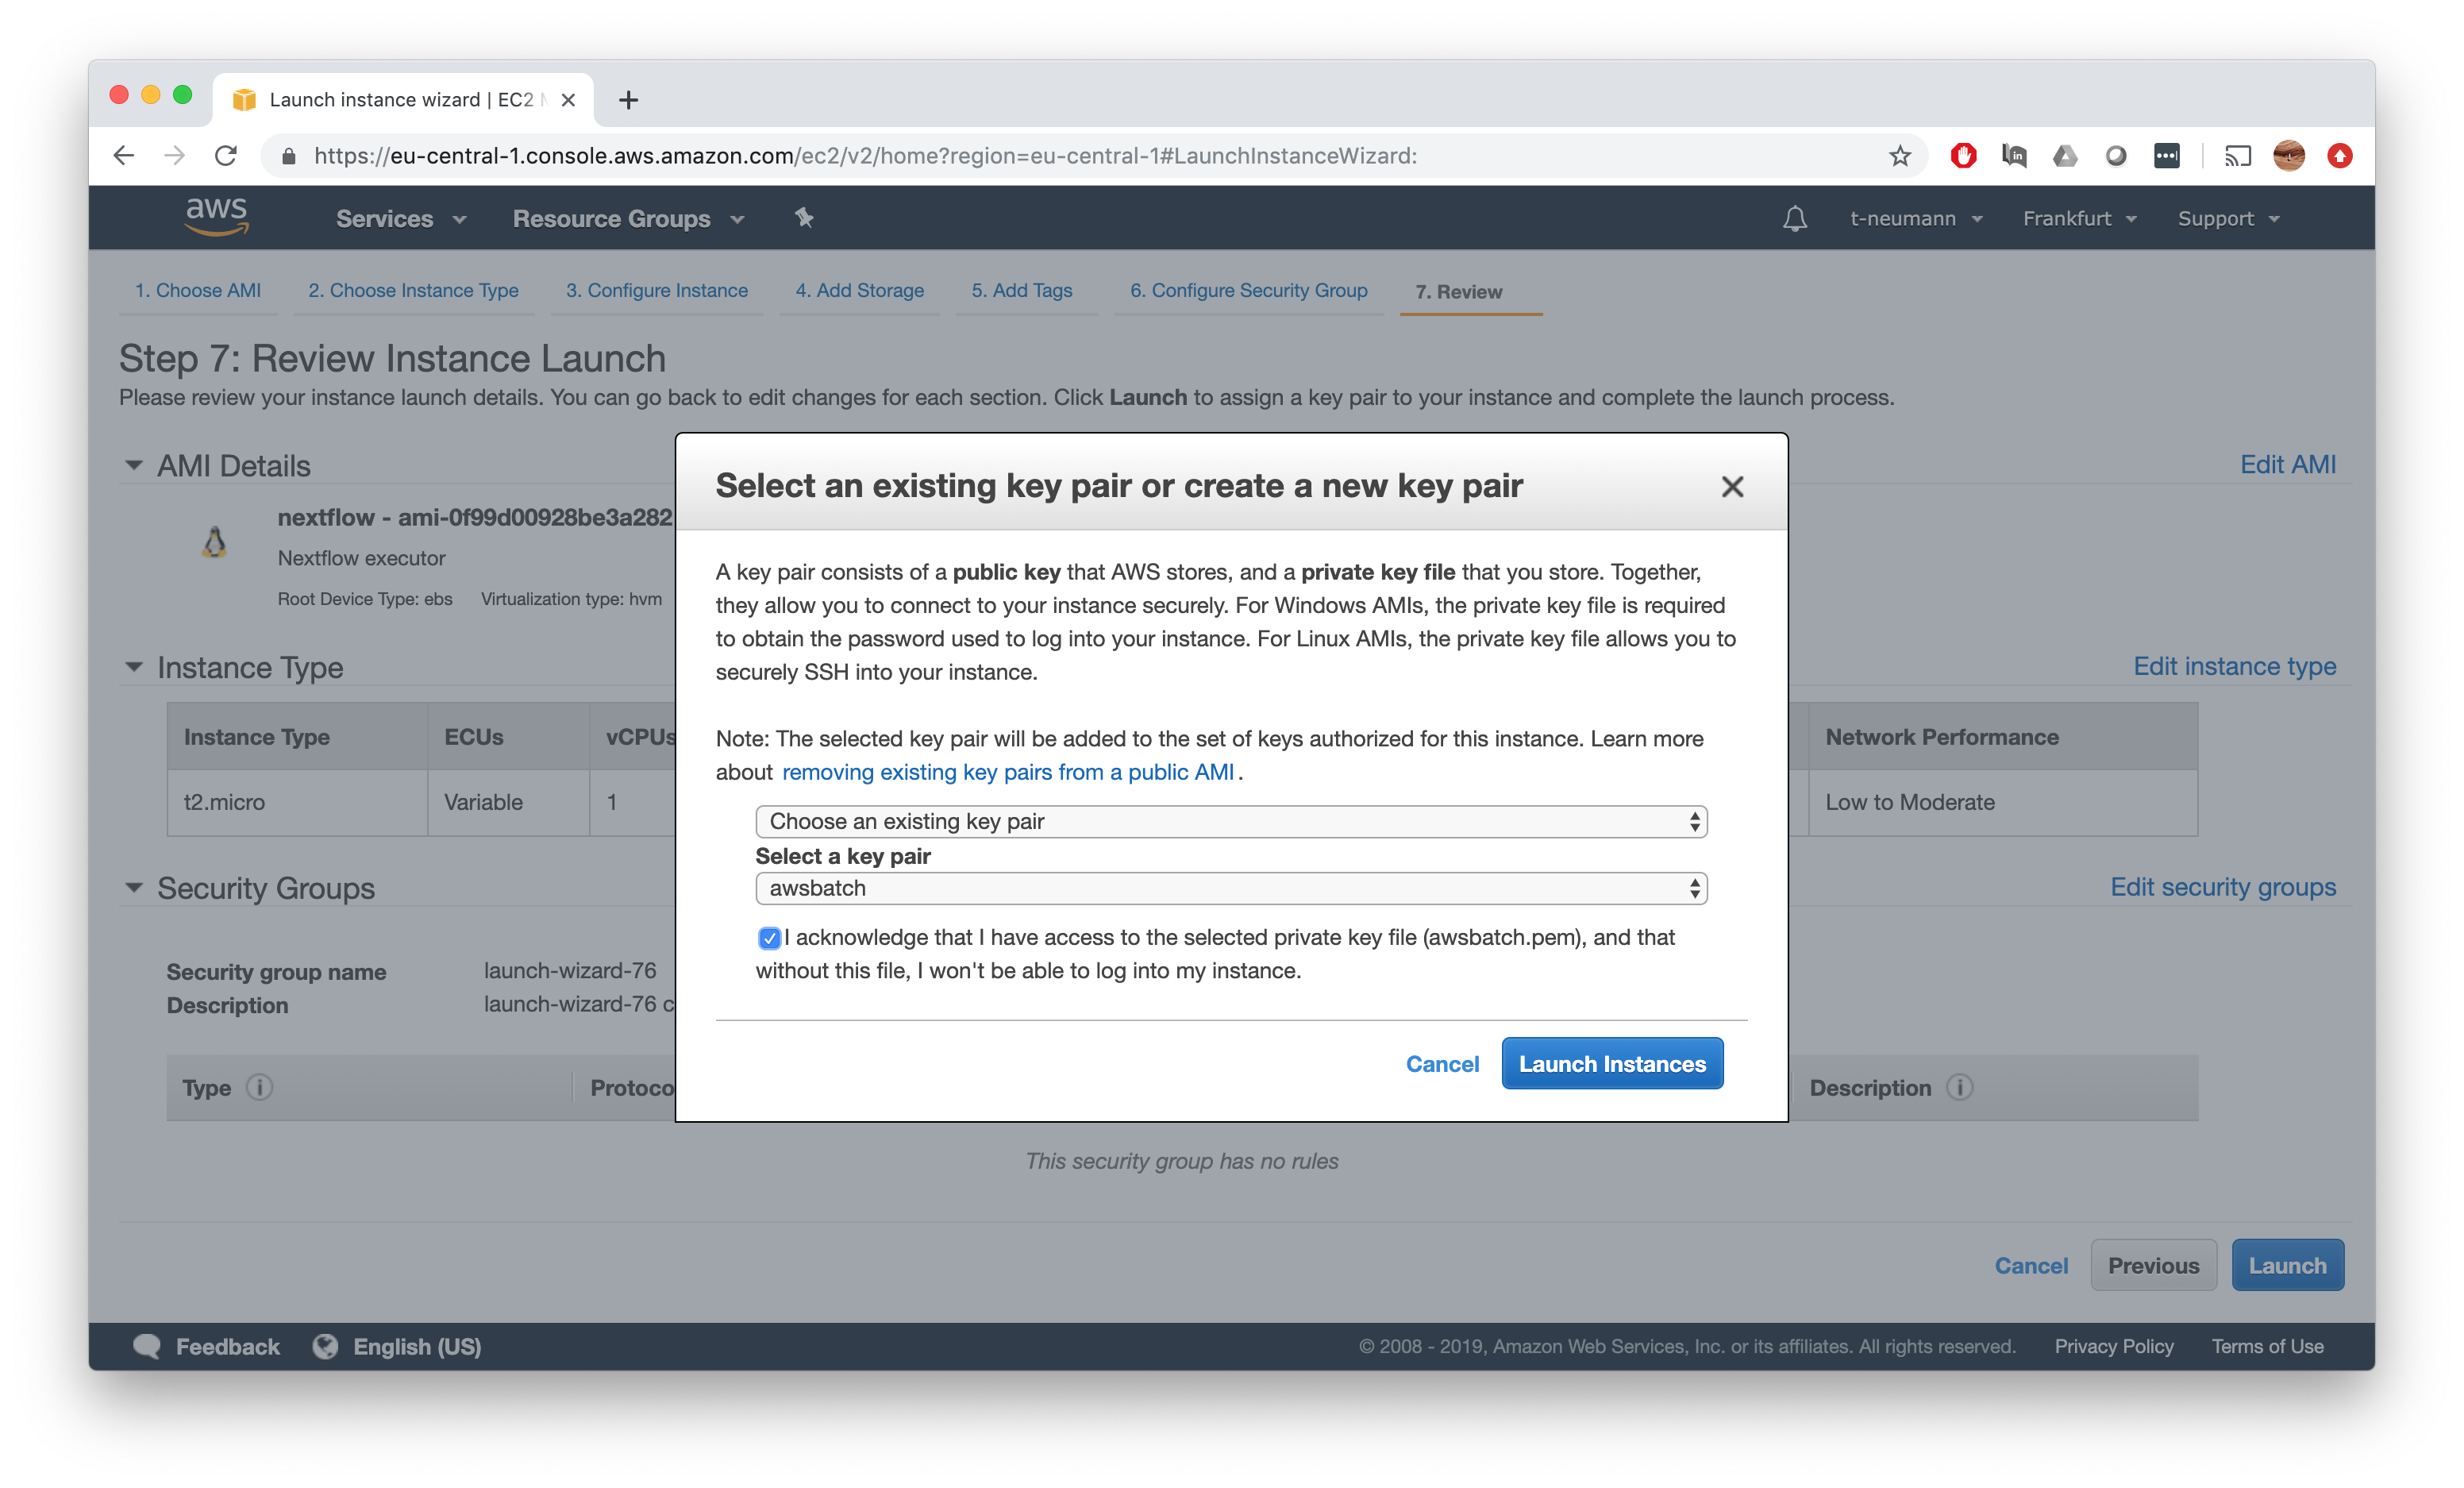
Finally, make sure to launch it with a keypair that you also have downloaded, otherwise you will be unable to connect to the instance.
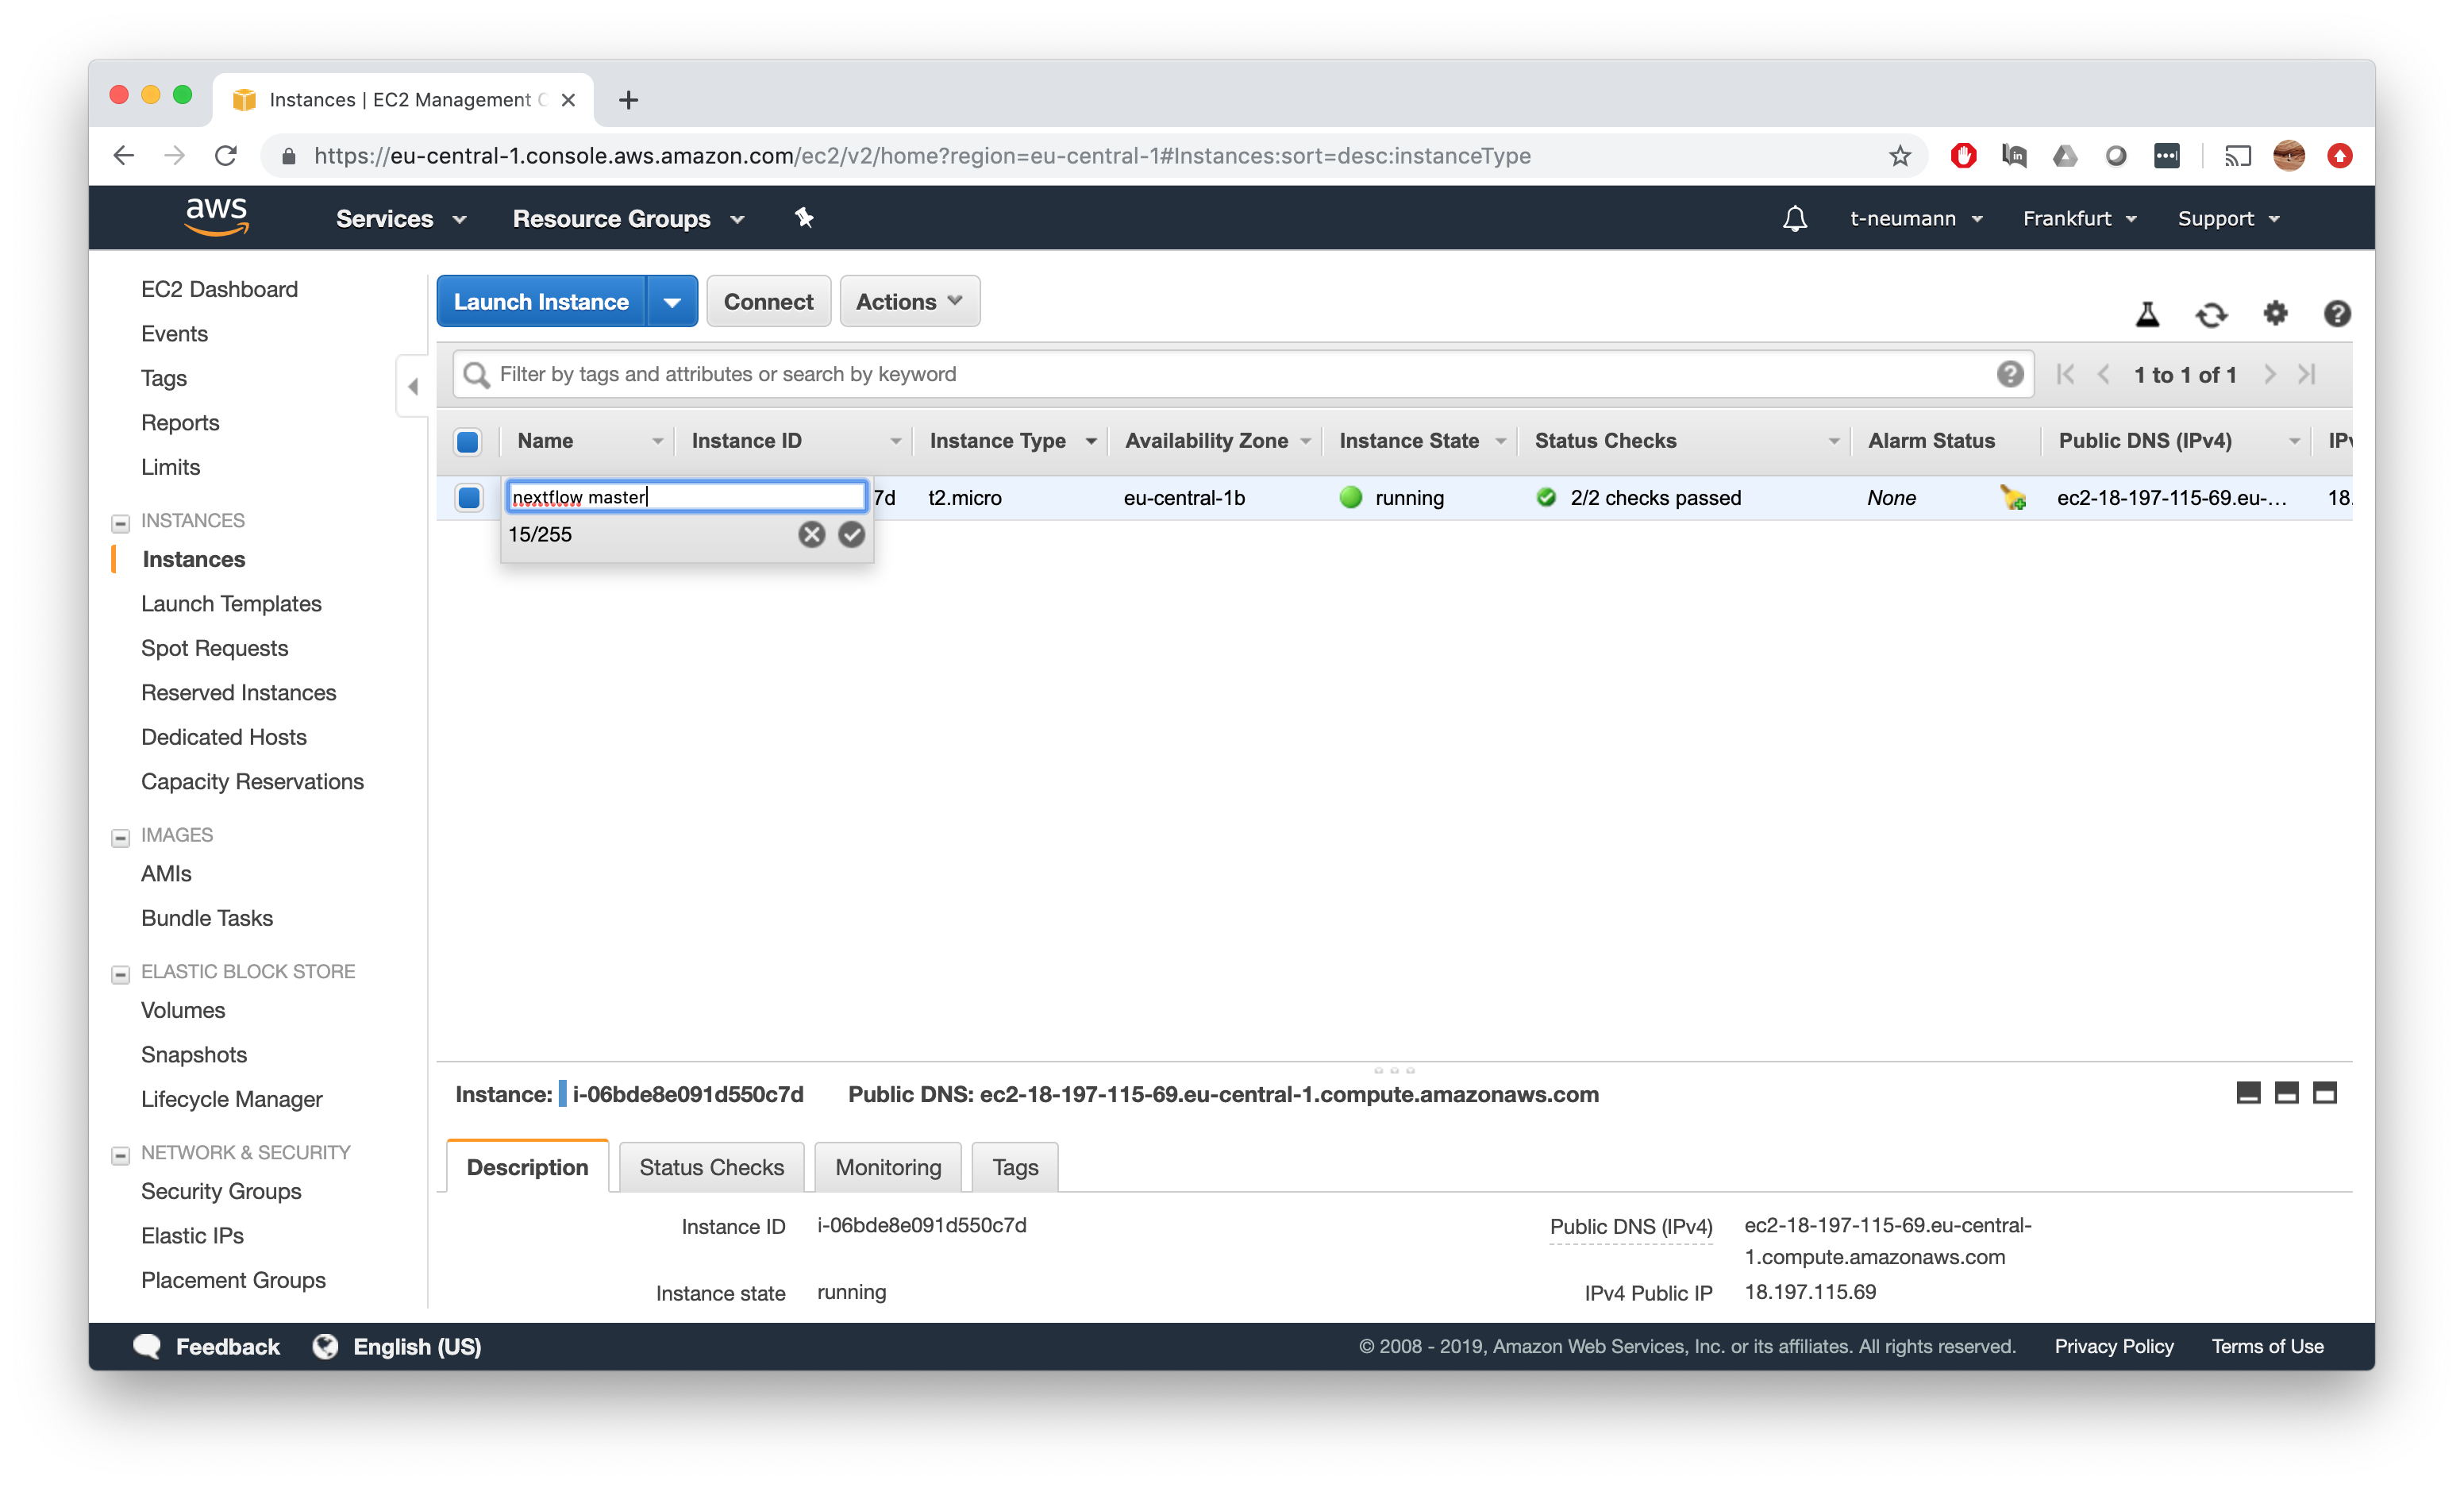
Finally, give some name to your master instance, since many more will be launched once we fire up our salmon-nfNextflow pipeline on our AWS Batch compute environment.
Finally, connect to the instance as already shown in Step 2 for example. Now we can pull our salmon-nf Nextflow pipeline.
[ec2-user@ip-172-31-38-222 ~]$ nextflow pull t-neumann/salmon-nf
Checking t-neumann/salmon-nf ...
 downloaded from https://github.com/t-neumann/salmon-nf.git - revision: 6ac6e6a15a [master]
[ec2-user@ip-172-31-38-222 ~]$
Next up, don’t forget again to export your AWS credentials.
[ec2-user@ip-172-31-38-222 ~]$ export AWS_DEFAULT_REGION=<REGION IDENTIFIER>
[ec2-user@ip-172-31-38-222 ~]$ export AWS_ACCESS_KEY_ID=<YOUR S3 ACCESS KEY>
[ec2-user@ip-172-31-38-222 ~]$ export AWS_SECRET_ACCESS_KEY=<YOUR S3 SECRET KEY>
Now there is only 1 last crucial step before we can actually launch our jobs on the AWS Batch queue: We have to create job definitions. Luckily for us, Nextflow will automatically create job definitions for us upon the first launch of a pipeline.
However, what I found is, that job definitions will only be properly created if the initial run contains only very few samples. So always have your initial run on a SINGLE SAMPLE!!. What happens if you don’t, is that your Nextflow submission will be stuck at the following step:
[ec2-user@ip-172-31-38-222 ~]$ nextflow run t-neumann/salmon-nf --inputDir s3://obenauflab/fastq --outputDir s3://obenauflab/salmon -profile awsbatch -w s3://obenauflab/work/salmon
N E X T F L O W  ~  version 18.10.1
Launching `t-neumann/salmon-nf` [silly_mccarthy] - revision: 6ac6e6a15a [master]

 parameters
 ======================
 input directory          : s3://obenauflab/fastq
 output directory         : s3://obenauflab/salmon
 ======================

[warm up] executor > awsbatch
From there on, you wait forever and wonder what’s going on, as it happened to me.
Start your Nextflow run on AWS batch
Now the last and most rewarding step of all - you are finally ready to launch the salmon-nf Nextflow pipeline on AWS!
[ec2-user@ip-172-31-38-222 ~]$ nextflow run t-neumann/salmon-nf --inputDir s3://obenauflab/fastq --outputDir s3://obenauflab/salmon -profile awsbatch -w s3://obenauflab/work/salmon
Notice, how both the inputDir and outputDir point to an s3 directory and how we also have to supply a work directory with -w on s3. Now hit Enter and watch the beauty unfold on AWS.
[ec2-user@ip-172-31-38-222 ~]$ nextflow run t-neumann/salmon-nf --inputDir s3://obenauflab/fastq --outputDir s3://obenauflab/salmon -profile awsbatch -w s3://obenauflab/work/salmon
N E X T F L O W  ~  version 18.10.1
Launching `t-neumann/salmon-nf` [silly_mccarthy] - revision: 6ac6e6a15a [master]

 parameters
 ======================
 input directory          : s3://obenauflab/fastq
 output directory         : s3://obenauflab/salmon
 ======================

[warm up] executor > awsbatch
[4a/72c0f7] Submitted process > salmon (d1ada222-b67f-47c0-b380-091eaab093b4_gdc_realn_rehead)
[f2/f8d97a] Submitted process > salmon (e46e4f3a-62f8-4bd1-a143-f384e219d6af_gdc_realn_rehead)
[90/35eb4d] Submitted process > salmon (1672de07-77db-4817-9c7f-f201c25e8132_gdc_realn_rehead)
[81/c47fe3] Submitted process > salmon (741fbacf-3694-46ef-b16f-66bac6ee0452_gdc_realn_rehead)
[f1/bc3afc] Submitted process > salmon (db18dd75-3b48-4c21-aa68-58b1cf37c8c2_gdc_realn_rehead)
[a8/88095d] Submitted process > salmon (0ac6634e-00b0-4107-a5d6-db8ffc602645_gdc_realn_rehead)
[a6/36e366] Submitted process > salmon (9fa785f2-1dcb-4966-a5fa-fe75d327cb81_gdc_realn_rehead)
[7d/5ae2b0] Submitted process > salmon (5b3c329a-aa14-4965-8d13-f508f4390eaf_gdc_realn_rehead)
[d9/3ec3fc] Submitted process > salmon (6cf08e2b-7e59-4537-b1c3-1c5b3838ab95_gdc_realn_rehead)
[19/d7d441] Submitted process > salmon (9c714c63-ee50-4385-9e25-09f940f5f902_gdc_realn_rehead)
[71/ff40cf] Submitted process > salmon (17686cd5-271a-4e24-9746-f93334fb86b5_gdc_realn_rehead)
[66/aaa185] Submitted process > salmon (0399ad16-816f-4824-ae28-7b82e006e7b7_gdc_realn_rehead)
[67/ccd647] Submitted process > salmon (1916abcd-61c0-4f23-96ac-be70aacb8dc1_gdc_realn_rehead)
[7d/0a090b] Submitted process > salmon (e1a4167d-b4ca-405c-8550-cc32bb1b1d09_gdc_realn_rehead)
[3b/a9972e] Submitted process > salmon (876a9725-34c1-4a23-a3fe-58a860d0f0c5_gdc_realn_rehead)
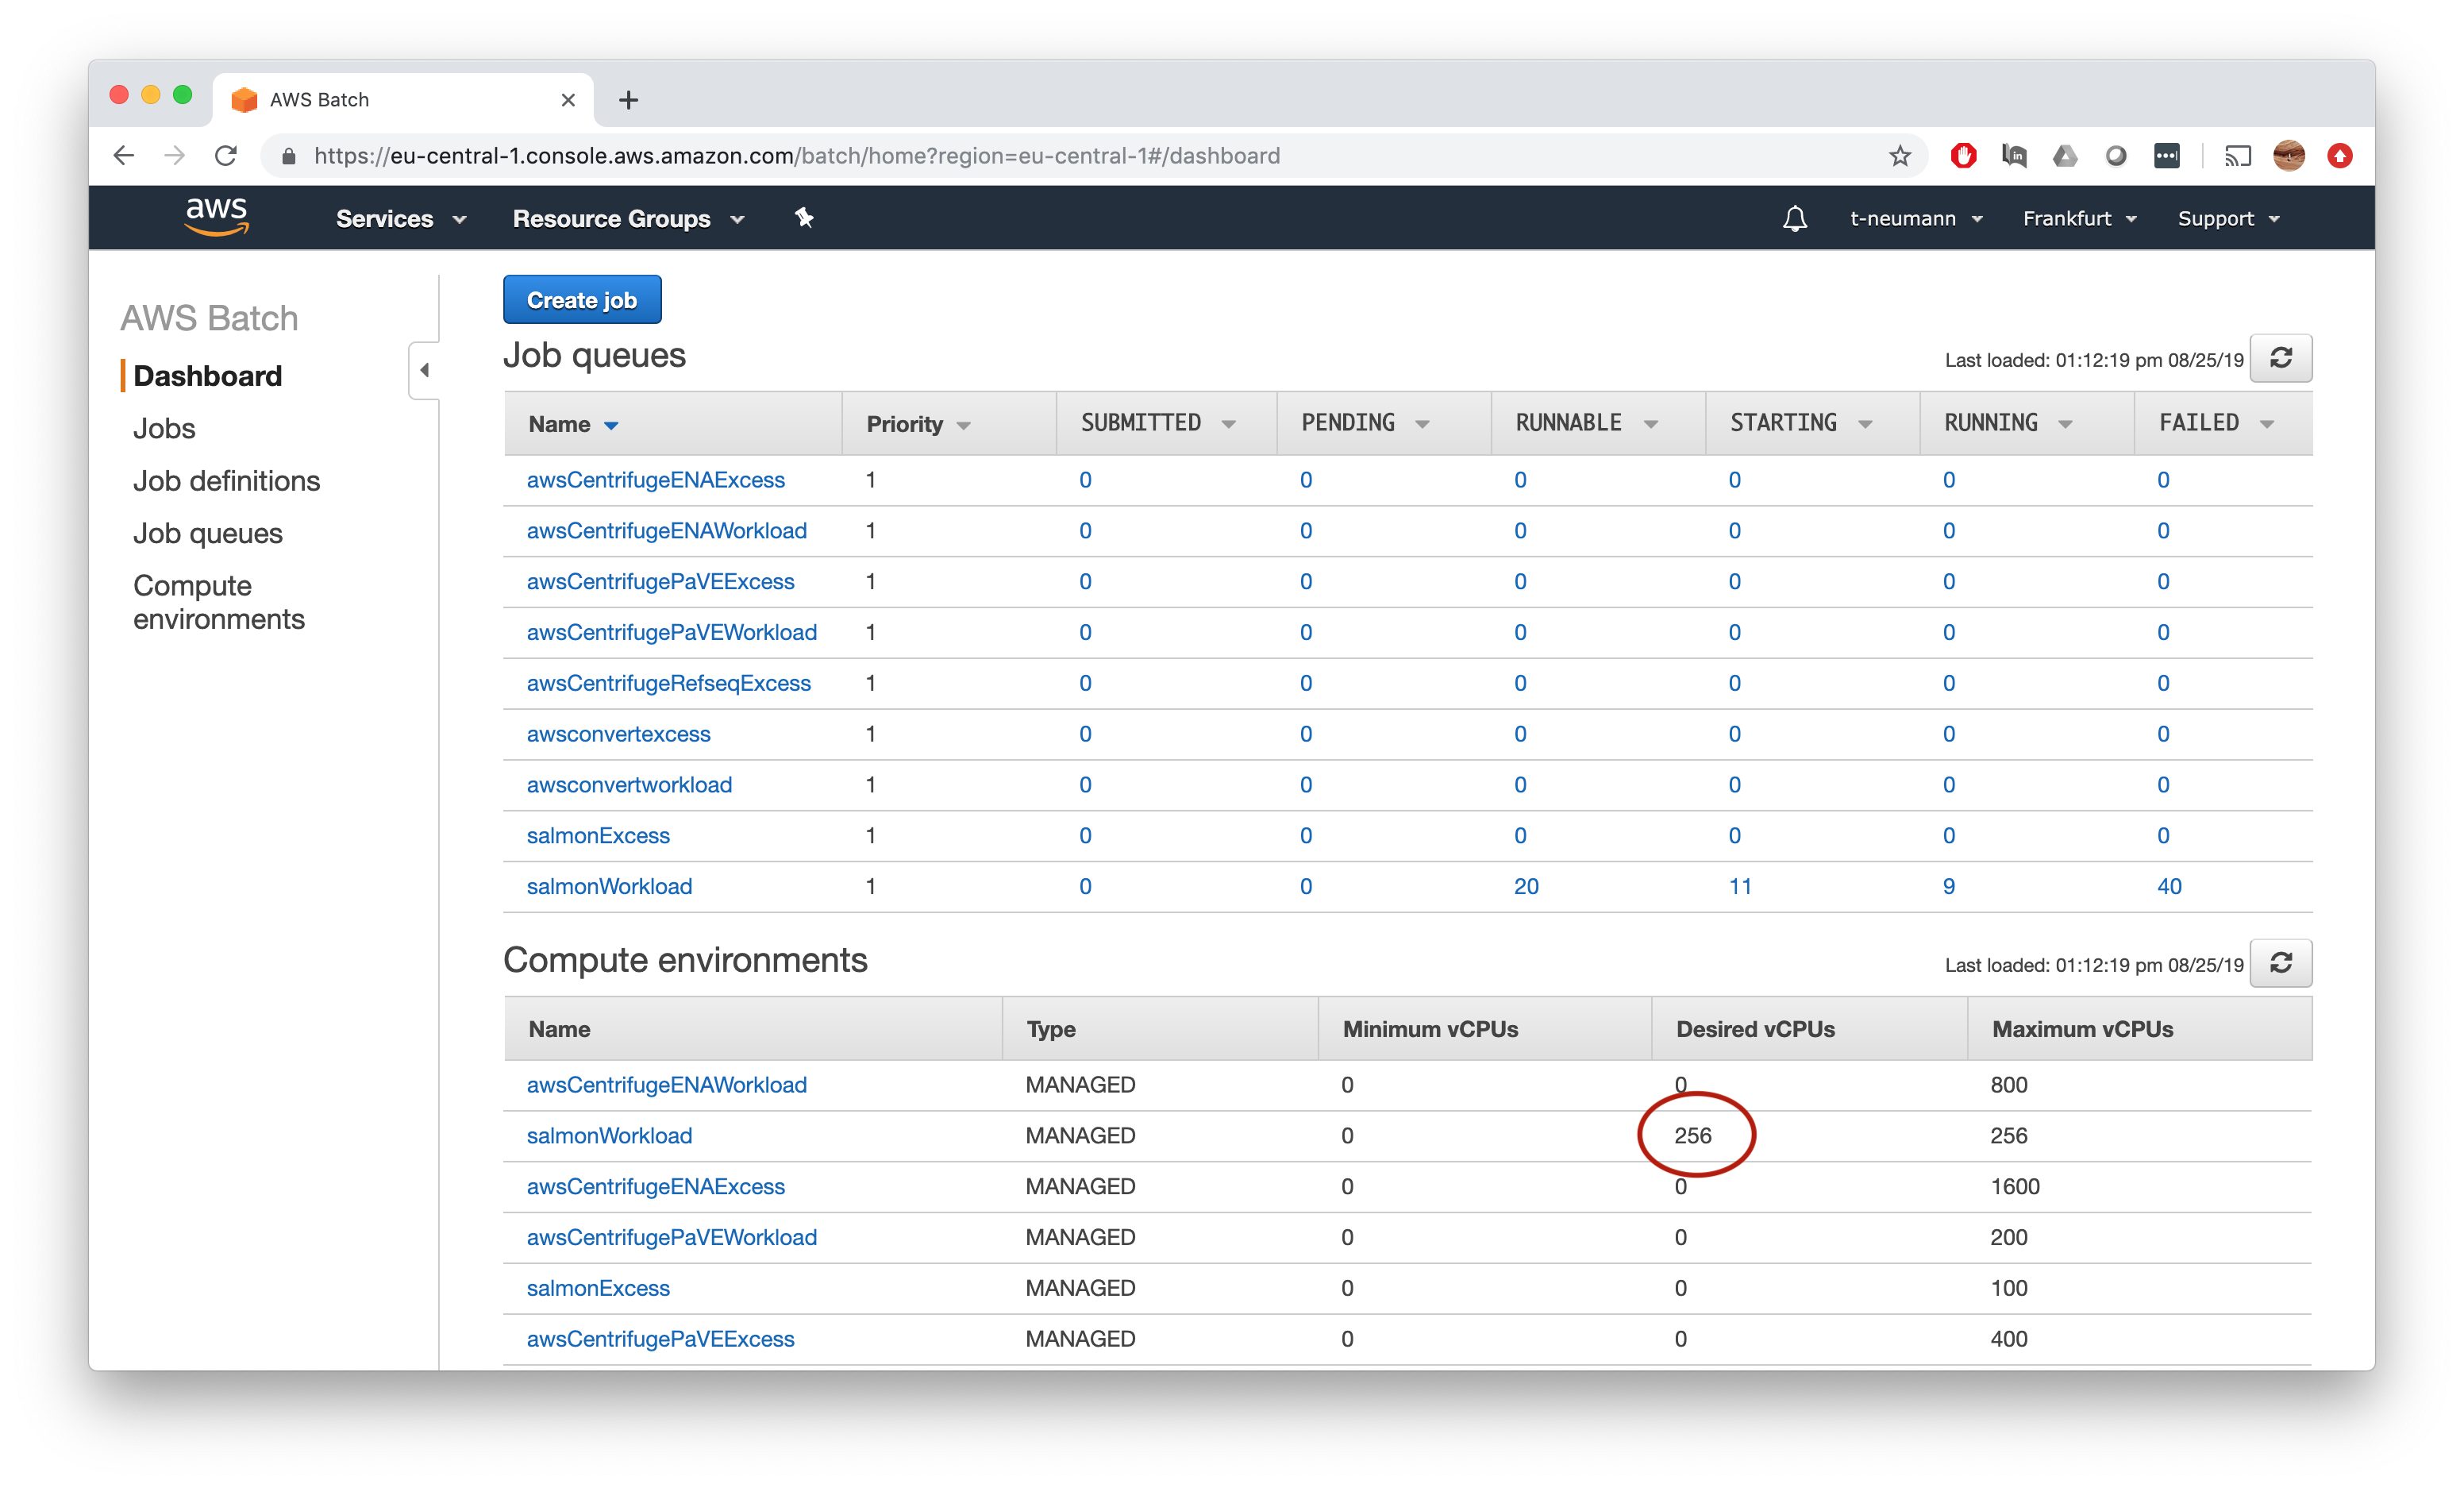
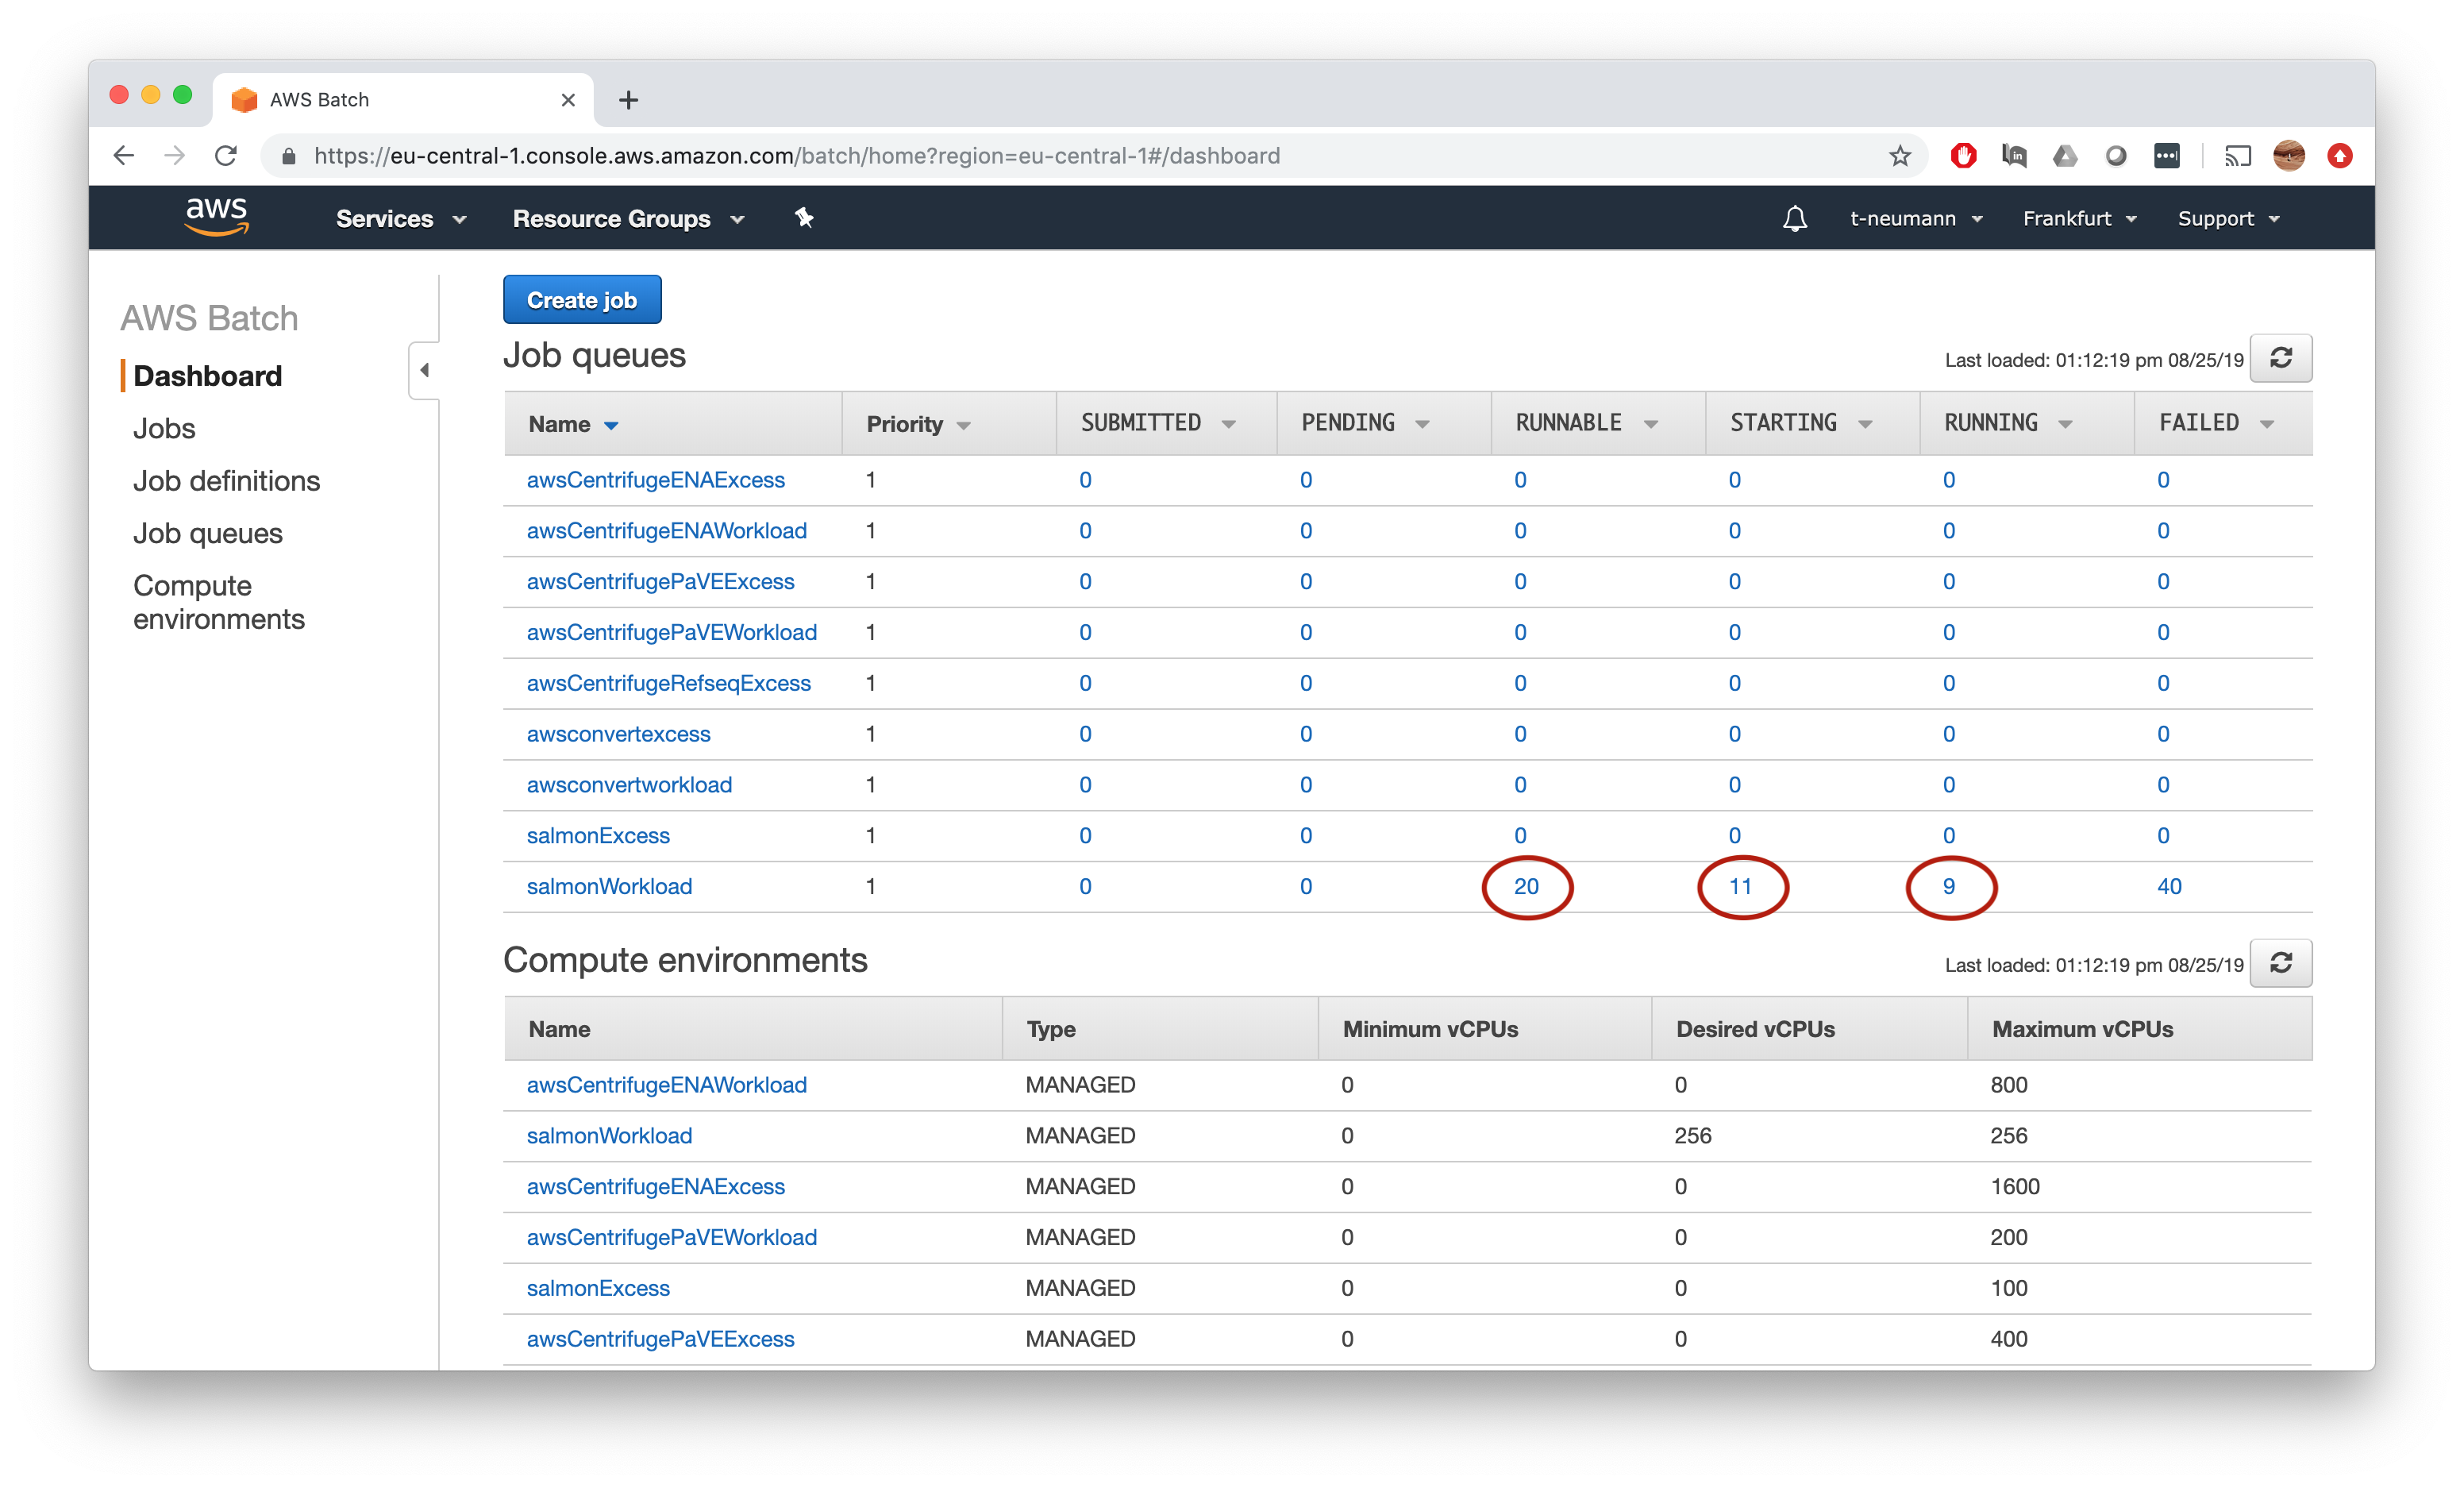
Note how AWS Batch automatically upscales the number of desired vCPUs of your compute environment once the jobs are submitted.
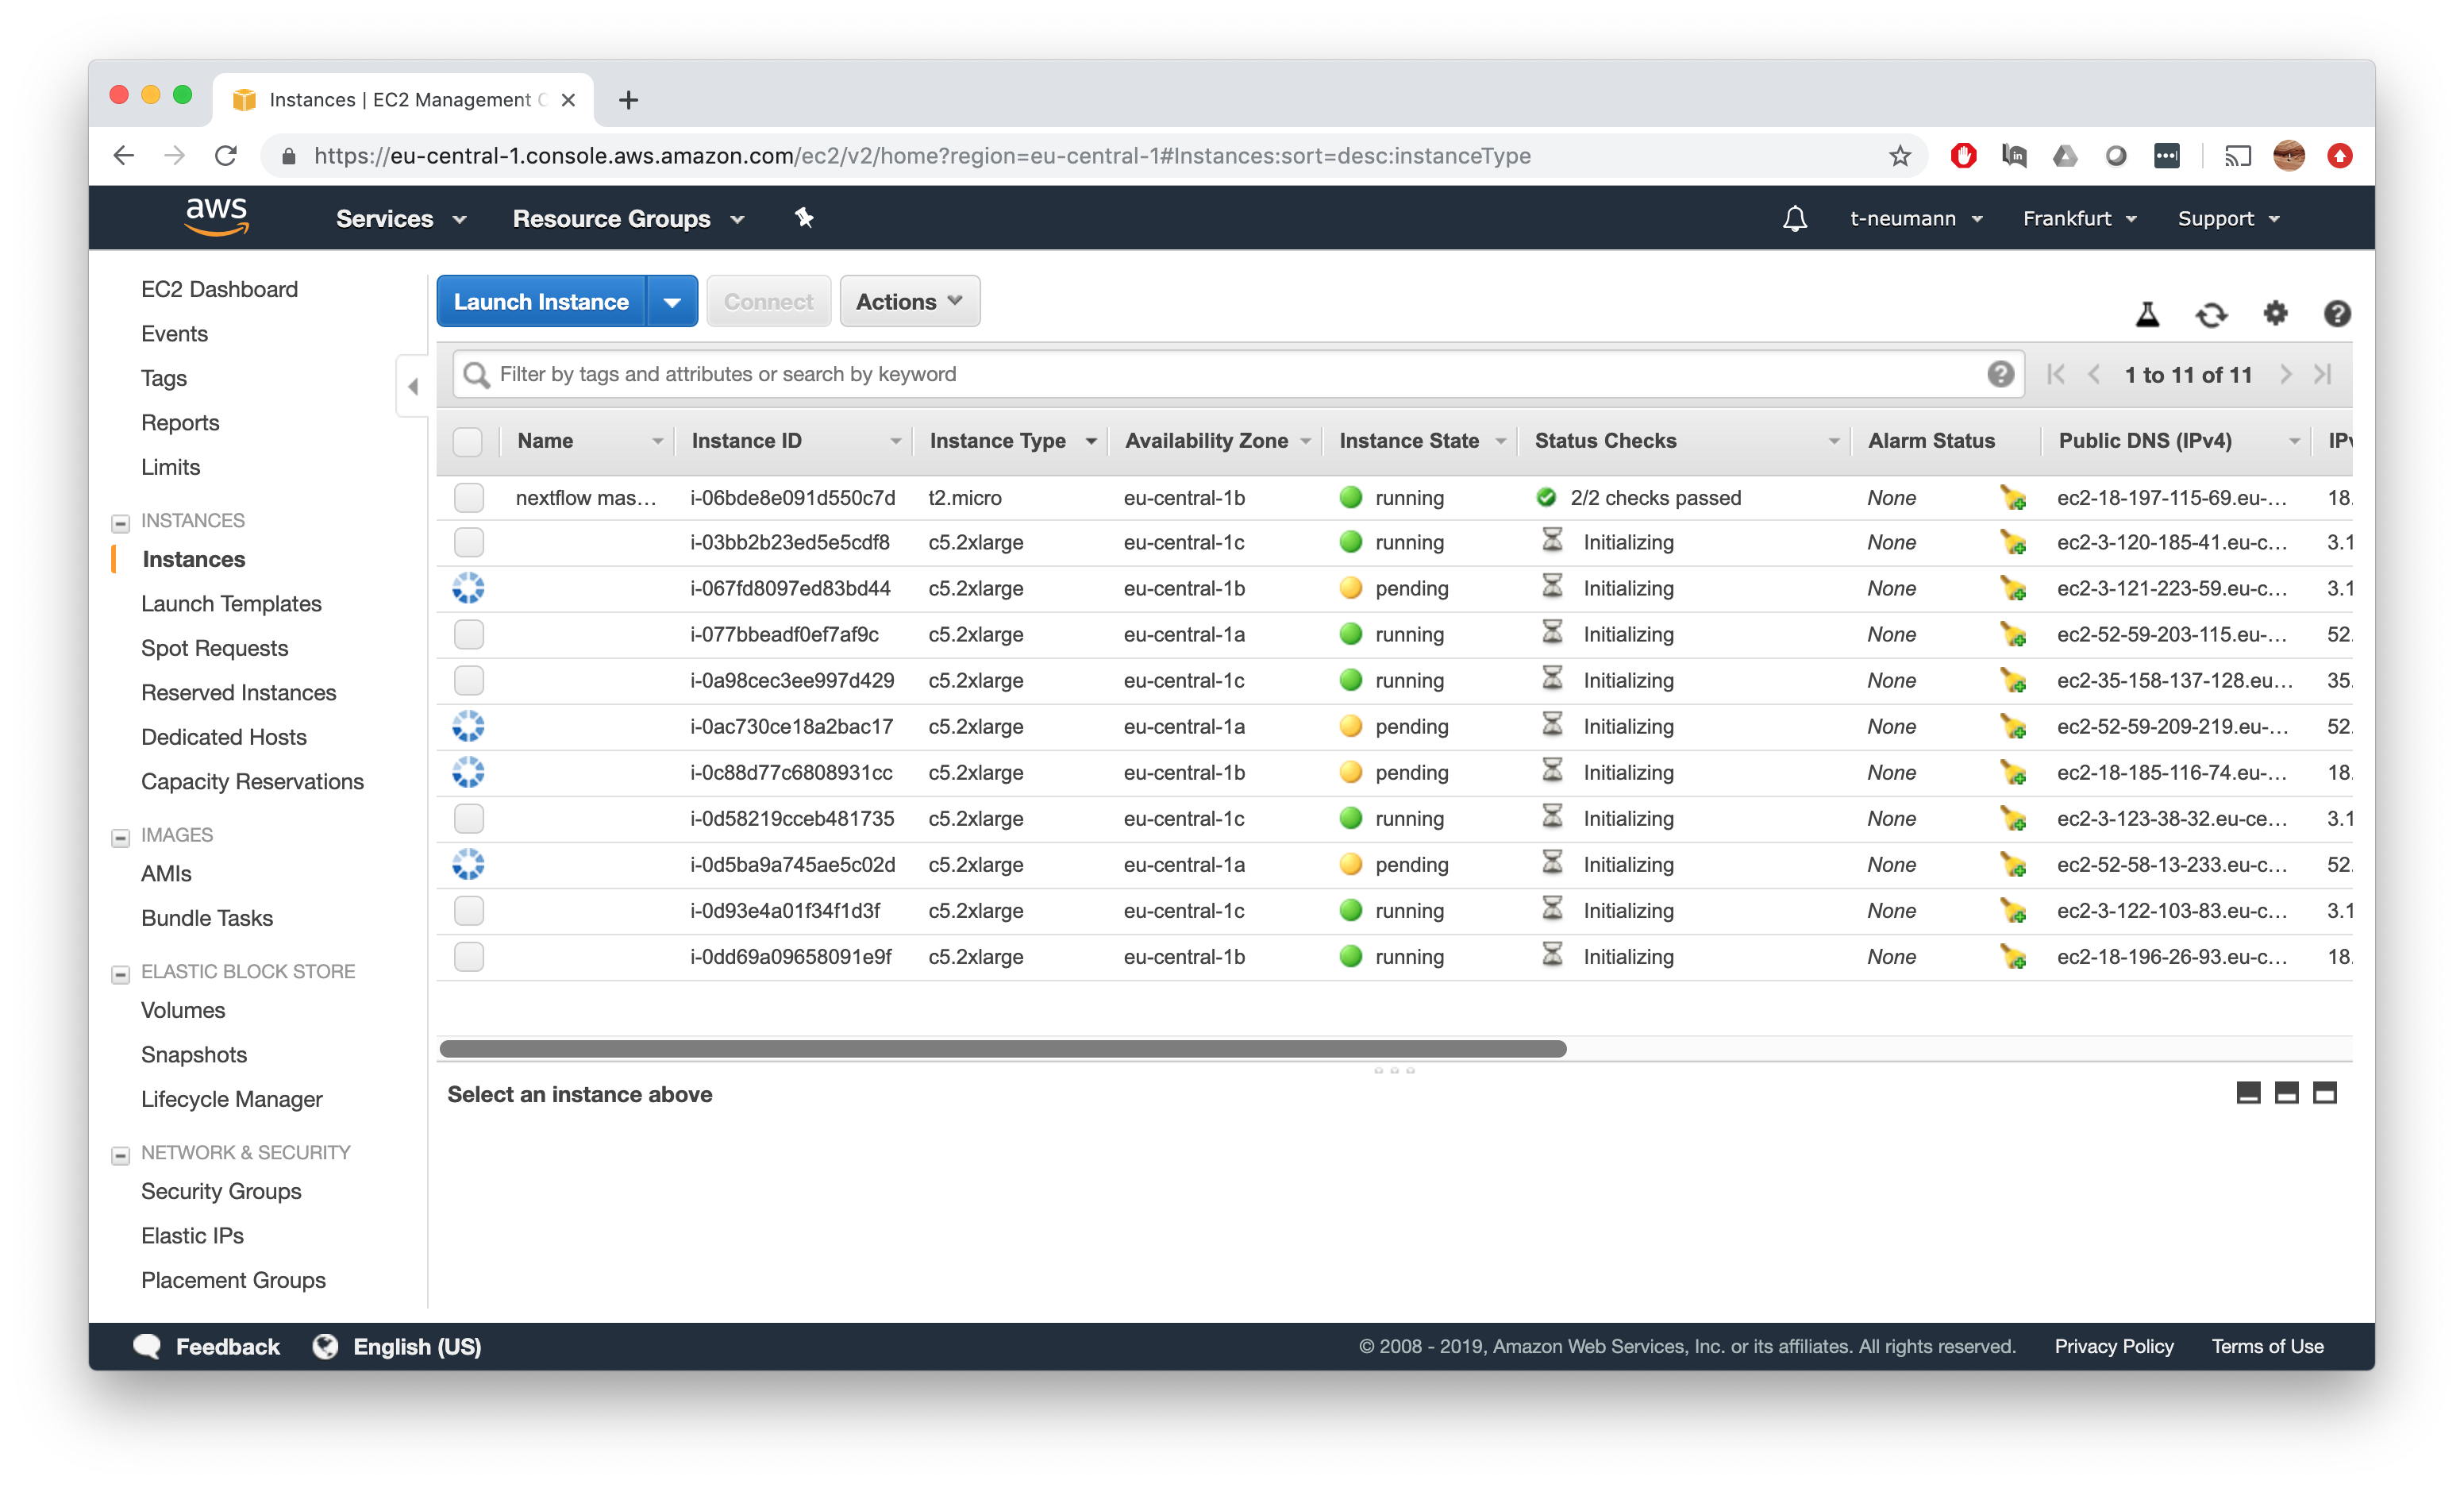
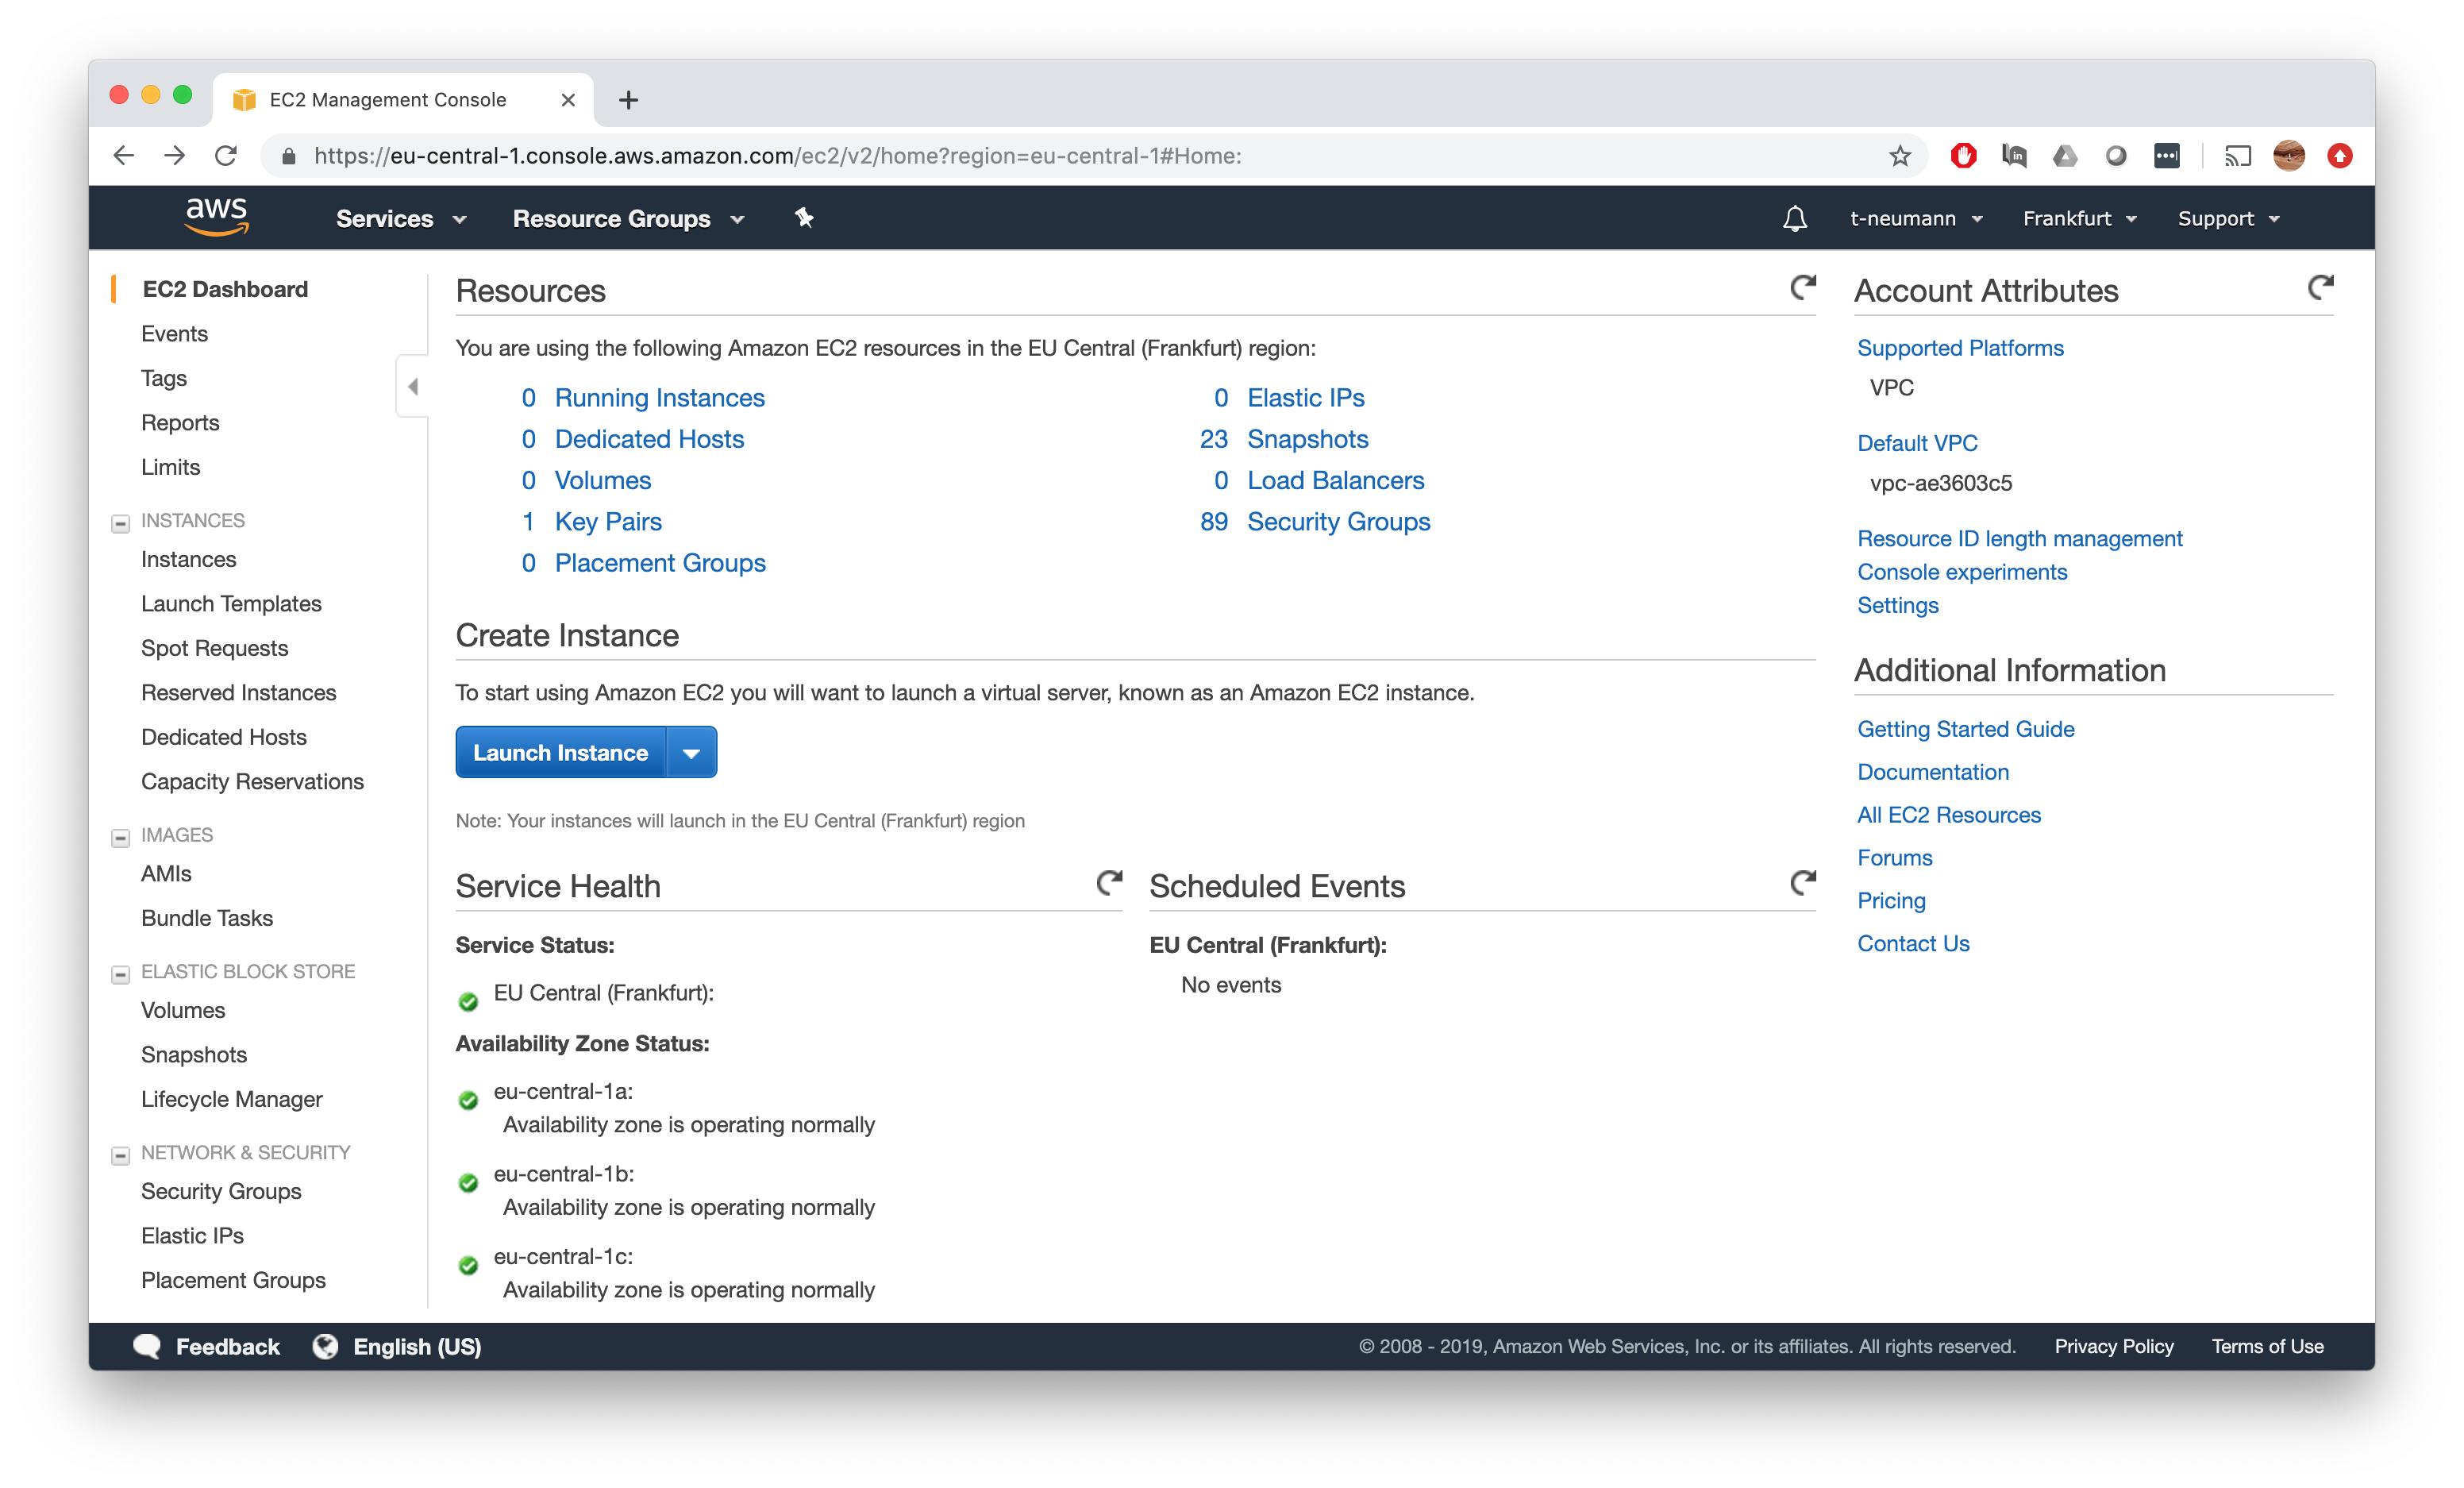
Watch in awe how AWS Batch fires up multiple EC2 instances automatically in your EC2 dashboard.
Watch how jobs transition from Runnable to Starting to Runnable to Succeeded state until all your samples have been processed.
[47/c580b5] Submitted process > salmon (2864cbe8-4d77-4477-ac84-791004e42237_gdc_realn_rehead)
[8c/84bc14] Submitted process > salmon (0fdb3d0e-e405-4e8d-8897-4a90ea4fe00c_gdc_realn_rehead)
[1d/3f6ec6] Submitted process > salmon (7ed99d57-f199-4dac-87a8-62393f5e0aea_gdc_realn_rehead)
[a9/330e5d] Submitted process > salmon (825daddc-a89a-483b-947e-74cc12ba013c_gdc_realn_rehead)
[98/33bed5] Submitted process > salmon (c3588f96-95c6-4008-bda2-502ceb963adb_gdc_realn_rehead)

t-neumann/salmon-nf has finished.
Status:   SUCCESS
Time:     Sun Aug 25 11:20:13 UTC 2019
Duration: 10m 22s

[ec2-user@ip-172-31-38-222 ~]$
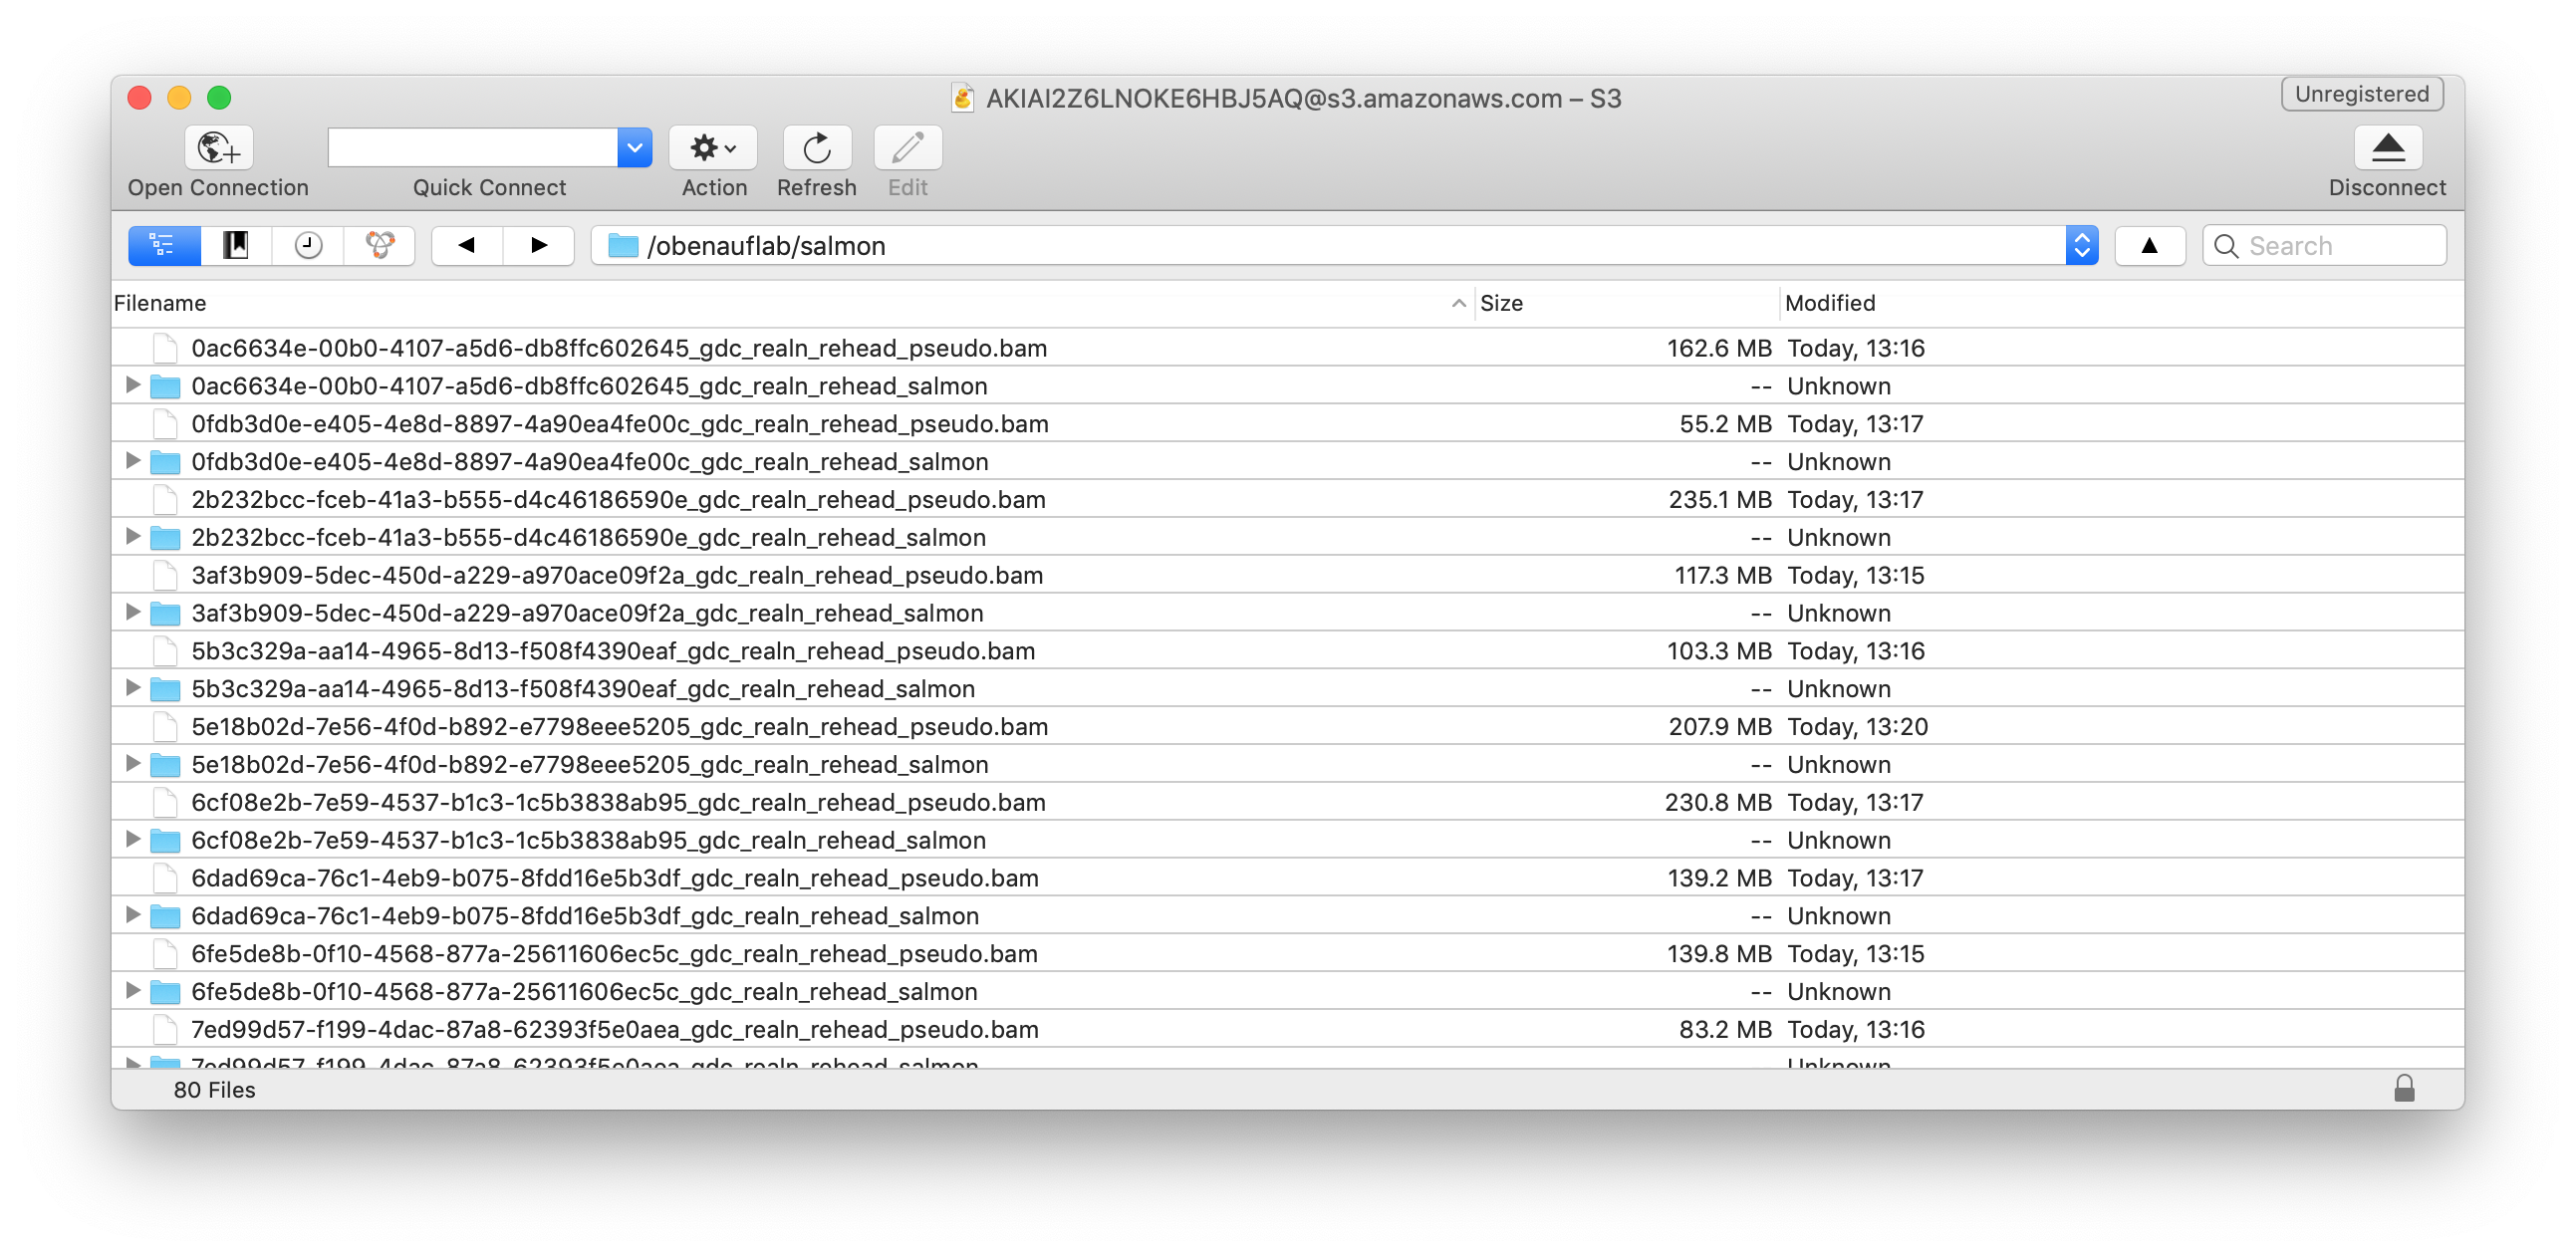
Now let’s check whether the results were produced in the correct s3 output directory.
Congratulations! You did it! It took a long time, was quite a tedious setup and frustrating for me at numerous steps, but with amazing help from the community, Boehringer-Ingelheim and also quite some trial-and-error I got it to work and hopefully so did you with much less hassle!
Happy pipeline building and number crunching with AWS and Nextflow!